PKI Integration
Links
Integration Schema
PKI Integration is done using native Microsoft Active Directory domain services.
MS CA server must be in Enterprise Mode of operation. To install CA in Enterprise mode, Enterprise Admin account is needed. CA in Enterprise Mode is installed on forest level! This means Domain Controllers will have links to this CA, even if it is installed in a subdomain.
Create Agent Account
On AD Domain Controller:
- Create a service account for Agent (example: “agentca”);
Add a Service Account on the CA
Open the Certificate Authority (CA):
- Launch the Certification Authority Console from the Administrative Tools in Windows.
- In the left pane, select (+) to expand the CA directory;
- Right-click the name of the CA and select Properties. The CA Properties dialog box displays.
- Click the Security tab;
- Click Add. The Select Users, Computers, Service Accounts, or Groups dialog box displays;
- Click within the Enter the object names to select field and type the name of the service account (e.g., Ima Service);
- Click OK. The CA Properties dialog box displays;
- Select the service account you added in the previous step (e.g., Ima Service) from the Group or user names list;
- Select the Read, the Issue and Manage Certificates, and the Request Certificates checkboxes to assign permissions to the service account. Click OK.
Create the Restricted Enrolment Agent Certificate Template
Open the Certificate Authority (CA):
- Expand the CA Name, Right click Certificate Templates, and select Manage;
- Right click the Enrollment Agent (Computer) template and select Duplicate Template (Do not choose Enrollment Agent user cert!). Name it per your preference;
- Select Windows Server 2008+ Enterprise;
- On the Request Handling tab, select Allow Private Key to be Exported;
- In the Subject Name tab, make sure Build from this Active Directory Information is activated and Subject Name format is set to Fully distinguished name. Click OK;
- Navigate back to the CA, right click Certificate Templates, select New, and select Certificate Template to Issue;
- Select the duplicate copy of the template created in the previous step. Click OK.
Create the User Certificate Template
Open the Certificate Authority (CA):
- Open the CA (certsrv) window.
- In the left pane, select (+) to expand the CA directory.
- Right-click the Certificate Template folder and select Manage. The Certificate Templates Console window displays.
- Select the desired template (User) under Template Display Name, and right-click Duplicate Template. The Duplicate Template dialog box displays.
Tip
For Wi-Fi, VPN, or Exchange Active Sync (EAS) client authentication select User template.
- Select the Windows Server that represents the oldest enterprise version being used within the domain to ensure backward compatibility of the certificate that was issued.
- Click OK. The Properties of New Template dialog box displays.
Edit User Template Properties
- Click the General tab;
- Type the name of the template displayed to users in the Template display name field. The Template name field auto-fills with the template display name without spaces;
- Select the desired length of time for the certificate to be active from the Validity period entry field/drop-down menu. Click Apply;
- Click the Request Handling tab;
- Select the appropriate client authentication method from the Purpose: drop-down menu. This selection might be based on the application of the certificate being issued, although for general purpose client authentication, select Signature and Encryption;
- Select the Allow private key to be exported checkbox;
Warning
For a certificate to be installed on an iOS device, this checkbox MUST be selected.
- Click Apply;
- Select the Subject Name tab;
- Select Supply in the request or Build from this Active Directory.
Create Enrolment Agent Certificate
On KSC server:
- Login as Administrator user. Go to Local Server Policies, find “Run as service” and add the “agentca” account to this role (SeServiceLogonRight permission);
- Give Local Administrator permission to “agentca” (needed for saving certs in MMC);
Warning
Service user account, which is used by KSMM to create a certificate request, must be a domain account and have enough permissions to access Windows certificate store. Standard user will not work. Local admin rights on the computer is a simple solution.
- Login as “agentca” to the Windows server with KSC;
- Launch Certificate snap-in (certmgr.mmc);
- Expand Certificates (Local Computer), double click Personal, right click Certificates, select All Tasks, and select Request New Certificate. Click Next;
- In the Wizard, Active Directory Registration Policy list, choose Enrolment Agent template. Choose its’ Options: Private key tab, choose Make private key exportable;
- Move the created certificate in Local Computer certificate storage;
- Give “agentca” permissions to read the certificate private key: right-click on the certificate, choose All Tasks -> Manage Private Keys…, click Add and choose the “agentca” account. Choose Full Control. Click Apply.
Create PKI Integration
On KSC MMC Console:
- Go to Mobile Device Management -> Certificates section;
- Click Integrate with public key infrastructure button;
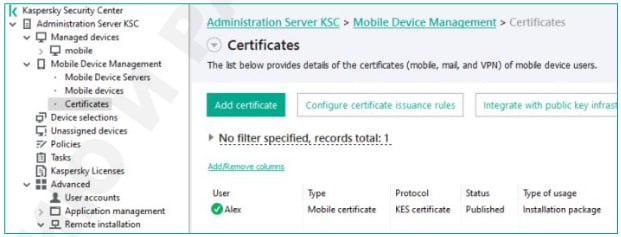
- In the window choose Integration with PKI section, enter the “agentca” service account login and password. Choose the User Template created earlier from CA in the drop-down list to use as default;
- Go to Issuance of mail certificates and Issuance of VPN certificates sections. In the Certificate Source drop-down list choose PKI. Do not change the default template, choose auto-renewal time period in days. Click Apply;
Warning
Do NOT change the Mobile Certificate Issuance - this may severe the KSC - Agent communication protocol.
Issue a certificate to a mobile device
On KSC MMC Console:
- Go to Mobile Device Management -> Certificates section;
- Choose the Add certificate button;
- In the wizard chose Mail or VPN certificate, Next, choose iOS or Android mobile devices, Next;
- Choose user account, who is a mobile device (controlled by KSMM) owner, for whom to issue a certificate;
- Choose Issue certificate using Kaspersky Security Center - this will launch the request procedure using the configured PKI integration.
Troubleshooting
Error
0x80094806 описана у MS https://learn.microsoft.com/en-us/windows/win32/com/com-error-codes-4 - CERTSRV_E_BAD_RENEWAL_SUBJECT 0x80094806 The request was made on behalf of a subject other than the caller. The certificate template must be configured to require at least one signature to authorize the request.
Solution
Add signatures in User Certificate Template:
