CleanPC is the ability to remotely execute a PC Refresh (via MDM) which users can do manually on their device by going to Settings > Update & Security > Recovery > Reset this PC > Get Started, then you are presented with Keep my Files or Remove Everything.
This best explains the differences between Retaining User Data and without Retaining User Data. Calling these CSPs will un-enroll your device. If you are using the AirWatch Agent this will also be removed when calling retaining user data option. When the AirWatch Agent is removed this will un-enroll your device.
AppLocker contains capabilities and extensions that allow you to create rules to allow or deny applications from running based on unique identities of files and to specify which users or groups can run those applications.
Using AppLocker, you can:
Control the following types of applications: executable files (.exe and .com), scripts (.js, .ps1, .vbs, .cmd, and .bat), Windows Installer files (.msi and .msp), DLL files (.dll and .ocx), and packaged apps (.appx).
Define rules based on file attributes derived from the digital signature, including the publisher, product name, file name, and file version. For example, you can create rules based on the publisher attribute that is persistent through updates, or you can create rules for a specific version of a file.
Assign a rule to a security group or an individual user.
Create exceptions to rules. For example, you can create a rule that allows all Windows processes to run except Registry Editor (Regedit.exe).
Use audit-only mode to deploy the policy and understand its impact before enforcing it.
Import and export rules. The import and export affects the entire policy. For example, if you export a policy, all of the rules from all of the rule collections are exported, including the enforcement settings for the rule collections. If you import a policy, all criteria in the existing policy are overwritten.
Note
AppLocker is only supported on Windows 10 Enterprise and Education SKUs when using GPOs, however, when configuring via MDM (AirWatch) all versions are supported
Create AppLocker Rule (Windows side)
Use a test Windows 10 device.
Creating the AppLocker Configuration File
Click on the Windows logo
Enter “group policy”
Click Edit group policy
AppLocker GPO
Go to Windows Settings → Security Settings → Application Control Policies →AppLocker
Click Configure rule enforcement
Enforce Packaged App Rules
In this example we will block the Xbox application (.appx). If you wanted to block RegEdit then you would configure the Executable rules.
Check Configured under Package app Rules; Enforce rules option is default,
You should ALWAYS test the rules before applying them, to do so, change the “Enforce rules” option to “Audit mode”. Once you’ve confirmed that the policy you’ve created at the end of the lab is working as expected then you return and change this back to “Enforce rules”
Click Apply & OK
Create Default Rules
Click Packaged app Rules, to start configuring the rules.
Right click in the white space to the right of the window
Select Create Default Rules
Edit Default Rule
For blacklisting only a few apps, start with an Allow rule and add your blacklisting exceptions. If you want to only allow a few apps then convert the default to a Block and whitelist your exceptions.
Right click on the default rule
Click Properties
Exceptions
Click Exceptions
Click Add…
Packaged App Reference
Select Use an installed packaged as a reference
Click Add…
Select Packaged Application
Using the scroll bar, scroll to the bottom
Check the Xbox app with Package Name of Microsoft.XboxApp& click OK
Package Name
All of the package’s information is pre-populated. You can block the Xbox app based on the specific version, package name, or by the publisher. We want to block any version of the Xbox application.
Raise the lever from Package version to Package name & click OK
Confirm Exceptions
Click Apply & OK
Now is the time to test if the policy is functioning correctly, if you can no longer access the xbox application on the device then you know that the policy working as expected.
As long as you do not see any other issues with the current configuration, go back to the app locker settings referred to in section 1.2 and change the “Audit mode” option to “Enforce rules”
Export AppLocker Policy
Right click AppLocker
Click Export Policy…
Save Policy as XML
Clear Policy
Now that we have exported our policy, we want to remove it from our test device.
Right click AppLocker
Click Clear Policy & Yes & OK
Create AppLocker Profile (AirWatch side)
Creating the Application Control Profile
In the AirWatch console go to click Device → Profiles → AddProfile → Windows → Windows Desktop → Device
Enter a profile name and select a Smart Group for the Assigned Groups
Select Application Control at the bottom of the policy list
Check the Import Sample Device Configuration box & click Upload
Upload the XML file create in the previous steps
Save & Publish the profile
Verify Profile
You should now see your Block Xbox Application Control (AppLocker) profile.
Manifest - permissions to run script with, folder where script is downloaded and run from, and type of action. To circumvent a bug in AirWatch 9.1.1 a batch file can be run by using the “Install” command instead of the “Run” command…
Note though that the ECHO command is always suppressed on the endpoint and even the pause command is escaped.
The script is run using System, Admin or User permissions - defined in the script Manifest.
The script is inserted in the Product (Device -> Staging & Provisioning -> Product List View → Add Product) with deployment options like Compliance triggers or Schedule for installation.
In order for machines to register you need to ensure they have a proper serial number. While this is never an issue on physical machines virtual machines often need updates to get working.
For FUSION Machines:
Before you start the VM navigate to the root folder for the VM. You’ll see a config file with a .vmx extension.
If you insert the following two lines in the .vmx file, it will boot with a shorter 12 Char serial number. Without this you cannot use WS1 or any feature that relies on serial number.
SMBIOS.useShortSerialNumber = “TRUE”
SMBIOS.use12CharSerialNumber = “TRUE”
For VSphere Machines:
In the vSphere Web Client, navigate to the vCenter Server instance.
Select the Manage tab.
Select Advanced Settings.
Click Edit.
Add the following two lines:
SMBIOS.useShortSerialNumber = “TRUE”
SMBIOS.use12CharSerialNumber = “TRUE”
Step 1: Copy the contents of the AirWatch folder (optionally just copy the AirWatch folder) to a location of your choice. My preferred location for the files/folders is C:\Installs\AirWatch.
Step 2: Create a staging user in the AirWatch console at the top Organization Group. Set the staging mode to: Single User, Advanced: Enroll on behalf of user. Record the username and password of this user.
Step 3: (Optional): Download the latest agent (you can use the download_latest_agent1.ps1 in \setupfiles) then copy that agent to the same folder as the localdevice.exe OR Registration.cs file. Rename the file to AirWatchAgent.msi (you may need to replace an existing file).
Step 4: Create an AirWatch Administrator account API Service Account in AirWatch with Console Administrator role. Using a Base 64 encoder get the encoded string using the format:
`username:password`
Copy the encoded string to be used later in the INI file.
Step 5: Ensure that you have a Rest API key generated in the AirWatch Console. Settings -> General -> Advanced -> API -> REST API
Step 6: Modify the localdevice.ini file to reflect the correct settings. ; represent comments in ini files.
#************************************## INI SAMPLE FILE ##************************************#[Config]Authorization=Basic %BASE_64_ENCODED_API_CREDENTIALS%API_Key=%API_KEY%API_Server=https://%API_SERVER_URL%/apiEnrollment_Server=%ENROLLMENT_SERVER_URL%;LocationGroupID is Optional - can search by group idLocationGroupID=%LOCATIONGROUP_ID% GroupID=%GROUP_ID%AdminEmailAddress=%ADMIN_EMAIL_ADDRESS%StagingUser=%STAGING_USERNAME%StagingPassword=%STAGING_PASSWORD%[SMTP]UseSMTP=0SMTPServer=%SMTPServer%Sender=%SMTPSender%[Staging]AllowedStagingUsers=%UserAccount% ;Deliniate multiple accounts using commas. Use a period to represent local machines;Azure Users [Debug]EnableDebug=0DebugUser=%DebugUserName%;This section is for testing only. Delete entire section when deploying.
Step 7: In the imaging software you will like to use, you will need to copy the software to the install path, and either have the scheduled task built OR have an instruction to install the scheduled task. The recommended approach is the \setupfiles\install_task_psonly.ps1
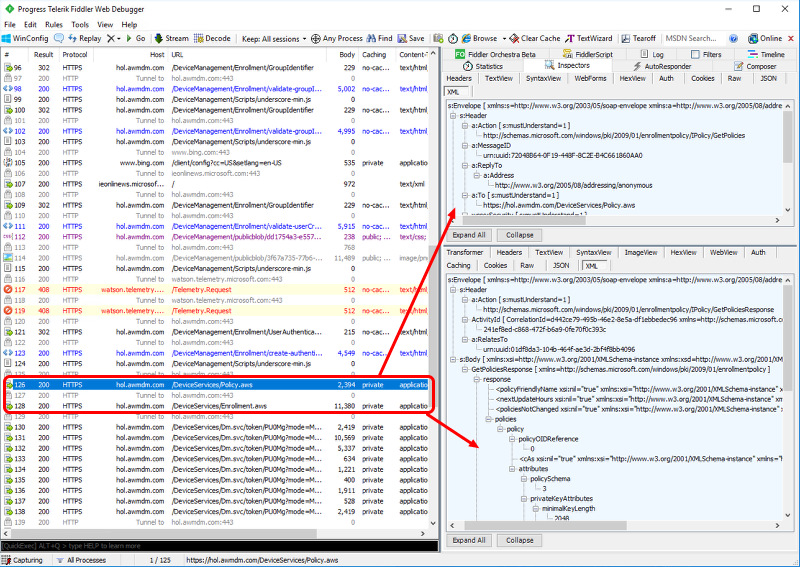
Use Fiddler. Fiddler is a free web debugging proxy server tool (local MitM-attack) which logs HTTP(S) (with decryption, using fake certificate) traffic to quickly obtain all network communications to and from the device.
Installation
Download and install Fiddler on Windows 10 client device
Choose No in “Orphaned Exemption Record Found” message window
In “AppContainer Loopback Exemption Utility” window, choose Exempt, then Save Changes, then close the window
This setting captures UWP application traffic and setting on Windows 10. By default, Fiddler captures traffic only for Win32 app types.
Use Menu Tools → Options…
Check Decrypt HTTPS Traffic
Confirm all warnings: Yes, Yes, Yes, OK
Configure filters: most simple way is to only show traffic from specific hosts
Toggle Capture traffic in Menu File → Capture Traffic, OR use F12 hotkey
Traffic Inspection
Click Inspectors.
Select Raw. Because most MDM/IDM communication is in SyncML format, for Windows 10, always select XML.
If inspecting HTTPS packets, they may be encoded, the click “Response body is encoded. Click to decode” message.
Enrollment Troubleshooting
The most important sessions which deal with enrollment are the Policy.aws and Enrollment.aws messages and the authentication traffic in them.
#Compliance Script. For use in SCCM Compliance item as a discovery script.#Checking first for Airwatch Enrollment$val=(Get-ItemProperty -Path "HKLM:SOFTWARE\Microsoft\Provisioning\OMADM\Accounts\*" -ErrorAction SilentlyContinue).PSChildname
#Now checking whether enrollment is with a real user or the staging user$path2="HKLM:\SOFTWARE\Microsoft\Enrollments\$val"$val2=(Get-ItemProperty -Path $PATH2 -ErrorAction SilentlyContinue).UPN
#This will be "Completed" if it is staged enrollment has completed but not yet flipped to final user$staging=(get-itemproperty -path HKLM:\SOFTWARE\AIRWATCH\EnrollmentStatus -ErrorAction SilentlyContinue).status
$reassignment=(get-itemproperty -path HKLM:\SOFTWARE\AIRWATCH\Reassignment -ErrorAction SilentlyContinue).status
if($staging -eq "Completed" -and $reassignment -eq $null){ Write-Host "Non-Compliant"}Elseif ($val2 -like "*staging*" -or $val2 -eq $null){ Write-Host "Non-Compliant"}else{ write-host "Compliant"}
This feature is available through the Apps & Books section. The article also suggests ways to get the executable commands to enter for your Win32 applications in the AirWatch Console. It ends with steps to troubleshoot issues.
Validated Use Cases
AirWatch validated the success of the software distribution feature in the listed use cases. Review the list and see if your deployment is similar to the validated use cases.
Silent deployment of MSI applications
MSIs with multiple transforms, and the ability to deploy different transforms to different sets of users
64 and 32 bit apps on 64 bit devices
Installers with registry validations and file checks after installation
Patch applied to an already deployed application
Application installation on system context and user context
A complete silent application installation
Application installation with dependencies
Packages with scripts that invoke multiple files (ZIP files that contain PowerShell scripts, EXE, and MST)
Installation of applications that require reboot
Applications with disk space, battery, and RAM checks
To deploy this sample, navigate to Devices & User > Profile > Add > Windows > Desktop > Device > Custom Settings, then copy and paste the SyncML into the box and publish the profile.
Modify the values inside of the data tags.
Change the target of the policies to either device or user. Inside of you will want to change to either ./Device/ or ./User/ but be careful as some policies support User, Device, or Both.
Google Chrome
Deploy attached Chrome CSPs samples via AirWatch. To deploy navigate to Devices & User > Profile > Add > Windows > Desktop > Device > Custom Settings, then copy and paste the SyncML into the box and publish the profile.
Modify the values inside of the data tags.
Change the target of the policies to either device or user. Inside of you will want to change to either ./Device/ or ./User/ but be careful as some policies support User, Device, or Both, you can reference which are support by looking at the Chrome ADMX template.
Tips to Get Configurations
Review some ways to get the commands and criteria for the Win32 application. Enter the data in the AirWatch Console when you upload the Win32 application package.
Get the Install Command
Review a few ways to get install commands for Win32 applications.
Note: If an install command prompts for user interaction on the UI, then enter these commands with the User option in the Install Context option.
Call any script from the command-line that results in a successful installation of the Win32 application.
The MSI file has the install command pre-populated with silent parameters. You can edit and update these in the AirWatch Console.
If the EXE or ZIP file contains the MSI file of the Win32 application, use the msiexec command to install.
Get the Uninstall Command
Review some ways to get uninstall command for Win32 applications.
In a command-line session, use the /? or /help parameters to display supported actions. For example, Mysampleapp.exe /?.
Look at the HKEYs in the listed registries on the device.
If the EXE contains an underlying MSI, use the msiexec uninstall command. For example, msiexec /x <path_to_file>.
Get Detection Criteria
Use detection criteria to determine if the Win32 application is on devices. To get the detection criteria, install the application and identify the checks on the device.
Product ID check
Run the wmic command and use WMIC Product where name=””.
Look at the HKEYs in the listed registries on the device for the product ID.
Look at the HKEYs listed for Product ID check to find the file criteria.
Look in the Program Files folder or the Program Files(X86) folder to find the file criteria.
Registry check
Look at the HKEYs listed for Product ID check to find registries.
Look in HKEY_CLASSES_ROOT\Installer\Products.
Get Exit Codes
Use the environmental variable, %errorlevel%, to get exit codes. Use it in conjunction with built-in DOS commands like ECHO, IF, and SET to preserve the existing value of %errorlevel%.
In a command-line session, run the install command for the Win32 application.
Run ECHO %errorlevel%.
The %errorlevel% variable returns the reboot exit code, if the Win32 application requires a reboot for installation.
Troubleshoot Software Distribution Issues
Win32 application installations involve the successful execution of multiple steps. If your application installation fails, follow the troubleshooting steps to find the issue.
Win32 Package Received Reported by App Deployment Agent
The App Deployment Agent on the user’s device handles Win32 application installations. The system deploys the agent to devices either upon enrollment or when it collects the latest App List sample from devices that are already enrolled.
The system holds the app-install commands in the queue until the agent reports back that the application installed.
Steps
Check the following components to see that the agent installed on your end-users’ devices.
In the AirWatch Console, check that the device successfully enrolled and syncs with the console.
Check the registry for the AW App Deployment Agent.
Open a command-line session and run regedit. This opens the Registry Editor.
In the Registry Editor, go to HKEY_LOCAL_MACHINE > SOFTWARE > Microsoft > EnterpriseDesktopAppManagement.
Look for the AW App Deployment Agent. The correct status value for the AW App Deployment Agent is 70.
Check services on the device to ensure that the AW App Deployment Agent is running.
Check the registry for the AW MDM nodes.
Open a command-line session and run regedit. This opens the Registry Editor.
In the Registry Editor, go to HKEY_LOCAL_MACHINE > SOFTWARE > AirWatchMDM > AppDeploymentAgent.
Find three nodes. If these three nodes are missing, then the device did not receive the Win32 application package.
App Manifest – This node contains information about the options set in the AirWatch Console on the Deployment Options tab.
Content Manifest – This node contains information about the options set in the AirWatch Console on the Files tab.
Queue – This node contains detailed logs about the installation of the application. You can view the logs to check the progress of the download of the application.
Win32 Application Installation Status
After the agent installs on devices, you can track the application installation to troubleshoot issues. The install status for the Win32 application displays the listed statuses.
Install command ready for device – The install command is queued on the device but the device has not checked in to the AirWatch system.
Install command dispatched – The device checks in to the system and consumes the install command.
Installing – The Win32 application is downloading and the installation is in progress on the device.
Installed – The installation is complete and the device sent an alert to the AirWatch Console.
Transform cache refers to any transformation on content downloaded. For example, unzip a zip package.
TRANSFORM_CACHE_FAILED: cache transformation precludes this operation. When unzip operation fails, this evaluation would fail. When runtime error happens, this evaluation would fail. Note that, unzip is running in non-overwrite mode, so if unzipping target directory already contains files which are also in the zip package, unzip would fail.
TRANSFORM_CACHE_SUCCESSFUL: cache transformation allows this operation.
Sanitize cache would validate content cache against content manifest and delete any files that are not specified in content manifest.
SANITIZE_CACHE_FAILED: cache sanitize precludes this operation. When content files in cache folder are not matching ones specified in content manifest, this evaluation would fail. When runtime error happens, this evaluation would fail.
SANITIZE_CACHE_SUCCESSFUL: cache sanitize allows this operation
Requirements evaluation evaluate the conditions requirements to perform the install/uninstall operation. For example, evaluate memory, power, etc.
REQUIREMENTS_EVALUATION_FAILED: Requirements evaluation precludes this operation. When requirements are not met, this evaluation would fail. When runtime error happens, this evaluation would fail.
REQUIREMENTS_EVALUATION_SUCCESSFUL: Requirements evaluation allows this operation
PENDING_EXEC_DEPLOYMENT_RETRY: "Install Command" / "Uninstall Command" execution failed and the client would retry again. Retry timeout and interval are specified through deployment manifest.
EXEC_DEPLOYMENT_FAILED: The "Install/Uninstall Command" execution precludes this operation after retrying. When command execution returns some exit code which is considered error (not matching success exit code, e.g), this evaluation would fail. When command execution is timed out, this evaluation would fail. When runtime error happens, this evaluation would fail.
EXEC_DEPLOYMENT_SUCCESSFUL: The execution allows this operation.
PENDING_REBOOT: The execution is finished and requires reboot.
/* Retry attempts elapsed and/or we need a new CM. We * will suspend for a DOWNLOAD_CONTENT_FAILED for a given * period of time, before rolling it back. */
"PENDING_NETWORK_CONNECTIVITY" indicates the underlying network condition has been changed and download would be reattempted in 5 mins interval with 3 retry count. (default).
"PENDING_DOWNLOAD_RETRY" indicates download would be reattempted in 5 mins interval with 3 retry count. (default)
Executes the detection criteria before installing or downloading the application.
Detection Failed indicates that the criteria defined was unable to detect the application or failed to be executed due to some runtime error which would abort the deployment. "LastStatusCode" would reflect the result.
Detection Successful indicates that the criteria were executed successfully and it successfully detected the application.
Final detection verifies the execution result in previous step. It has the same implications as first detection.
Detection Failed indicates that the criteria defined was unable to detect the application or failed to be executed due to some runtime error which would abort the deployment. "LastStatusCode" would reflect the result.
Detection Successful indicates that the criteria were executed successfully and it successfully detected the application.
DEPLOYMENT_OPERATION_QUEUED = 0x000
a registry entry would be created under HKLM->SOFTWARE->AirWatchMDM->Queue
DEPLOYMENT_OPERATION_FAILED: There are some runtime/fatal errors thrown and the operation is aborted.
DEPLOYMENT_OPERATION_SUCCEEDED: The operation is successfully performed.
DEPLOYMENT_OPERATION_SUSPENDED: On certain conditions, the operation has to be suspended. The suspended operation would be reattempted on predefined interval.
Dependencies evaluation installs app dependencies. The installation of app dependency would go through the same deployment flow shown in this table.
DEPENDENCIES_FAILED: Dependencies evaluation precludes this operation. When dependency app deployment encounters failure on all evaluations here and the operation is considered being failed, for example, download failure or runtime error, this evaluation would fail.
DEPENDENCIES_SUCCESSFUL: Dependencies evaluation allows this operation
Reference Count is the count for app installation and number of apps who depends on it. The corresponding record/output for this stage is "InstallCount" in registry. The most significant bit in "InstallCount" is called "Permanent Bit" indicating whether the application is user installed. The remaining 31 bits are referring to actual reference count. If it is larger than 1 or it is equal to 0 for uninstallation, then the client state machine would preclude the following steps.
CHECK_REFERENCE_COUNT_FAILED: Reference count evaluation precludes this operation (install/uninstall). When the application is already installed/uninstalled, this evaluation would fail. When application is installed externally (user installed), this evaluation would fail. When any other runtime error happens, this evaluation would fail.
CHECK_REFERENCE_COUNT_SUCCESSFUL: Reference count evaluation allows this operation (install/uninstall).
Steps
If the installation fails after status #2, Install command dispatched, take these steps to find the reason for the failure.
In the AirWatch Console, validate the configurations for the Win32 application on the Deployment Options tab.
Go to Apps & Books > List View > Internal and edit the Win32 application.
Select Edit > Deployment Options tab.
In the How To Install section, review the InstallContext configurations for Device or User.
Review the Admin Privileges setting.
Review the Install Command setting.
Side-load the application to the device to see if this actions triggers the install command.
In the AirWatch Console, look at the Console Event Logs to find the reason for the failure in HUB > Reports & Analytics > Events > Console Events.
Look for a failure reason on the device.
On the device, open a command-line session and run regedit. This opens the Registry Editor.
In the Registry Editor, go to HKEY_LOCAL_MACHINE > SOFTWARE > AirWatchMDM> AppDeploymentAgent.
Look in the Queue node at the log field.
If there is no Queue node, look for a node with the device or user SID. This value has the Win32 application product code. Select the product code to view the reason for installation failure.
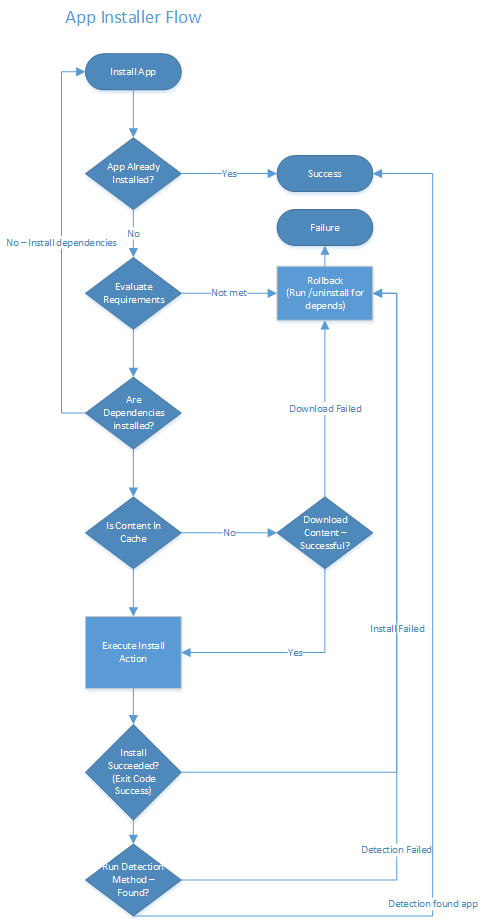
Review the App Installer Flow chart for a depiction of how the device validates the pre and post installation checks.
Copy transaction id from SQL DB ‘CBDFAD47-28F4-4D63-(A1D-91C3542840’ and search in syncml inside Device Services logs
Request Sent to Device
1.2DM/1.2721174828C828F0E444B325860CB5C3037Dhttps://migtest.ssdevrd.com/DeviceServices/Dm.svc/token/uq7Qncbdfad47-28f4-4d63-9a1d-91c3542840161ca07aea-16ea-4989-b793-0fe0d44d28ae./cimv2/MDM_AppInstallJob/MDM_AppInstallJob.JobID=%22WC_96%22/Exec=CreateJobchrtext/plainJobData=<AppInstallJob id=“96”><WebApplication PackageFullName=“webclicp” ActionType=“1” DeploymentOptions=“1” IsBundle=“false”><ContentURLList><ContentURL>https://google.com</ContentURL></ContentURLList><FrameworkDependencies/></WebApplication></AppInstallJob>
Copy the Profile Settings from the Latest AirWatch Console
Log into a version of the AirWatch console that supports the desired profile functionality.
Configure and Save this payload to create a profile.
Find the new profile in the list view: 1) Click its radio button. 2) Click the </>XML option. 3) Copy the SyncML that appears.
Paste the SyncML into a text editor, and edit it: 1) Remove lines of text so that all the code falls between the tags: <[ Add, Delete, Replace, or Exec ]> to <[ Add, Delete, Replace, or Exec ]> 2) Optionally, remove the whitespace, and linearize the SyncML.
Copy the formatted code.
Create New SyncML
Go to the Configuration Service Provider (CSP) Reference.
Access the newest Windows Insider features.
Follow the site’s available guidelines to create the code sample.
Copy the text.
Publish SyncML code:
Navigate to Devices > Profiles > List View > Add > Add Profile > Windows > Windows Desktop.
Refer to the LocURI to determine the profile’s context.
User Profile: Select if the LocURI begins with ./User/.
Device Profile: Select if the LocURI begins with ./Device/.
Configure General settings to determine how the profile deploys and who receives it.
Select the Custom Settings payload.
Click Configure, and paste the complete block of SyncML code in the text box.
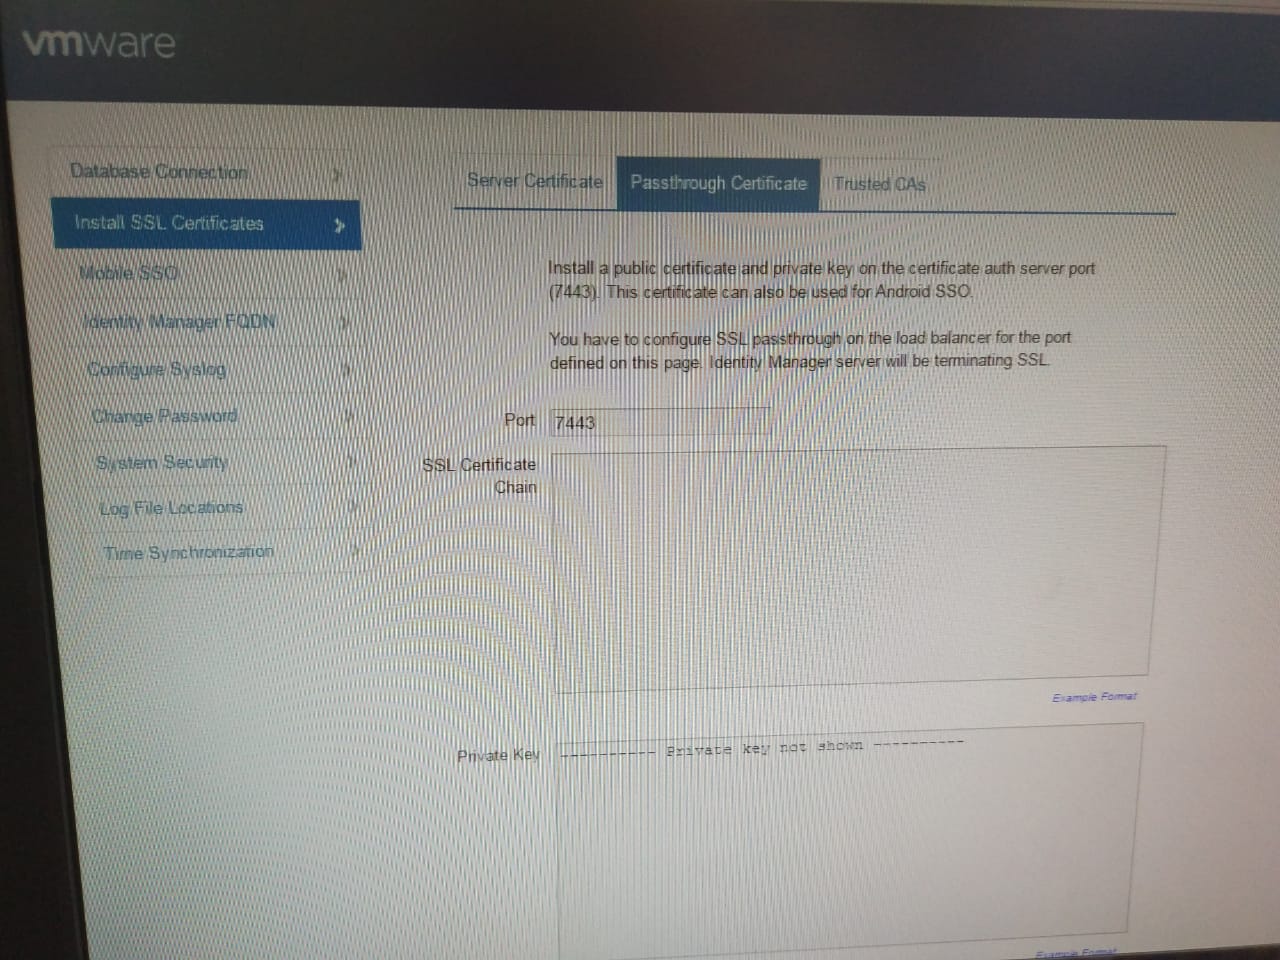
If inner AirWatch CA/SCEP is used, go to Groups & Settings → All Settings → Enterprise Integration → Workspace ONE Access → Configuration, click Certificate → EXPORT button
Go to Devices → Profiles & Resources → Profiles → ADD → Add Profile → Windows → Windows Desktop → User Profile and make a User profile
Warning
There is also a Windows Desktop →Device Profile. Do NOT use it for SSO/Conditional Access, it will not work!
Give it a Name. Example: “Win10 SSO”. Select a group in Smart Groups. For example, choose all devices (World icon)
Go to SCEP tab/payload, and set:
Credential Source: **AirWatch Certificate Authority
**Certificate Template: **Certificate (Cloud Deployment)
**Issuer: CN=<Issuer name in certificate, example = name of current Organization Group>
On vIDM / Workspace One Access side
Go to Identity & Access Management → Manage and select Authentication Methods
Check the Enable Certificate Adapter, then Select File and upload the Certificate (*.cer) which you downloaded from the AirWatch CA/SCEP from the step above, or from ADCS Domain CA
Click Save
Go to Identity & Access Management → Identity Providers, click on Built-in IF you are NOT using the ESC connector. If you are using the Connector, choose it in the list
Find Authentication Methods area and select Certificate (Cloud Deployment) check box, then click Save
Go to Identity & Access Management → Policies and select default_access_policy_set, select Edit
In Configuration tab, ALL RANGES, select Device Type = Windows 10, and in “**then the user may authenticate using “**choose Certificate (Cloud Deployment)
(Optional) In “if the preceding method fails or is not applicable, then” choose Password (Cloud Deployment)
(Optional) Select the (****+) ADD FALLBACK METHOD and in “If the preceding method fails or is not applicable, then” select Password ( Local Directory)
Windows 10 Device Tests and Checks
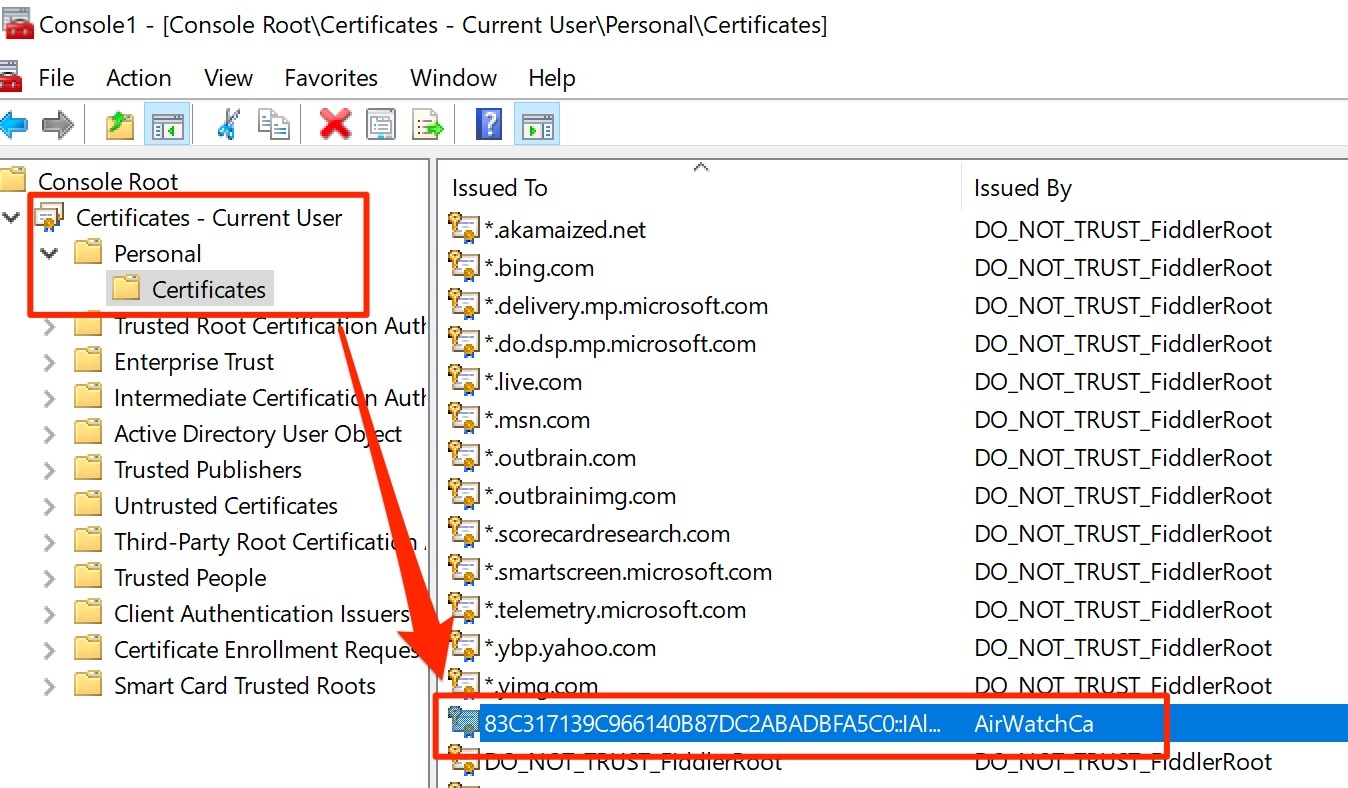
On enrolled Win10 device, open MMC, select Menu File → Add/Remove Snap-In…, select My User Account
Check Personal folder to see that the profile certificate was delivered
Use Hub to access vIDM/Workspace ONE Access portal.
Troubleshooting certificate issues
CertificateAuthAdapterBase function header for requesting the certificate from Windows:
//function names & var names obfuscatedprotectedX509Cert[]getCert(@NonnullStringtenantId,@NonnullHttpServletRequestrequest,@NonnullHttpServletResponseresponse,@NonnullMap<String,String>attribVal,@NullableMap<String,String>inputParam)throwsAuthAdapterConfigException{...}X509Cert[]certs=getCert(tenantId,request,response,attribVal,inputParam);if(certs==null||certs.length==0){logger.info("No certificates were provided by the browser");// --> horizon.logif(certs==null){adapterResponse.setStatus(AuthnAdapterResponse.AuthnStatus.FAILURE);logger.info(logId+" authentication failure, no certificate provided");//-->horizon.log
getCert method returns the certificate, received from client browser HTTP-request. If not, it logs errors in horizon.log file on WS1 Access/vIDM.