Integration - Microsoft CA
DCOM preferred architecture for PoC
- Windows Server for Certificate Authority role should be Datacenter/Enterprise Edition
- The Certificate Authority should be in Enterprise Mode (AD integration)
- The ACC/ESC connector should be in the same Active Directory Domain with appropriate CA
- Check network ports! They are different for DCOM and SCEP
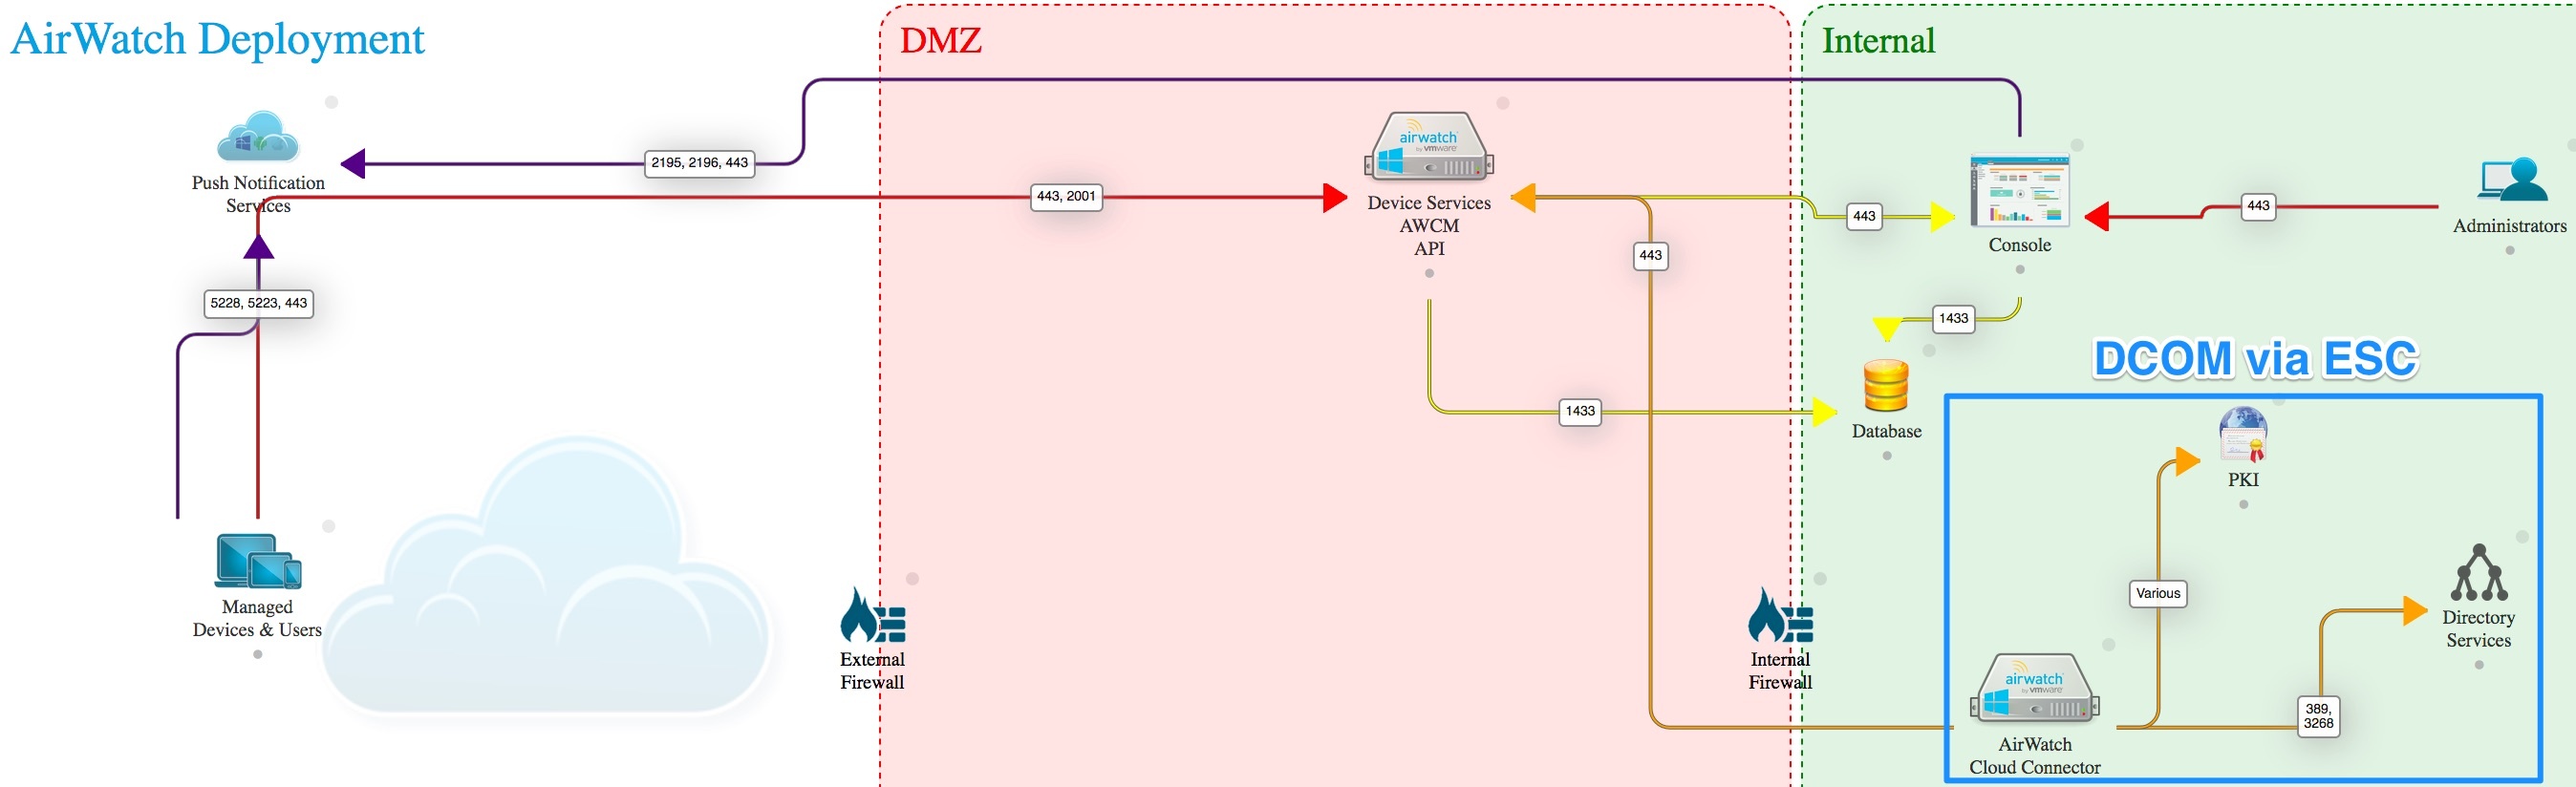
Network Requirements
- TCP Port 135: Microsoft DCOM Service Control Manager.
- TCP Ports 1025 - 5000: Default ports DCOM processes.
- TCP Ports 49152 - 65535: Dynamic Ports.
Configuration
Step 1 - Install Microsoft CA
Step 2a - Configure Microsoft CA, Basic
Warning
The following steps are applicable only if the Security Department allows a service account to have access to their CA
Add a Service Account on the CA
- Launch the Certification Authority Console from the Administrative Tools in Windows.
- In the left pane, select (+) to expand the CA directory.
- Right-click the name of the CA and select Properties. The CA Properties dialog box displays.
- Click the Security tab.
- Click Add. The Select Users, Computers, Service Accounts, or Groups dialog box displays.
- Click within the Enter the object names to select field and type the name of the service account (e.g., Ima Service).
- Click OK. The CA Properties dialog box displays.
- Select the service account you added in the previous step (e.g., Ima Service) from the Group or user names list.
- Select the Read, the Issue and Manage Certificates, and the Request Certificates checkboxes to assign permissions to the service account. Click OK.
Info
If Security Department does not allow the above, propose to use a separate child CA, and do the above configuration on it. Separate CA can be turned off in case of problems.
Warning
CA server must be in Enterprise Mode of operation. To install CA in Enterprise mode, Enterprise Admin account is needed. CA in Enterprise Mode is installed on forest level! This means Domain Controllers will have links to this CA, even if it is installed in a subdomain.
Step 2b - Configure Microsoft CA, Enroll On Behalf Of (EOBO)
Tip
Security Advantage!
- The following steps are applicable if the Security Department DOES NOT allow a service account to have access to their CA;
- As result of EOBO configuration, users will request certificates by themselves. If service account gets disabled, users will still be able to request certificates.
CA Step 0: Enable LDAP Referrals
Info
This action is only needed in multi-domain environment!
Run the following commands on the CA. This configuration is needed on ADCS CA since we are requesting certificates on behalf of some other user using service account.
This feature is only supported on Windows 2008 R2 Enterprise and later. See the link below for context and details: https://technet.microsoft.com/en-us/library/ff955842(v=ws.10).aspx
Use CMD to restart certificate services and enable cross-forest LDAP Referrals:
net stop certsvc
certutil -setreg policy\EditFlags +EDITF_ENABLELDAPREFERRALS
net start certsvc
CA Step 1: Create the Restricted Enrolment Agent Certificate Template
- Open the Certificate Authority (CA).
- Expand the CA Name, Right click Certificate Templates, and select Manage.
- Right click the Enrollment Agent (Computer) template and select Duplicate Template (Do not choose Enrollment Agent user cert!). Name it per your preference.
- Select Windows Server 2008+ Enterprise.
- On the Request Handling tab, select Allow Private Key to be Exported.
- In the Subject Name tab, make sure Build from this Active Directory Information is activated and Subject Name format is set to Fully distinguished name. Click OK.
- Navigate back to the CA, right click Certificate Templates, select New, and select Certificate Template to Issue.
- Select the duplicate copy of the template created in the previous step. Click OK.
CA Step 2 - Enroll a computer for the Signer Certificate
Substep A: Generate a new Restricted Enrollment Agent Signer Certificate
Tip
The following actions in this step can be done on any server that can connects to the Certificate Authority. Hint: do it on the server with ESC/ACC connector.
- Open MMC.
Warning
Use the same service user account to open MMC and import certificate, as the one used later for transmitting EOBO certificates. Using other user account, including admin accounts, will break the certificate request schema!
- Click File and select Add/Remove Snap in.
- Select Certificates.
- Select Computer Account.
- Select Local Computer and select Finish. Click OK.
- Expand Certificates (Local Computer), double click Personal, right click Certificates, select All Tasks, and select Request New Certificate. Click Next.
- Select Active Directory Enrollment Policy and select Next.
- Check the duplicate template created in earlier steps and select Enroll.
- Once completed, select Finish.
Warning
Service user account, which is used by AirWatch to create a certificate request, must be a domain account and have enough permissions to access Windows certificate store. Standard user will not work. Local admin rights on the computer is a simple solution.
Substep B: Configure the issued certificate
- Once the certificate has been issued, right click it and select All Tasks followed by Manage Private Keys.
- Click Add.
- Type Network Service and select Check Names. Once added, select OK twice.
Substep C: Export the Certificate
If the certificate needs to be installed on multiple Device Services servers or AirWatch Cloud Connector servers, export with the private key. If not, skip to exporting just the public key.
Note
- Right click the issued certificate, select All Tasks followed by Export.
- Select No, do not export the private key, select Next.
- Select DER encoded binary X.509 (.CER), select Next.
- Select a destination for the exported certificate and select Next. Click Finish.
Substep D: Import the certificate for Device Services and ESC/ACC servers
- Open MMC.
- Click File and select Add/Remove Snap in.
- Select Certificates.
- Select Computer Account and select Next.
- Select Local Computer and select Finish. Click OK.
- Expand Certificates (Local Computer) and select Personal. Right click Certificates, select All Tasks and select Import…
- Select the .cer file exported in previous steps and select Next.
- Ensure Place all certificate in the following store is set to Personal and select Next. Click Finish.
CA Step 3: Add a User Certificate Template on the CA
- Open the CA (certsrv) window.
- In the left pane, select (+) to expand the CA directory.
- Right-click the Certificate Template folder and select Manage. The Certificate Templates Console window displays.
- Select the desired template (User) under Template Display Name, and right-click Duplicate Template. The Duplicate Template dialog box displays. AirWatch will use the duplicate certificate template. The template you choose depends on the function being configured in AirWatch.
Tip
For Wi-Fi, VPN, or Exchange Active Sync (EAS) client authentication select User template.
- Select the Windows Server that represents the oldest enterprise version being used within the domain to ensure backward compatibility of the certificate that was issued.
- Click OK. The Properties of New Template dialog box displays.
CA Step 4: Configure Certificate Template Properties
- Click the General tab.
- Type the name of the template displayed to users in the Template display name field. The Template name field auto-fills with the template display name without spaces.
You may use this default value or enter a new template name if desired. The template name may not contain spaces. Make note of the template name. You will need to enter this information in AirWatch. You will enter the Template name you just configured with no spaces in the AirWatch Console in the Issuing Template field within the Configuring the Certificate Template screen.
- Select the desired length of time for the certificate to be active from the Validity period entry field/drop-down menu.
- Click Apply.
- Click the Request Handling tab.
- Select the appropriate client authentication method from the Purpose: drop-down menu. This selection might be based on the application of the certificate being issued, although for general purpose client authentication, select Signature and Encryption.
- Select the Allow private key to be exported checkbox. For a certificate to be installed on an iOS device, this checkbox MUST be selected.
- Click Apply.
- Select the Subject Name tab.
- Select Supply in the request or Build from this Active Directory
Note
Selecting Supply in the request means the certificate fields will be generated by AirWatch console. Doing this will give AirWatch admin control over the text in certificate request.
Selecting Build from this Active Directory allows to write something simple in the AirWatch console Request Template fields (DN). CA admin will control over the text in certificate request. Do this if multiple fields are required for customer to configure EMail etc., and add these:
- Include e-mail name in subject name
- Include this information in alternate subjject name: E-Mail name, User principal name (UPN), etc.
11 (optional). If Enrollment agent template is used, select the Issuance Requirements tab and select This number of authorized signatures = 1. Under the Application policy drop-down field, select Certificate Request Agent and select Apply.
Enable the Template for Certificate Authentication
- Click the Extensions tab.
- Select Application Policies from the Extensions included in this template: field. This allows you to add client authentication.
- Click Edit. The Edit Application Policies Extension dialog box displays.
- Click Add. The Add Application Policy dialog box displays.
- Select Client Authentication from the Application policies: field.
- Click OK. The Properties of New Template dialog box displays.
Provide the AD Service Account Permissions to Request a Certificate
- Click the Security tab.
- Click Add. The Select Users, Computers, Service Accounts or Groups dialog box displays. This allows you to add the service account configured in Active Directory to request a certificate.
- Enter the name of the AirWatch service account in the Enter the object names to select field.
- Click OK. The Properties of New Template dialog box displays.
- Select the service account you created previously - for AirWatch on the CA, from the Group or user names: field.
- Select the Enroll checkbox under Permissions for CertTemplate ServiceAccount. Click OK.
Enable the Certificate Template on the CA
- Navigate to the Certificate Authority Console.
- Click (+) to expand the CA directory.
- Click Certificate Templates folder.
- Right-click and select New > Certificate Template to Issue. The Enable Certificates Templates dialog box displays.
- Select the name of the certificate template (e.g., Mobile User) that you previously created in Creating a Name for the Certificate Template.
- Click OK.
(optional - if Enrollment Agent template is used) Link User template to Enrollment Agent
- Open the Certificate Authority (CA).
- Expand the CA Name, Right click Certificate Templates, and select Manage.
- Choose the new Enrollment Agent (Computer) template created for AirWatch
- Open the Superseded Templates tab.
- Click Add..
- Choose the created User Template, and add it to the list. Click OK.
Step 3 - Configure the AirWatch console
Configure the CA
- Login to the AirWatch Console as a user with AirWatch Administrator privileges, at minimum.
- Navigate to System > Enterprise Integration > Certificate Authorities.
- Click Add.
- Select Microsoft ADCS from the Authority Type drop-down menu. You need to select this option prior to populating other fields in the dialog so applicable fields and options display.
- Enter the following details about the CA in the remaining fields:
- Enter a name for the CA in the Certificate Authority field. This is how the CA will be displayed within the AirWatch Console.
- Enter a brief Description for the new CA.
- Select ADCS radio button in the Protocol section.
Note
If you select SCEP, note that there are different fields and selections available not covered in this guide
- Enter the host name of the CA server in the Server Hostname field (FQDN or IP)
- Enter the actual CA Name in the Authority Name field. This is the name of the CA to which the ADCS endpoint is connected
Tip
Authority Name can be found by launching the Certification Authority application on the CA server - the inner name of the CA.
- Select the radio button that reflects the type of service account in the Authentication section. Service Account causes the device user to enter credentials. Self-Service Portal authenticates the device without the user having to enter their credentials.
- Enter the service account Domain\Username and Password. This is the username and password of the ADCS service account which has sufficient access to allow AirWatch to request and issue certificates.
If Enrollment Agent is used:
Note
Configure the Certificate Template
For Enrollment Agent, data supplied by AD (in CA config)
- Select the Request Templates tab. Click Add.
- Complete the certificate template information:. + Name: a friendly name for the new Request Template. This name is used by the AirWatch Console + Description (optional): a brief Description for the new certificate template + Certificate Authority: choose the just created one from the certificate authority drop-down menu + Issuing Template: the name that you configured in CA in Configuring Certificate Template Properties in the Template name field. Make sure you enter the name with no spaces. AirWatch automatically places “certificatetemplate:” prefix afterwards. This is normal. Do not enter the word “certificatetemplate:” yourself! + Requester Name: put something simple here, since request attribs are handled at the CA level. Example: {EmailDomain} or {EnrollmentUser}
- Click Save.
For direct User template, data supplied in request
- Select the Request Templates tab. Click Add.
- Complete the certificate template information. + Name: a friendly name for the new Request Template. This name is used by the AirWatch Console + Description (optional): a brief Description for the new certificate template + Certificate Authority: choose the just created one from the certificate authority drop-down menu + Issuing Template: the name that you configured in CA in Configuring Certificate Template Properties in the Template name field. Make sure you enter the name with no spaces. AirWatch automatically places “certificatetemplate:” prefix afterwards. This is normal. Do not enter the word “certificatetemplate:” yourself! + Subject Name: put specific fields, which will be in the certificate. Example syntax for multi-line Subject Name field:
CN={EnrollmentUser},E={EmailAddress},OU={UserDistinguishedName}+ Private Key Length: choose a value (This is typically 2048 and should match the setting on the certificate template that is being used by DCOM) + Private Key Type: +Signing, +Encryption (This should match the setting on the certificate template that is being used by DCOM) + San Type: enter fields for Subject Alternative Name. Email Address, User Principal Name, and DNS Name are supported by ADCS Templates by default, and AirWatch recommends that you use them.
Example of fields to match CA config: User Principal Name = {UserPrincipalName} Email Address = {EmailAddress}
- Select the **Automatic Certificate Renewal** checkbox to have certificates using this template automatically renewed prior to their expiration date. If enabled, specify the Auto Renewal Period in days.

- Select the **Enable Certificate Revocation** checkbox to have certificates automatically revoked when applicable devices are unenrolled or deleted, or if the applicable profile is removed.
Note
If you are making use of the Enable Certificate Revocation feature, go to Devices & Users > General > Advanced and set the number of hours in the Certificate Revocation Grace Period field. This is the amount of time in hours after the discovery that a required certificate is missing from a device that the system will wait before actually revoking the certificate.This will help to NOT identify certificate missing on device because of big Wi-Fi latency or network issues.
- Select the **Force Key Generation on Device** checkbox to generate public and private key pair on the device which improves CA performance and security.
- Click Save.
Test the certificates
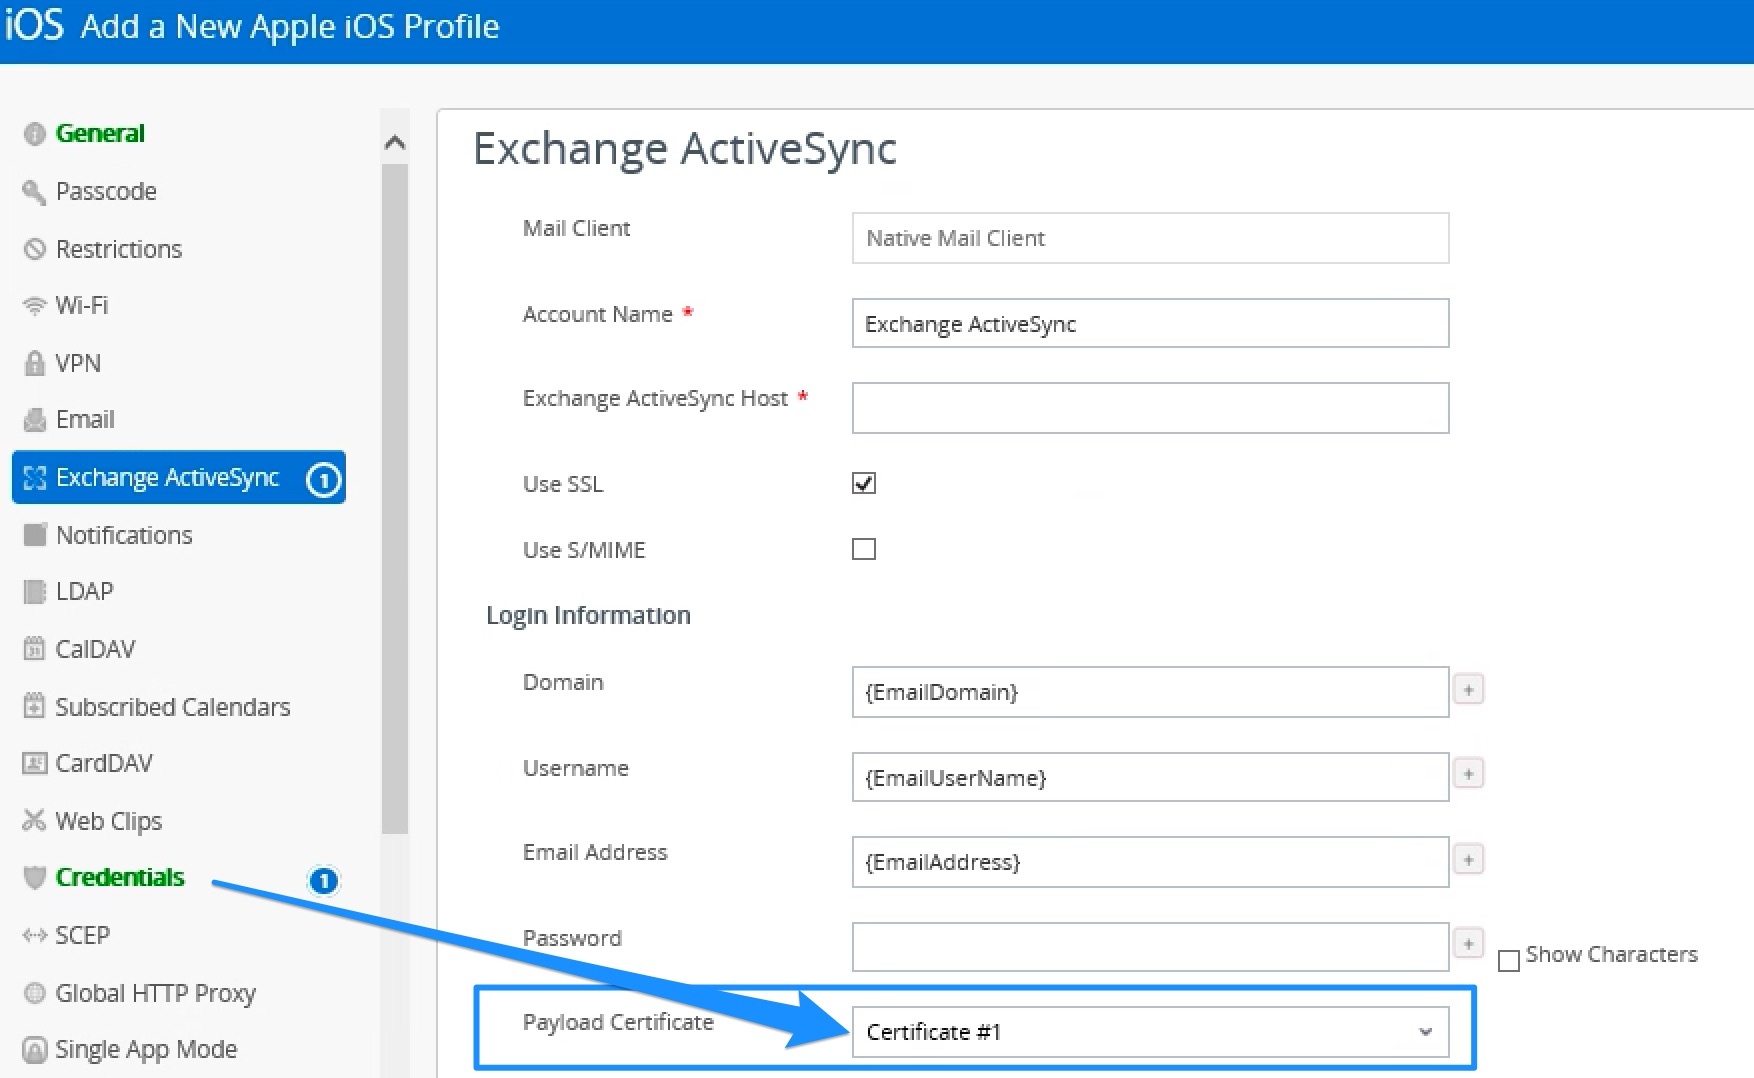
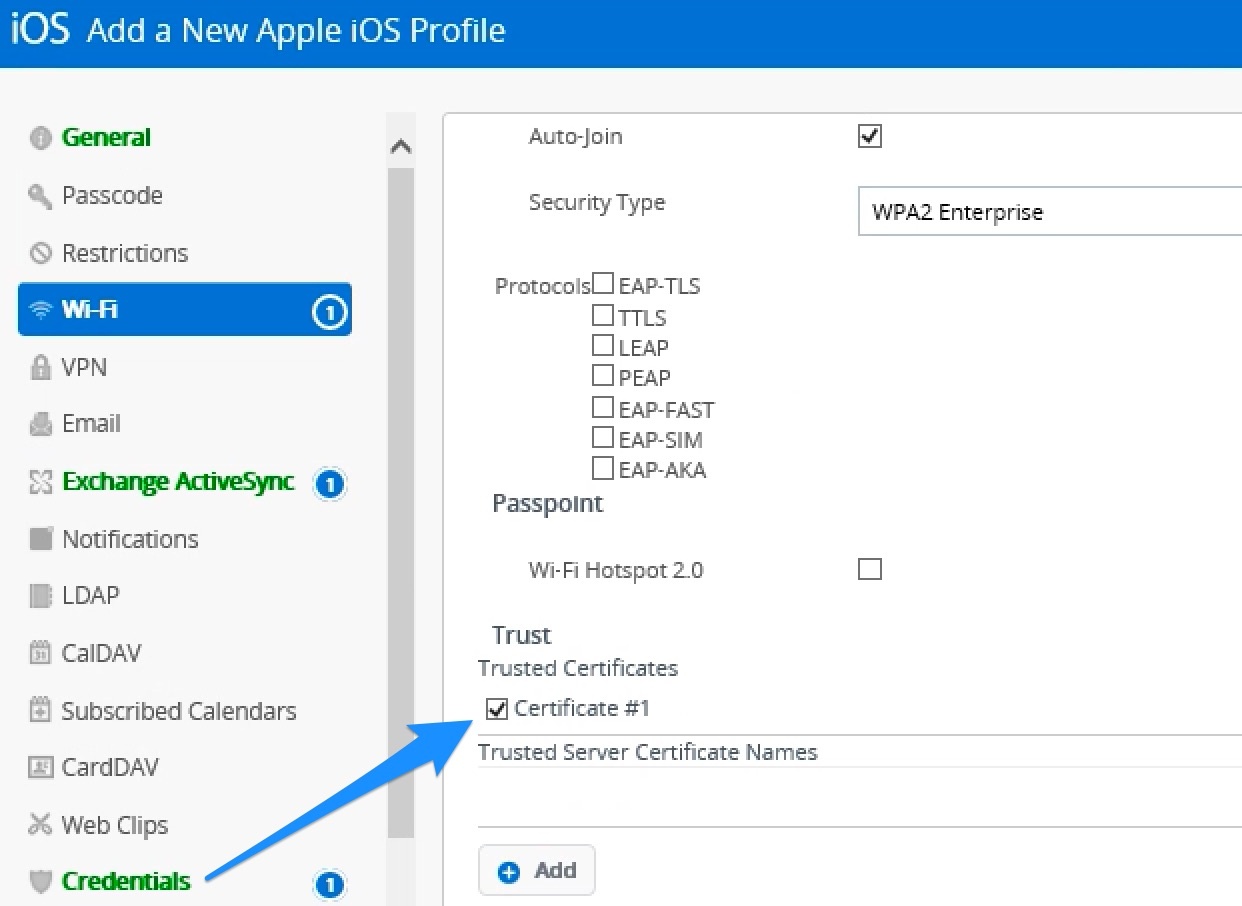
- Create a new device profile
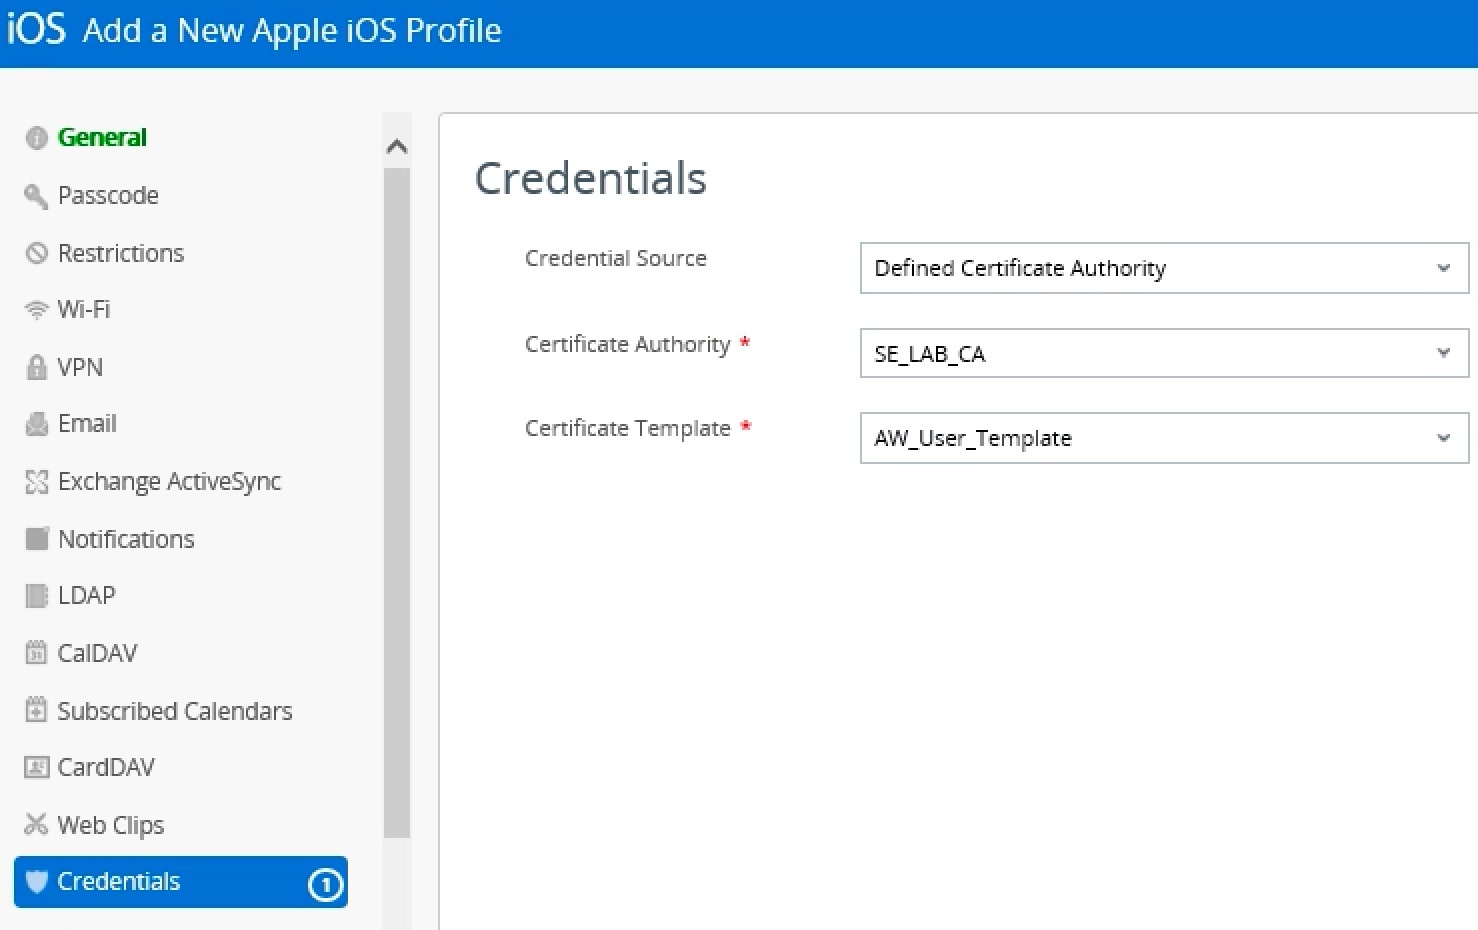
- Configure EMail settings in profile to use the Certificate (automatically named “certificate #1”)
- Configure Wi-Fi settings in profile to use Certificate (automatically named “certificate #1”)
Check the profile on iPhone/Android: you should see the Certificate profile applied, then certificate gets issued. Check the customized fields: Subject Name and Subject Alternative Name.