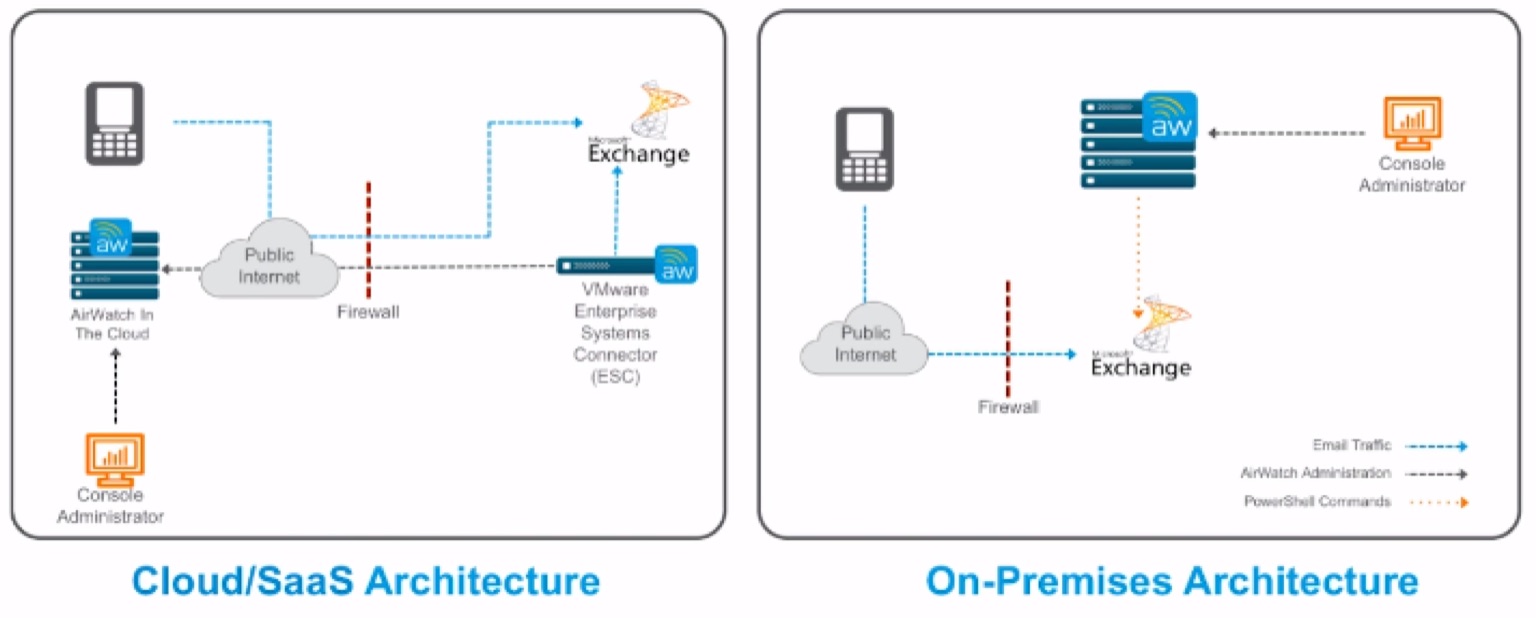
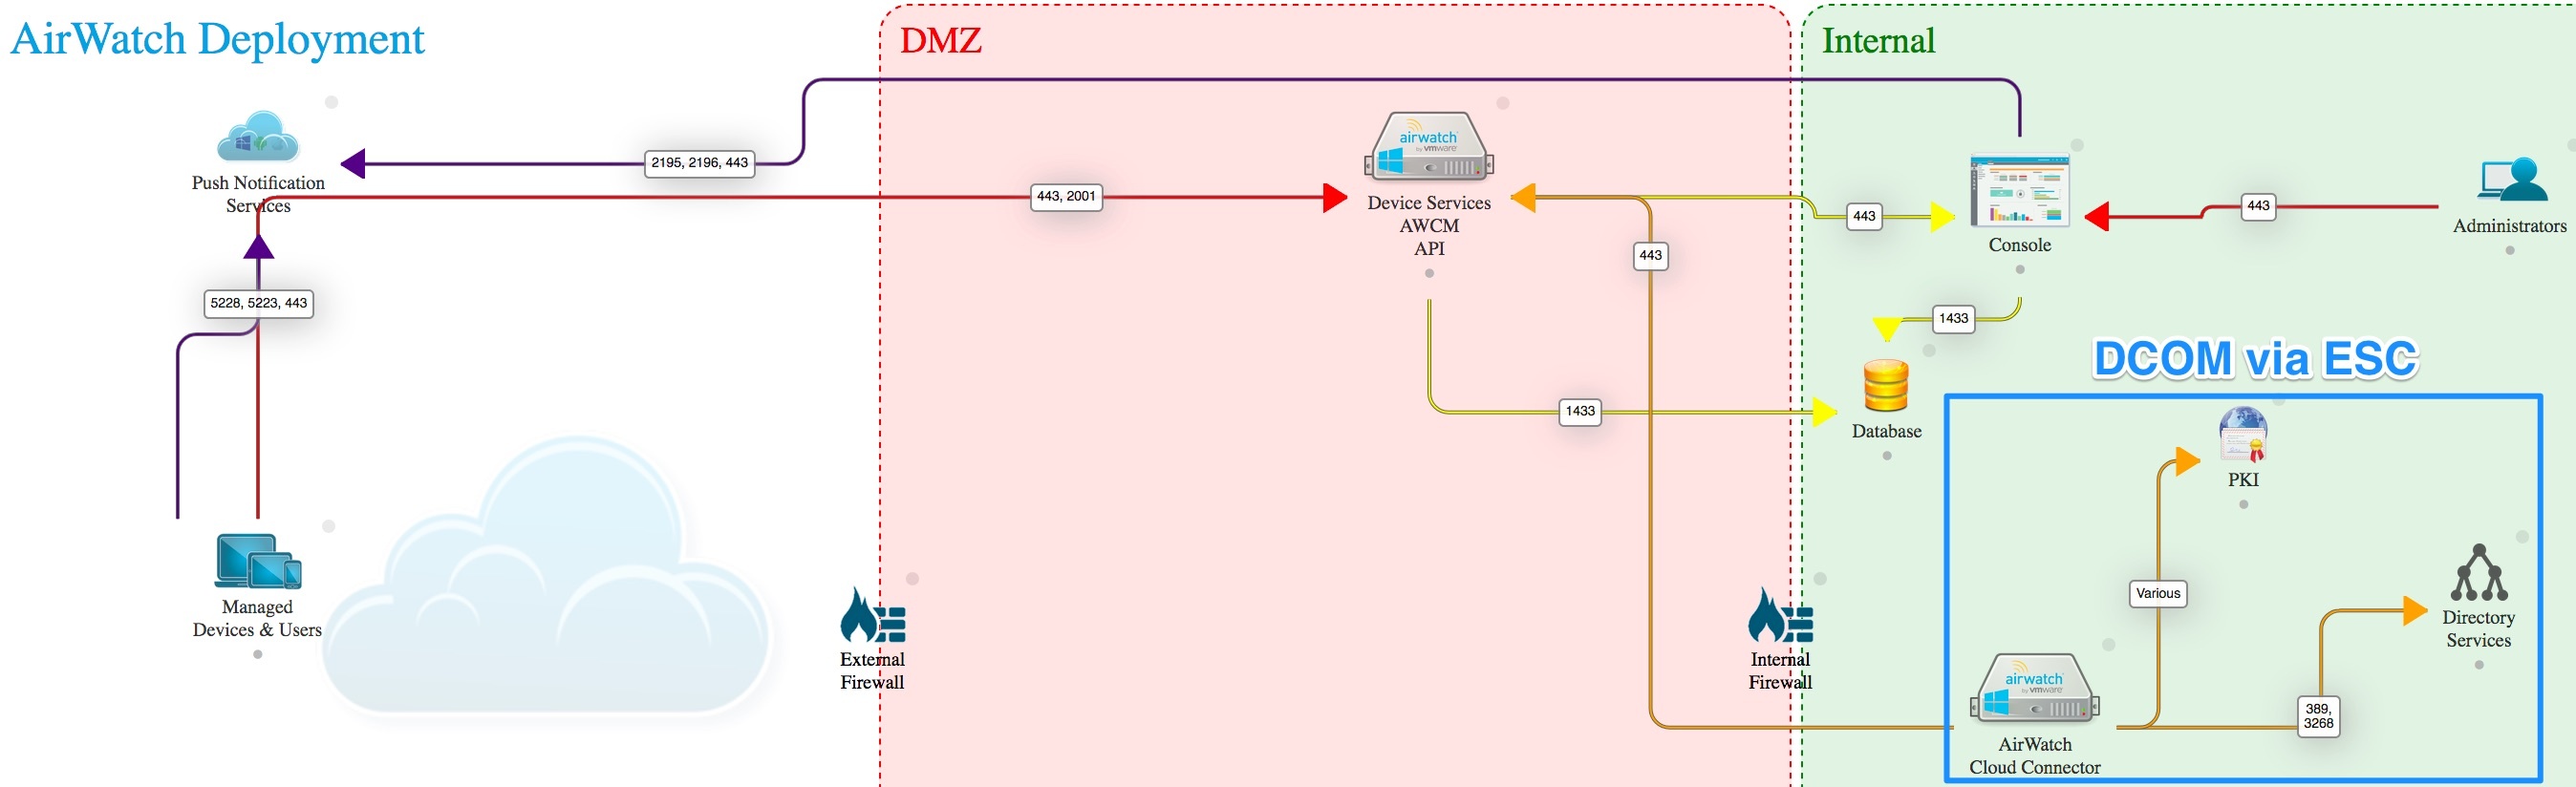
Do not install Enterprise Service Connector/AirWatch Cloud Connector (ESC/ACC), until you are absolutely sure AWCM is working
Do not install AWCM or ESC (ACC) in Global tenant
Check there is a Device Root Certificate in the Organization Group, in which work is done. It is located in \system configuration\system\advanced\device root certificate. If there is nothing, click Generate.
AWCM Installation
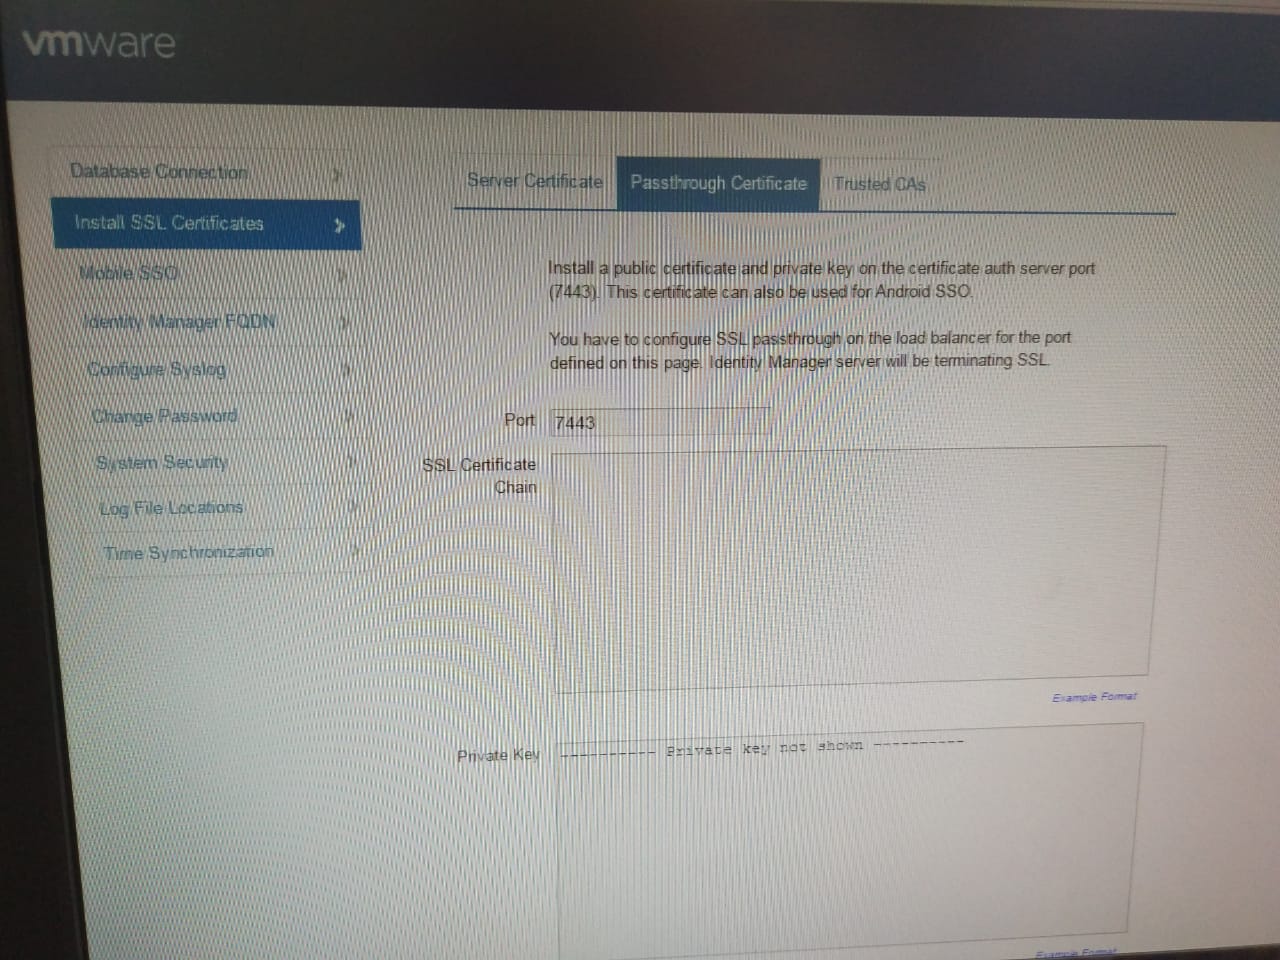
When installing AWCM, DO NOT use the self signed SSL certificate, check the box for “custom SSL” which really means the public SSL Cert you put in IIS for Device Services. Notice that in the installation dialog box the two fields for password are NOT the same. One is for the SSL Cert you are importing and one is for the password to the Java Keystore.
Make sure that REST API is enabled in the OG where you are enabling AWCM.
Make sure that AWCM is enabled in the Site URL’s page. Also, put the correct information in the two fields. The External URL should NOT contain http:// or https://. The Internal Service URL should contain https:// instead of http:// and should have the port number after the URL and “/awcm” at the end. It should look like https://{url}:2001/awcm.
Download and run the AWCM Secure Channel Certificate program from the Secure Channel Certificate page ON THE SERVER RUNNING AWCM.
DO NOT download the program onto another computer and copy it to the AWCM server!
Download and run this program “As Administrator”.
There is a possibility that you will receive an error message that the application can’t find the Java Folder, this can be a result of not running the program “As Administrator”.
Browse to the AWCM Status page by going to https://{url}:2001/awcm/status. If this page doesn’t come up or if there is an SSL error stop and fix it before you go on. Check the SSL Certificate common name, it should match the name of the DS URL. If it says “Air Watch “ then you need to uninstall and reinstall AWCM, this time installing the correct SSL Certificate (see #1).
ESC/ACC WILL NOT WORK if you use the self signed certificate!
AWCM Status page MUST BE TRUSTED by AirWatch Console AND by ESC. Test by opening https://{url}:2001/awcm/status status page in browser - there MUST BE NO CERTIFICATE WARNING!
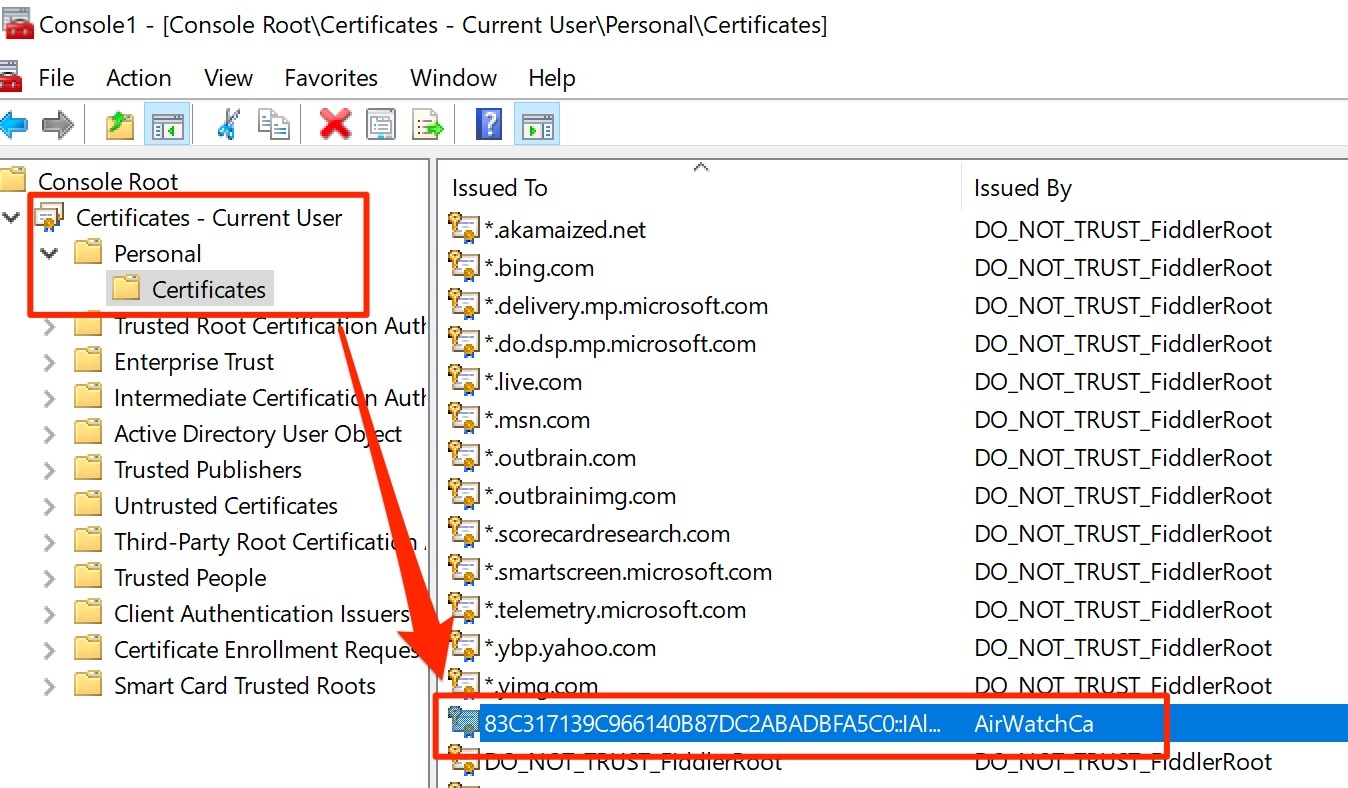
Confirm that the awcm.truststore and the awcm.keystores are not corrupt and contain the correct certificates. Run the keytool application (see next section) and list the contents of both stores.
In awcm.keystore there should be 1 certificate and it should contain the SSL certificate for the site.
In the awcm.truststore there should be 2 or 3 certificates: one of them is Secure Channel Certificate.
If the certificates do not exist in the stores then you may need to re-install AWCM. If the password is not accepted then the store may be corrupt and you will need to reinstall AWCM.
Java KeyStore
AWCM is a Java web application and stores its certificates in the Java Keystore as opposed to the Microsoft Certificate store. The Java Keystore and Java Truststore are located in the \airwatch\airwatch {version}\awcm\config folder.
There is a utility in Windows called “keytool”. With this utility you can view, add, and delete certificates from the Java Keystores.
⭐️ Password to awcm.truststore = “password”
Password to awcm.keystore = password to the PFX certificate uploaded on installation of AWCM. DO NOT use password less than 6 characters! Or you will not be able to change certificate in awcm.keystore.
Example of keytool commands:
# List the certificates in the store:keytool -list -v -keystore awcm.truststore
# Import a certificate into a store:keytool -import -trustcacerts -file {cert file} -alias {common name} -keystore $JAVA_HOME/jre/lib/security/cacerts
Replace database of AWCM
Run the following command to replace SSL cert on AWCM servers:
Ensure that clients who are required to connect to AWCM are pointed to and are able to reach the endpoint on the load balancer. This means that if installation of AWCM is on the DS servers, then ensure that the requests for AWCM from the DS services are still accessing the load balancer so that they are subject to the set rules;
As per the Installation Guide, the preferred deployment for a customer using ESC/ACC with AWCM is to deploy multiple AWCM nodes in an active-passive configuration. This makes everything easier since persistence of connections doesn’t matter. There are no specific advantages with having two active nodes as the network load is not much while using only ESC/ACC.
Load Balancing AWCM - Persistence Rules with F5 LTM
To deploy AWCM with multiple nodes behind a load balancer without clustering, you must account for persisting the connections to the AWCM servers. In the HTTP request that is sent to AWCM (from a device, the Device Services server, the Console Server, ACC, and so on), there is a cookie value called awcmsessionid, which is used to establish request level affinity to an AWCM node from a pool of nodes. You must configure your load balancer or proxy to parse the HTTP request for this value and use it for persistence. The persistence settings are only necessary for AWCM servers that are load-balanced in an active-active manner. The persistence settings will ensure that established connections are not dropped when the F5 switches from one AWCM server to the other to balance the load.
The iRule might vary based on a client’s existing configuration or best-practices, but the basics are straight forward:
Parse the HTTP request for the awcmsessionid cookie’s value
Set persistence with this value via the “persist carp” command.
In Local Traffic → Profiles: Persistence create a persistence profile based on the default “hash” profile. All items should be default except the following:
Algorithm: “CARP”
iRule: created in Step 1.
Configure the Virtual server with the following settings:
Select an HTTP profile from the “HTTP Profile” drop-down list;
Select OneConnect profile = oneconnect (for HTTP request balancing, not just connection);
Apply the persistence profile under the Resources tab
Load Balancing AWCM - Persistence Rules with Citrix NetScaler
Check for persistence by hitting the URL [https://awcm url:port/awcm/statistics?awcmsessionid=abc123](https://awcm urlport) on ACC server and on machine from outside network. If the servers are different then customer needs to change the persistence rule on load balancer on their end.
Common Errors
AWCM Status Error - DNS name
AWCM not working - page https://<DS_URL>:2001/awcm/status unavailable.
Error log seen:
Solution: DNS name of Device Services is registered on external proxy and not known to servers. Go to C:\Windows\System32\drivers\etc\hosts file on AirWatch Admin Console, and also on server with Enterprise Connector Service and add the EXTERNAL public DNS name (listed in public certificate) of AWCM binded to its’ internal IP.
AWCM Status Error - Cryptography
AWCM not working - page https://<DS_URL>:2001/awcm/status unavailable.
Error log seen:
Solution: AWCM was installed AFTER crypto algorithms were disabled in IIS hardening, and it cannot launch normally. Reinstall of AWCM needed.
AWCM SSL Certificate Error
Certificate error while browsing the AWCM status page
Login to the AWCM server.
Open a command prompt, navigate to the following directory (E:\airwatch\airwatch\AWCM\config) and run the following: keytool -list -v -keystore awcm.keystore
Enter the password when prompted
Export a new SSL certificate from a machine.
❗️Make sure that the full signing chain is exported (settings that you select when exporting the certificate) and that the password used to export is same as the one used for the current awcm.keystore.
If the passwords are not same, the import happens but an error message appears when AWCM starts and the status page does not load (as the pre-configured password will be incorrect and the AWCM app will not be able to open the keystore).
When the certificate is on the AWCM server (copy into the C:\airwatch\airwatch\AWCM\config directory), run the following command to replace SSL certificate:
Once this has completed successfully, you will now see a new file named awcm.keystore.new in the config directory. Stop the AWCM service.
Rename the awcm.keystore to awcm.keystore.old.
Rename the awcm.keystore.new to awcm.keystore.
Start the AWCM service.
Using a valid AWCM URL, try to access the page (https://{url}:2001/awcm/status) and if the status page loads, then check the certificate details. It should display the values for the newly uploaded certificate.
If the status page does not load, check the log files.
If rollback is required, rename the awcm.keystore to awcm.keystore.new.
Then rename awcm.keystore.old to awcm.keystore. Restart AWCM to restore the old settings.
AWCM and Admin Console trust error
ESC/ACC starts and generates no errors in log, also no errors in AWCM. But error in console while performing Test connection for ESC/ACC: Undefined Error; Please check server logs.
Reason: there is no trust between AWCM and AirWatch Admin Console
**Remedy:
**Import Intermediate and Root certificates for public PFX certificate in AWCM server and AirWatch Admin Console Server
ACC Errors
ACC must be able to reach AWCM:
Protocol HTTPS
Telnet from ACC to AWCM Server on the relevant port (usually 2001 for On-Premise installations and 443 for SaaS environments)
Also, verify by opening a browser on the ACC server, entering https://:2001/awcm/status and /awcm/statistics to ensure there is no certificate trust error.
For On-Premise installations: if using ACC with AWCM and there are multiple AWCM servers and they required to be load-balanced them, persistence needs to be configured - see the above section.
ACC must be able to reach the Console Server:
Protocol: HTTP or HTTPS
Telnet from ACC to the Console URL on the relevant port (usually 80 or 443)
Also, verify by opening a browser on the ACC server, entering http(s)://
If auto-update is enabled, ACC must be able to query AirWatch Console for updates
ACC must be able to reach the API
Protocol: HTTPS, port TCP443
Verify by navigating to the URL of your API server on the ACC server: https:///API/help
When the credentials screen appears, enter the credentials of a console admin and the API Developer page should appear.
ACC to API access is required for the proper functioning of the AirWatch Diagnostics service.
Connectivity Errors
If you see errors in the ACC logs indicating connections being closed/aborted/terminated, check if there is any network device in between the ACC and AWCM that would close or terminate idle connections. The outbound connection required for use by ACC must remain open at all times. Check the TCP session timeout on this network device in between and see if this can be increased to a value >2 minutes;
ACC sends what is known as an IDLE message, by default every 2 minutes. This IDLE message by ACC helps ACC register itself as a listener on AWCM so that AWCM knows that this ACC is ready to take requests;
If there are any network devices between ACC and AWCM that closes the connection between these components deeming the connection as an idle connection, it could cause issues with this ACC/AWCM connectivity.
401 Errors on ACC
Check time on ACC and AWCM servers to make sure they are correct and synced to NTP preferably to avoid time synchronization issues.
For any certificate related issues, enable and check CAPI2 logs on ACC and make changes accordingly in certificate stores (adding root/intermediate CA certificates to establish trust)
Reason: ESC/ACC service does not start because there is no trust between ESC/ACC and AWCM.
If this error is present after trying to hit Update/Check URL on the console, check the SSL certificate on the console and do the following:
keytool -list -v -keystore "{AWCM install path}/awcm.truststore" > c:\test.txt
In the .txt file, search for the secure channel and it should match with the secure channel certificate in the console.
Remedy:
Generate new certificates for ESC/ACC and download the installer. Then, uninstall ACC and install the new ACC with the renewed certificates. Restart the AWCM service, if required.
Reinstall AWCM and download the installer from the console.
Usually, on-prem installation of WS1 UEM is doing with localized Windows servers (French, Russian, as an examples). With that, default settings in IIS can be set up incorrectly. This issue may prevent enrolling Windows devices (iOS or Android devices enroll well at the same time).
Solution
To fix this isseu you need to change .NET Globalization settings for Default Website level for all DS servers in your environment:
The pre-installation verification tool is an exe file that can be loaded onto the AirWatch app servers and will perform standard checks on the local machine, to the DB, and to the internet to ensure that the environment meets the VMware AirWatch Pre-Reqs.
Once installed, certain information is required, such as DB server and username/PW, and once entered takes you through the checks and presents the results in the application. Should it need to be shared there is an export option that creates an Excel file.
There is also additional functionality tests related LDAP, SMTP, Exchange, SSRS, and PKI
iTools for Windows. Allows you to install applications on, move files to and from, and otherwise maintain your iOS device, such as an iPod or an iPhone - http://itools-for-windows.en.softonic.com/download
Microsoft Remote Connectivity Analyzer
ActiveSync, LDAP and O365 Connectivity Tool
The tool can identify: Host connectivity and name resolution (DNS) problems, Exchange Server/ActiveSync configuration issues, etc.
main – is being added on install, is usually configured with policies. Cannot be deleted.
additional – is added by users if this is allowed by policies. Can be configured manually.
Warning
(15.08.2017) For policies which are being distributed centrally for the main account there is no possibility to configure “Ignore SSL errors”. If in a PoC of Boxer you have to connect to a private/test mail server, this may pose a problem.
Variant 1 (recommended): server is signed by a cert, which was given by a inner CA (issued by =/= issued to)
Solution: on all devices in the test, you have to manually deploy the certificate chain in the trusted section:
In Android 7.0+, by default, apps don’t work with CA certificates that you add. But app developers can choose to let their apps work with manually added CA certificates. https://support.google.com/nexus/answer/2844832?hl=en
Variant 2: server is signed by a self-signed cert (issued by == issued to)
Solution: use the first account to distribute policies from any public EMail. For example, Office365 from our VMTestDrive
Note
Account can be only one for all devices - this account will not be used
After Boxer installation connect to the account provided by policies (VMTestDrive)
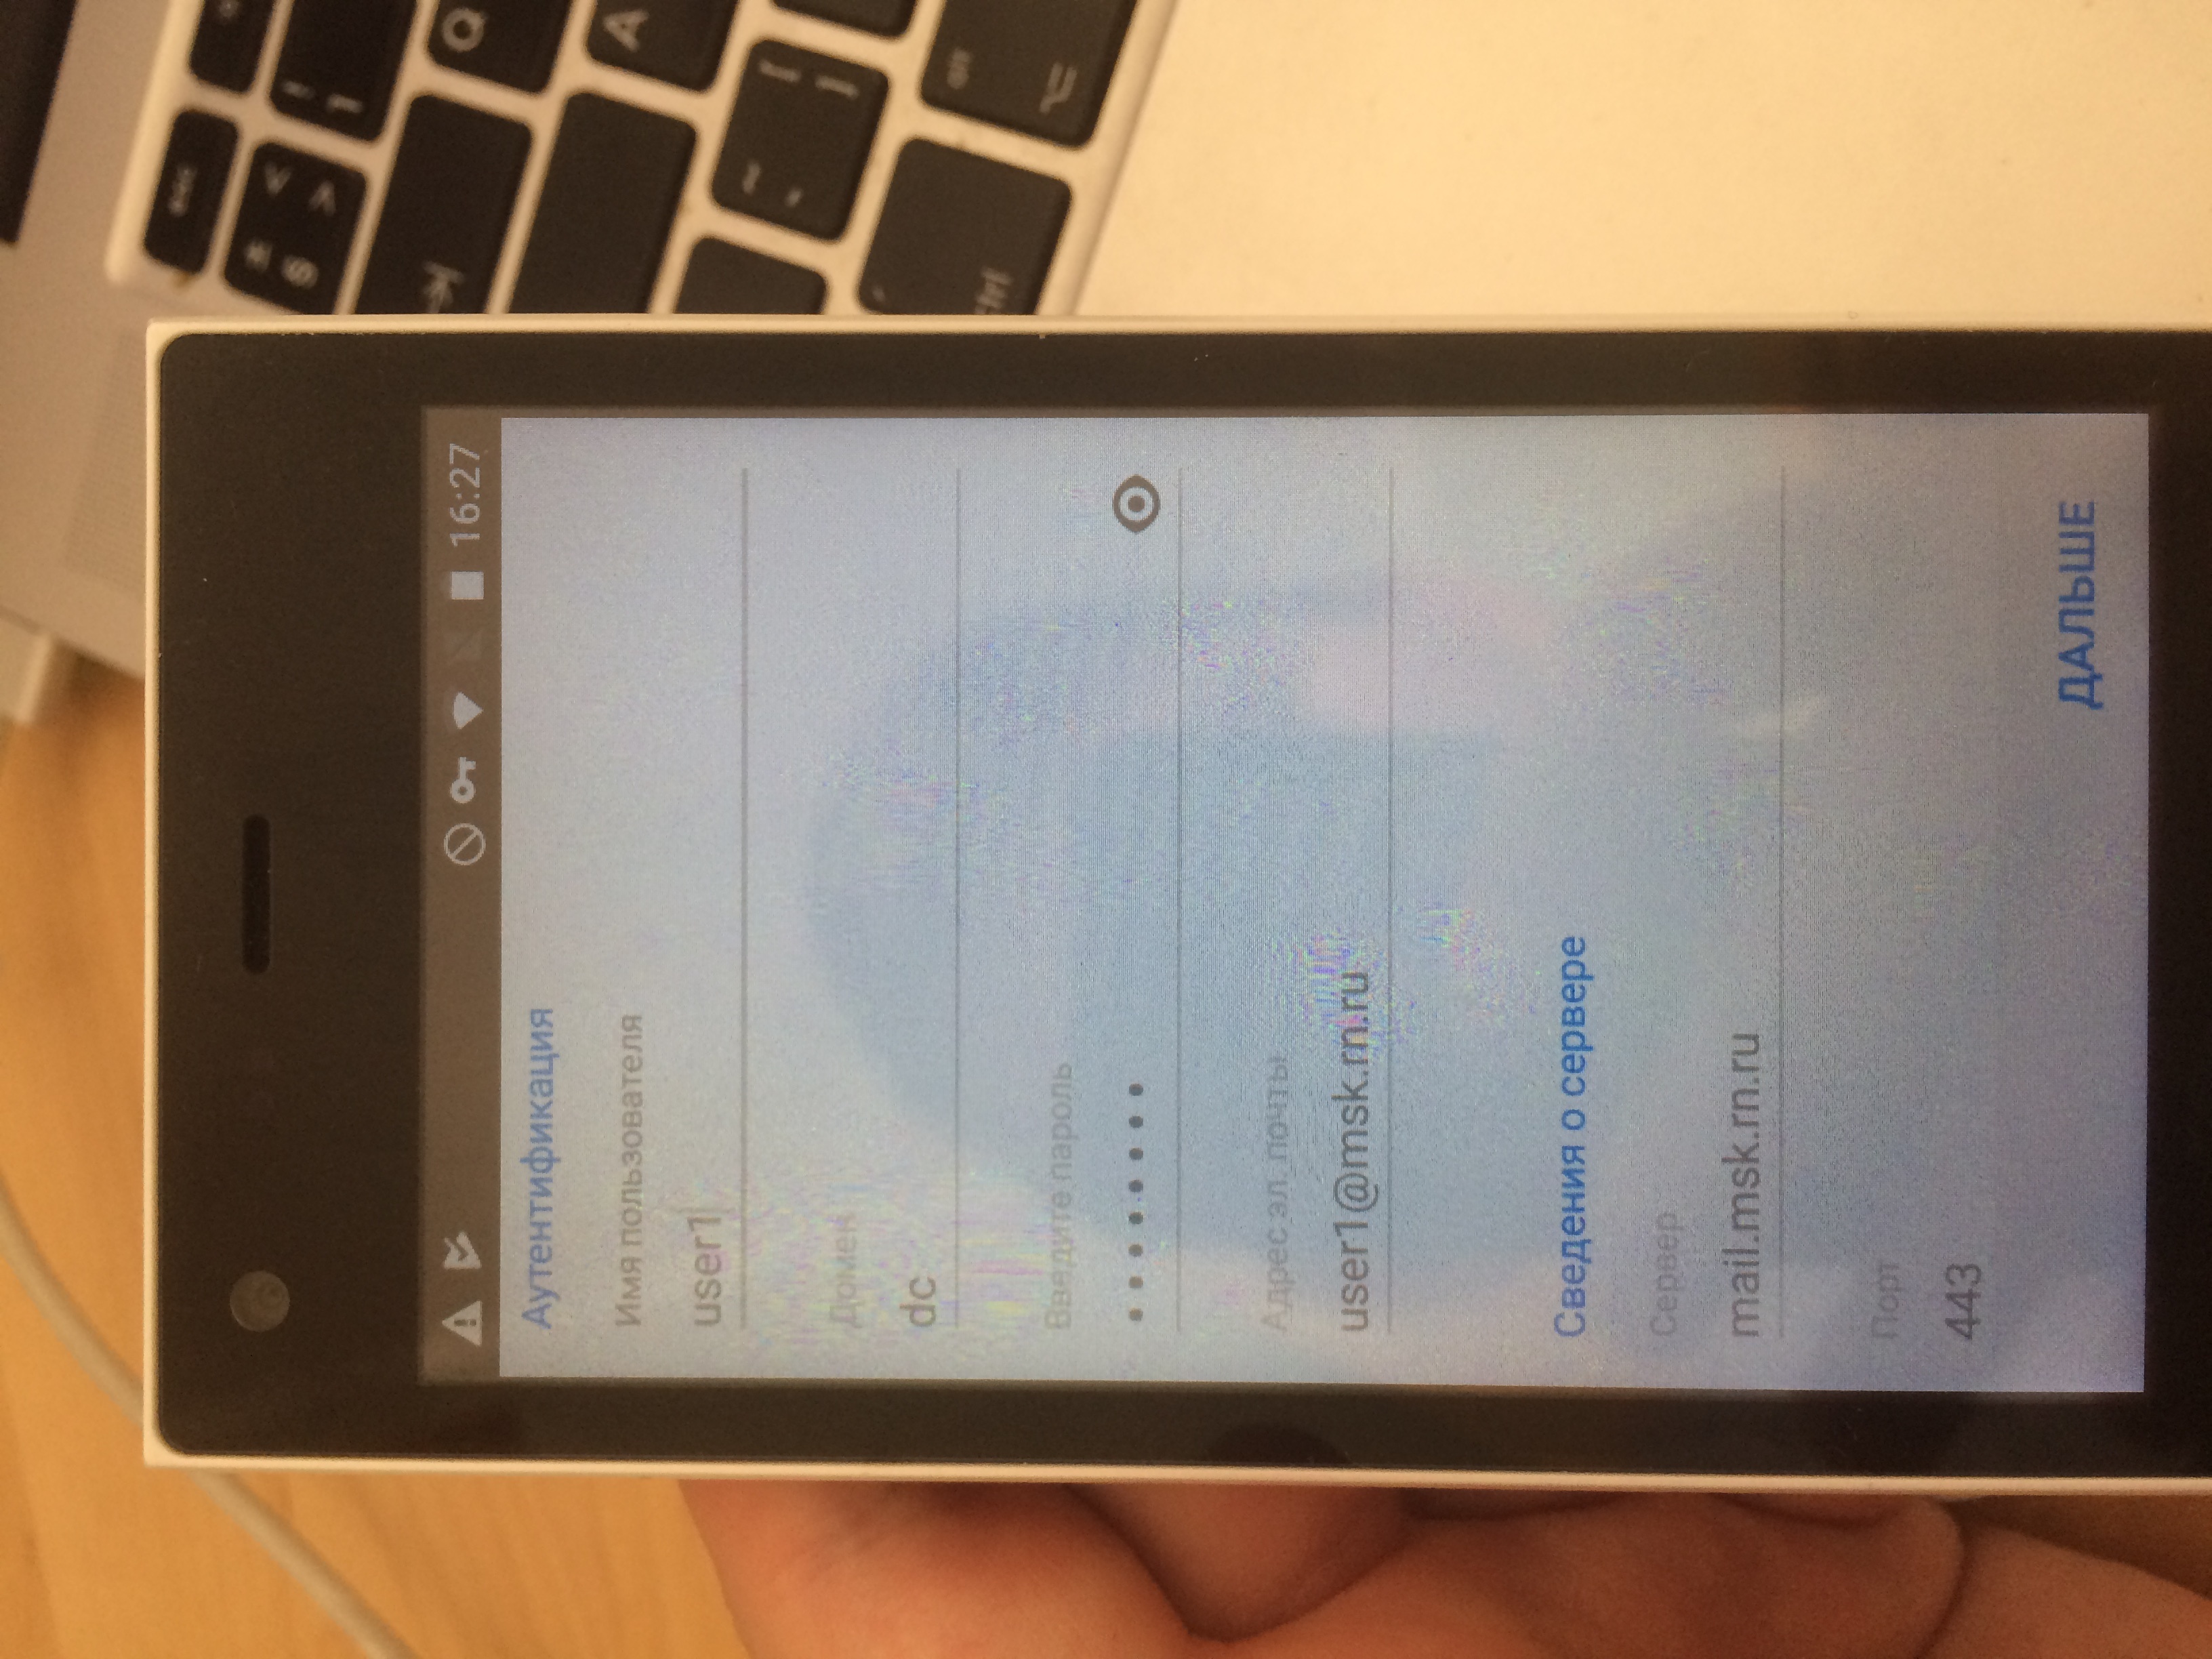
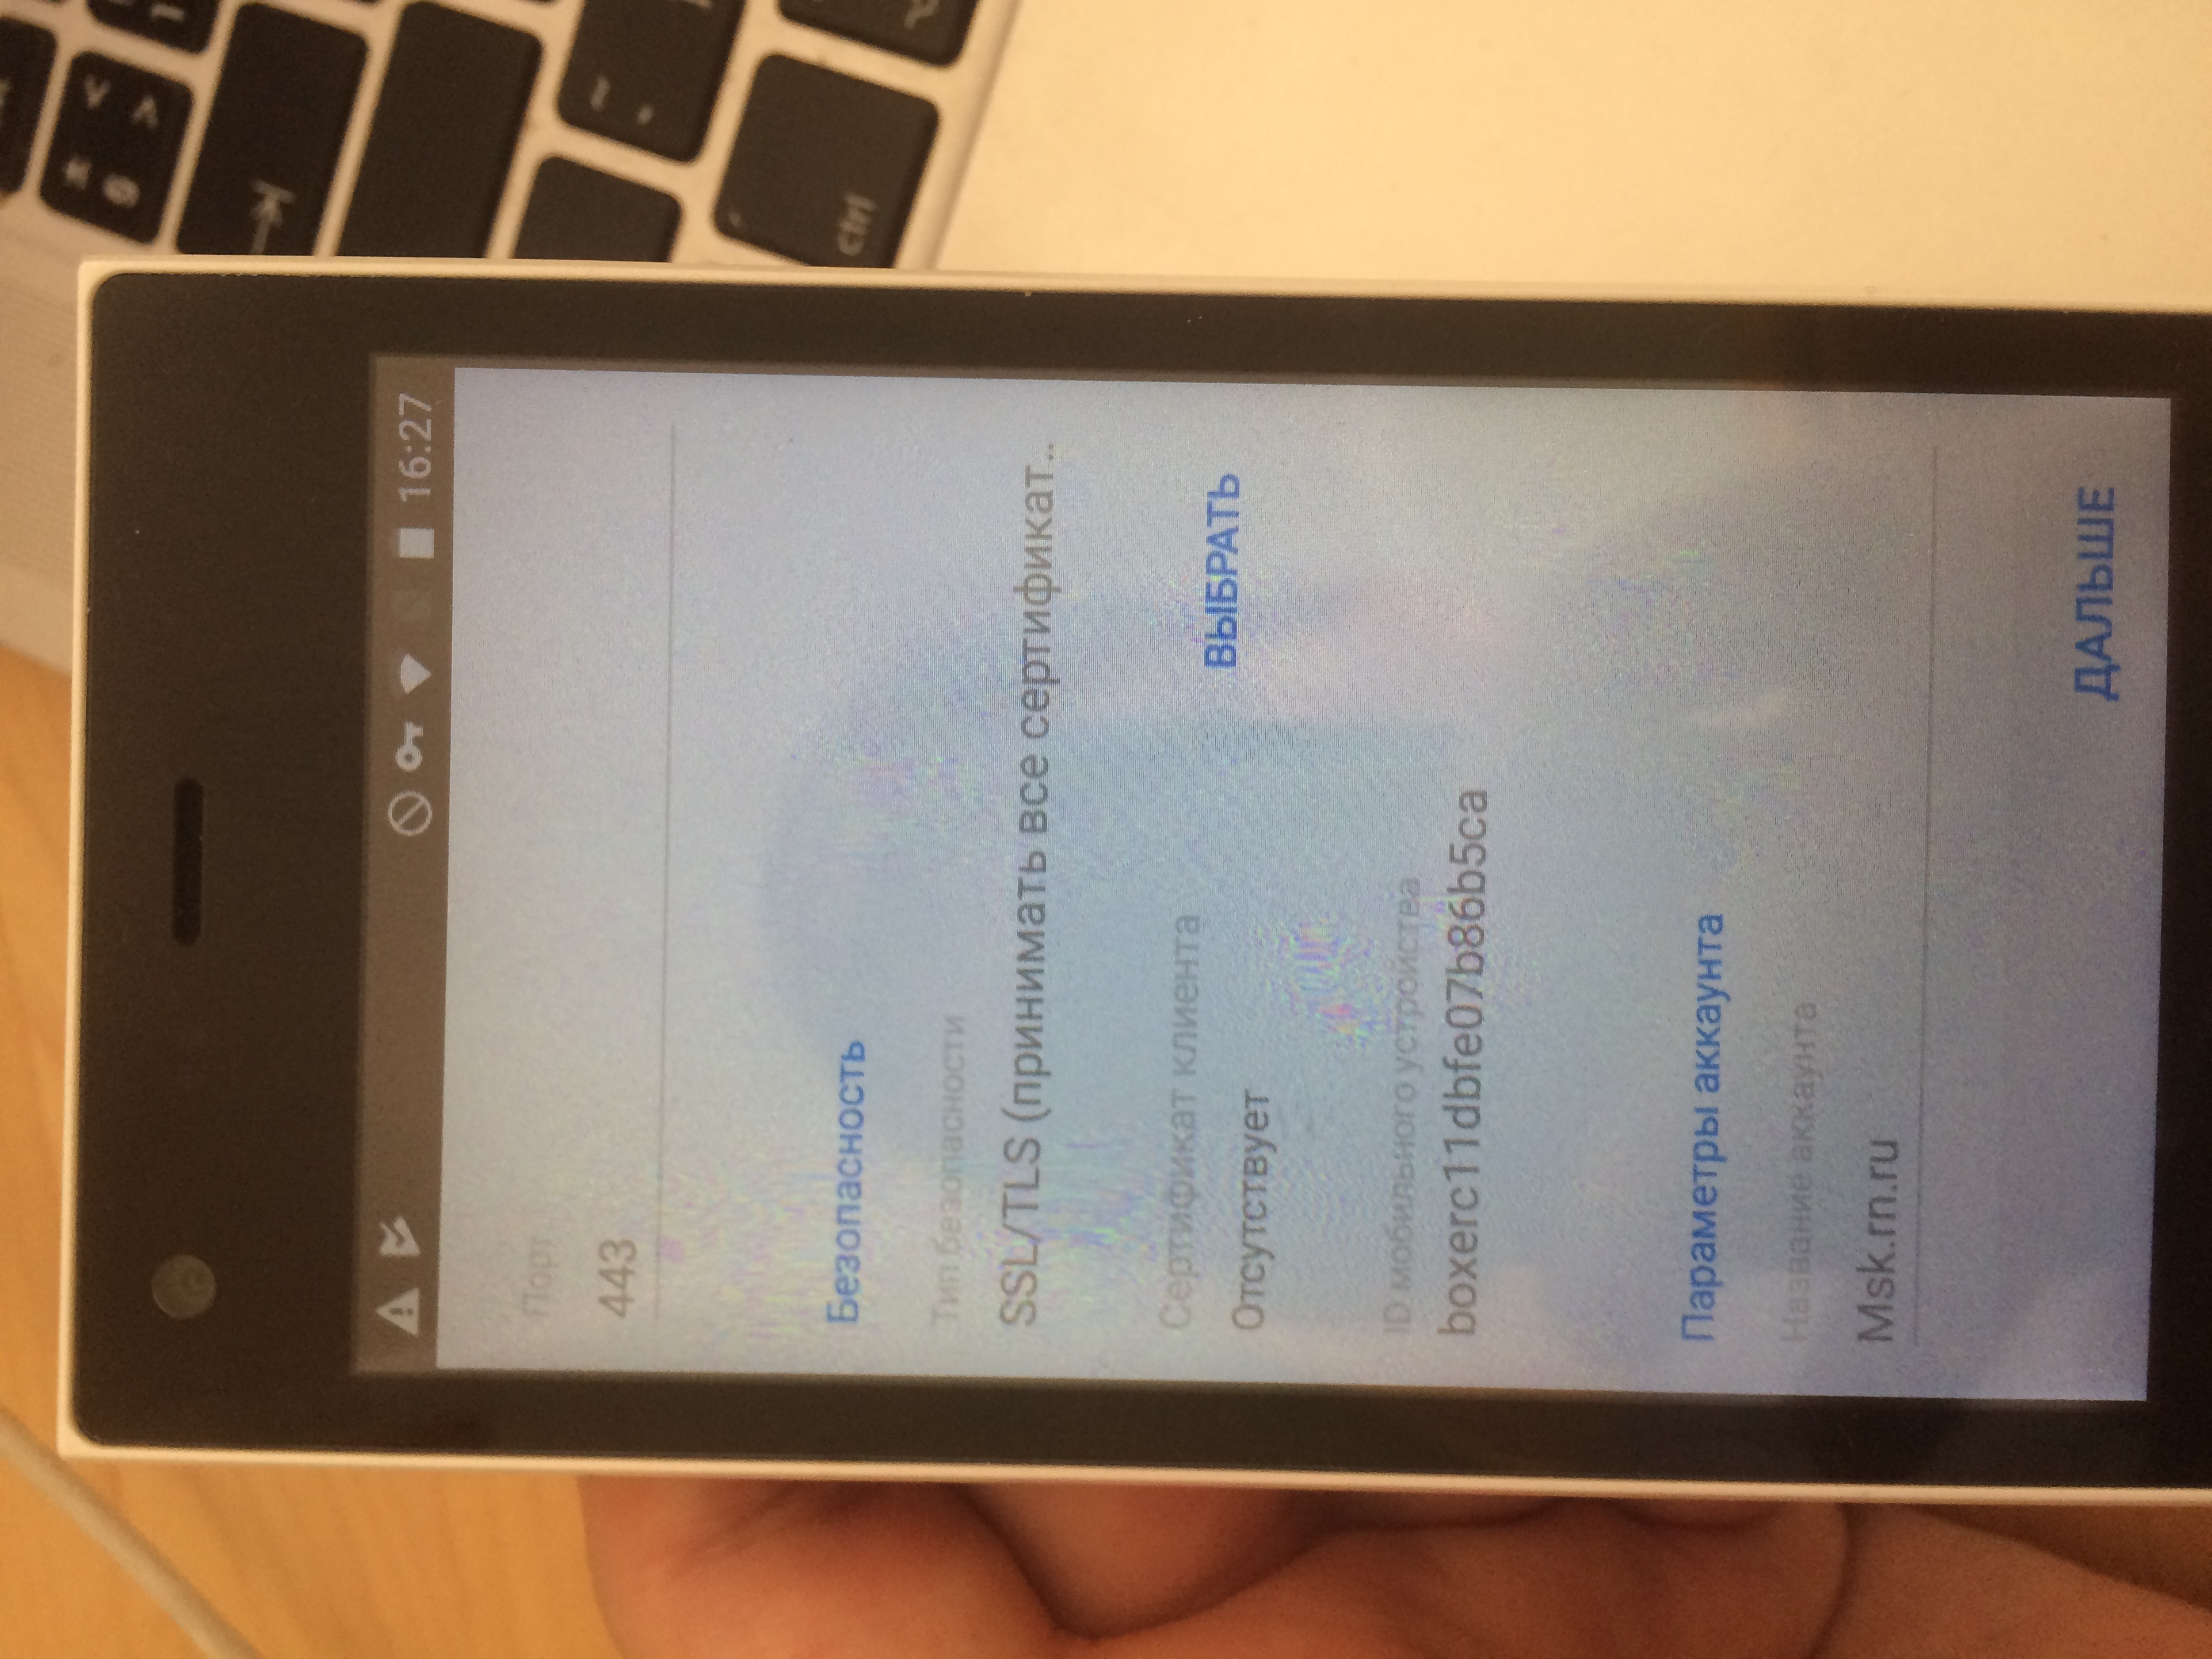
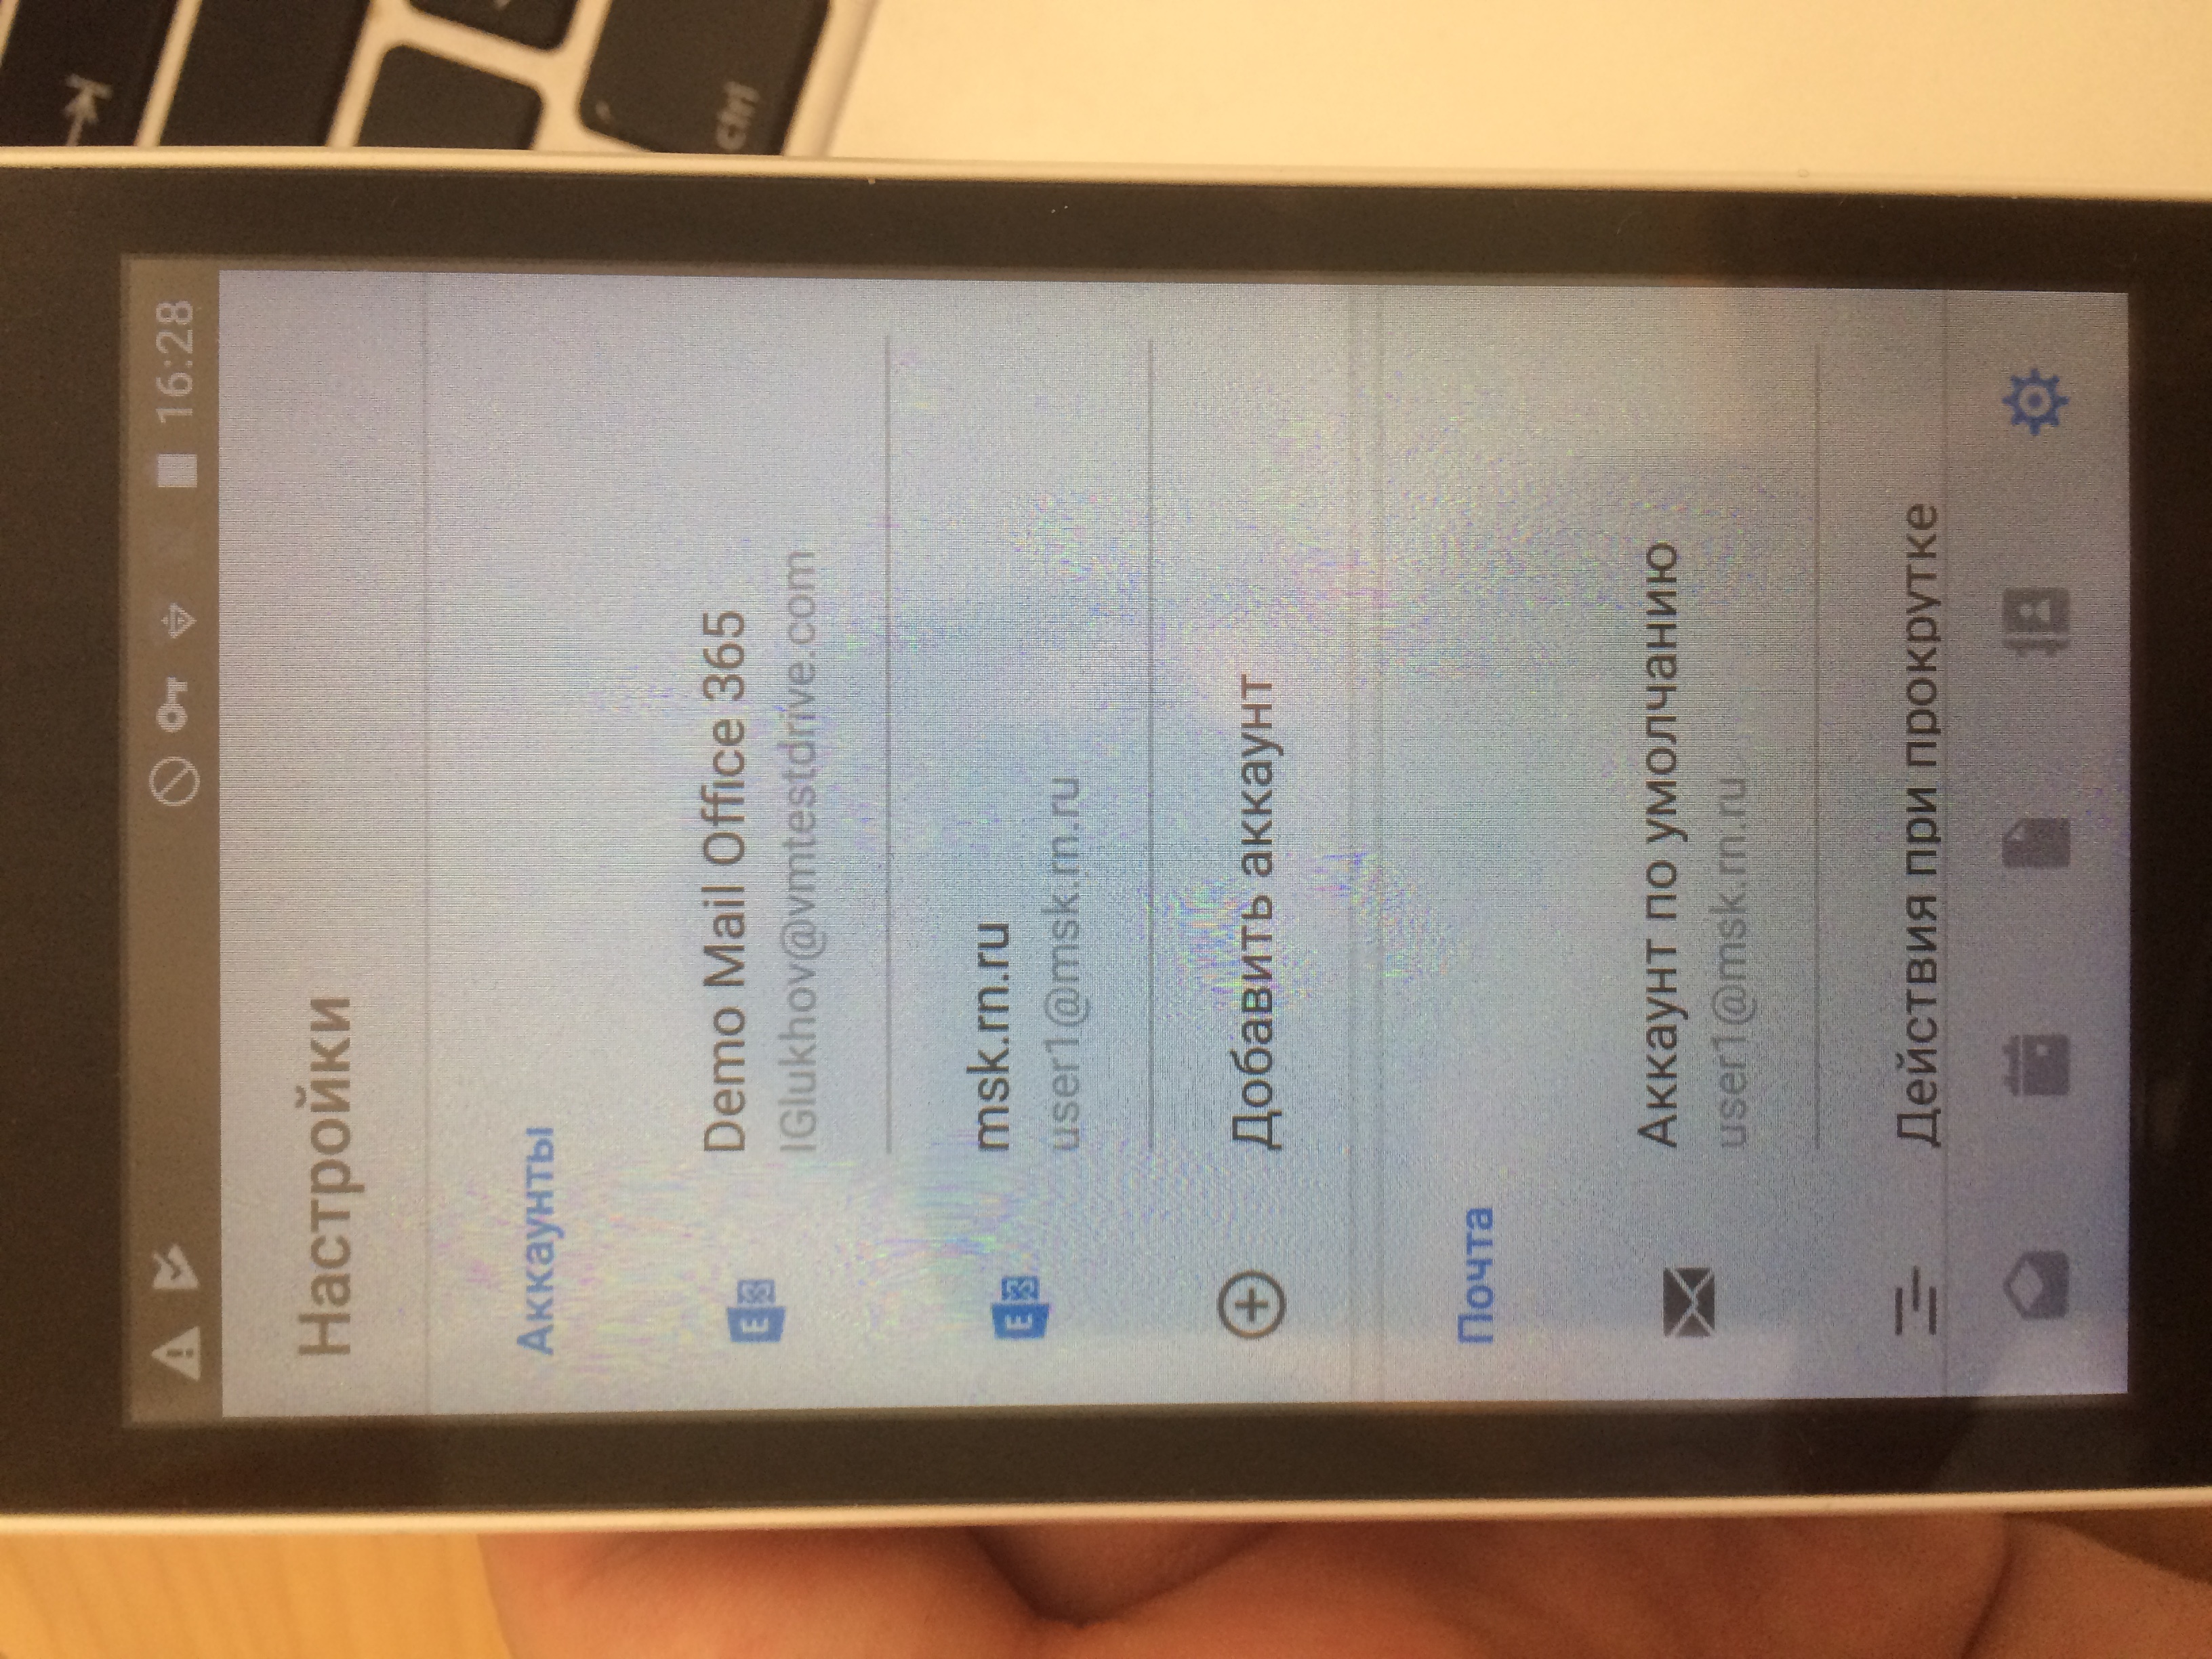
Choose Add Account (“Добавить аккаунт”) in Boxer left menu (IMG_1455.jpg)
Insert an address (IMG_1456.jpg) and later choose Manual configuration (“Ручная настройка”). Type -> Exchange Server.
See config in IGM_1457.jpg ang IGM_1458.jpg as an example of such a connection. It is important to choose SSL (Accept any certificates / “принимать любые сертификаты”).
Warning
After adding the account first time, Inbox may sync for a long time (>30min)
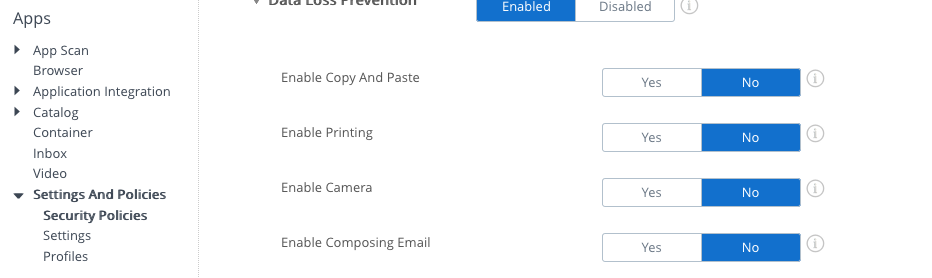
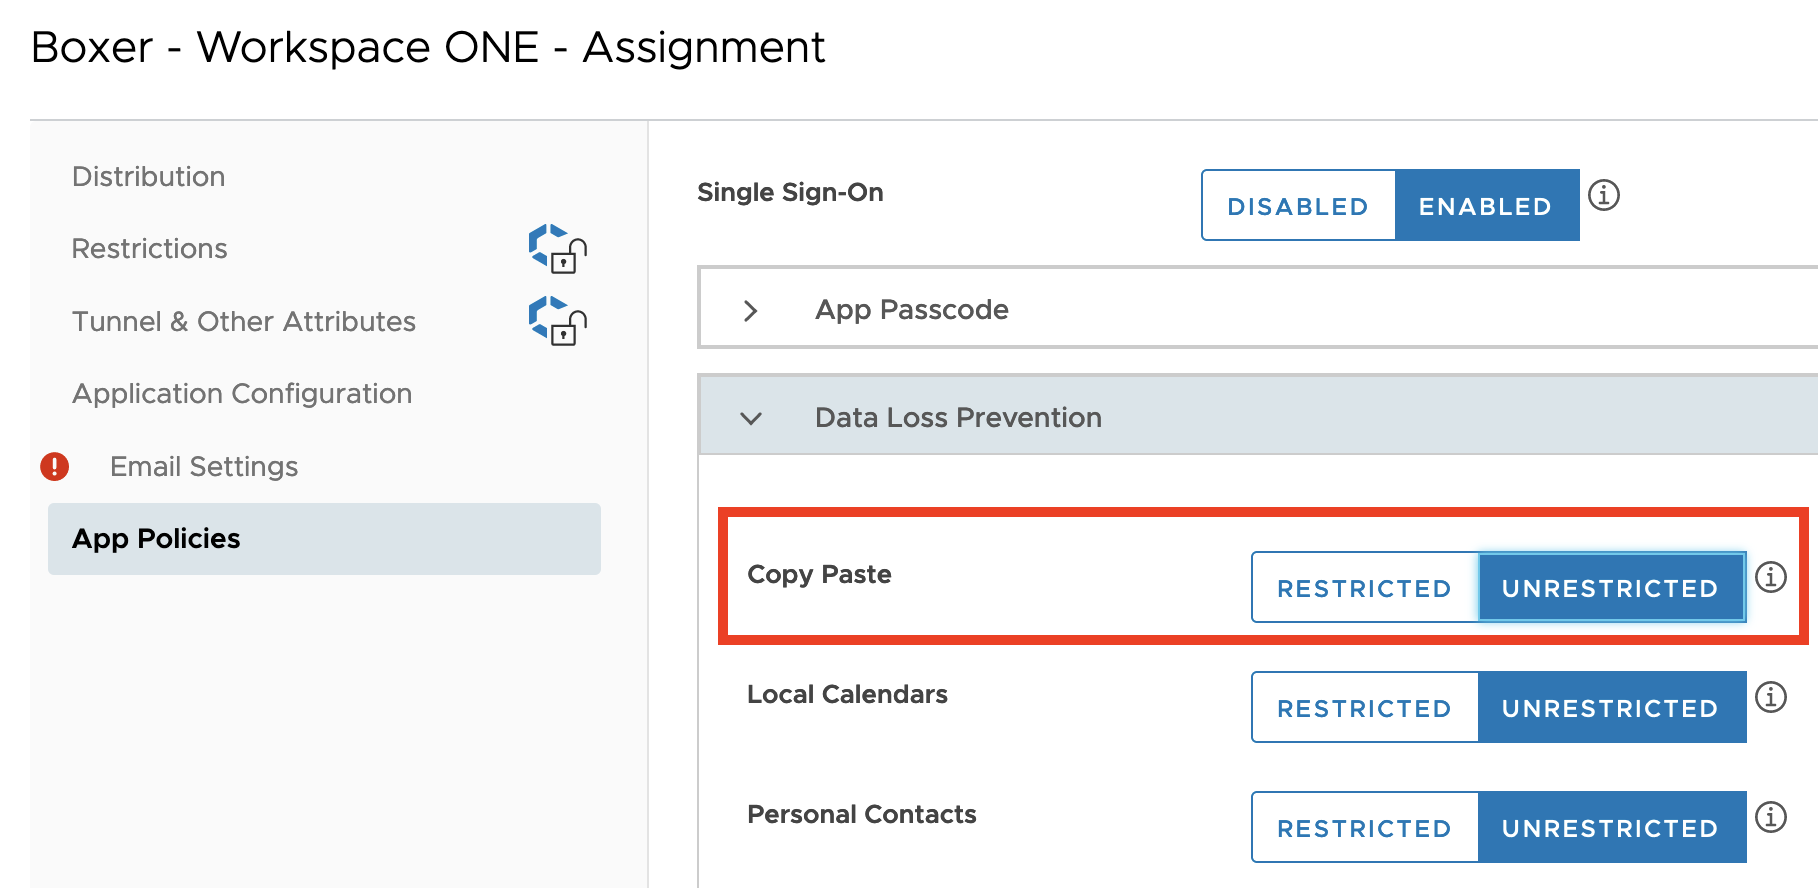
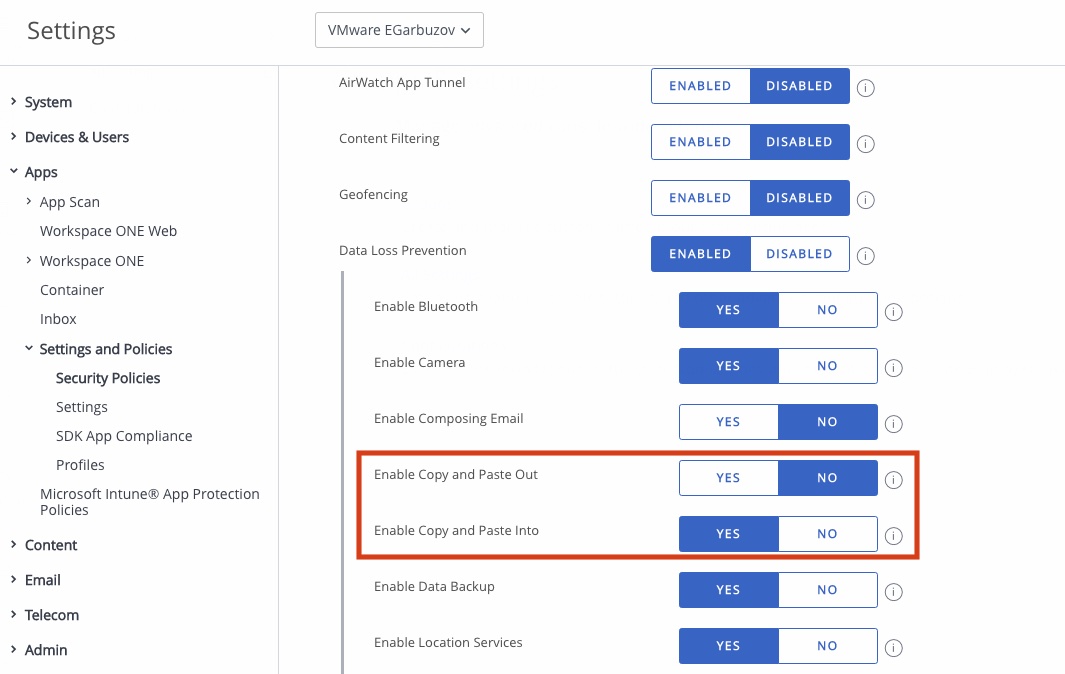
Unlike all other WS1 SDK-enabled Apps, Boxer has two different approaches to restrict Copy&Paste:
At the Assignment stage in App Policies, there is a Copy Paste setting. As a result, copy&paste functions will be denied in ANY directions
❗️Unrestricted personal mail accounts in Boxer still can be troublmakers in this case. Recommend to disable it
If you need to do more granular restriction you need to implement this on SDK profile
Recommended to set Native Boxer DLP capability to Unrestricted. It can be Restricted for potential more secure way, but SDK settings must be enabled after this settings
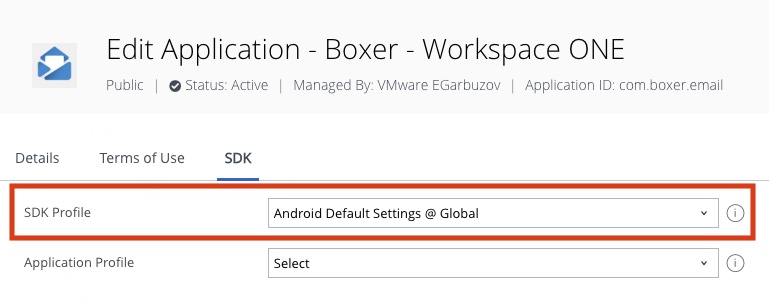
The Boxer App must be published with SDK-profile enable. We use the Default profile, but it should work with Custom SDK-profile as well
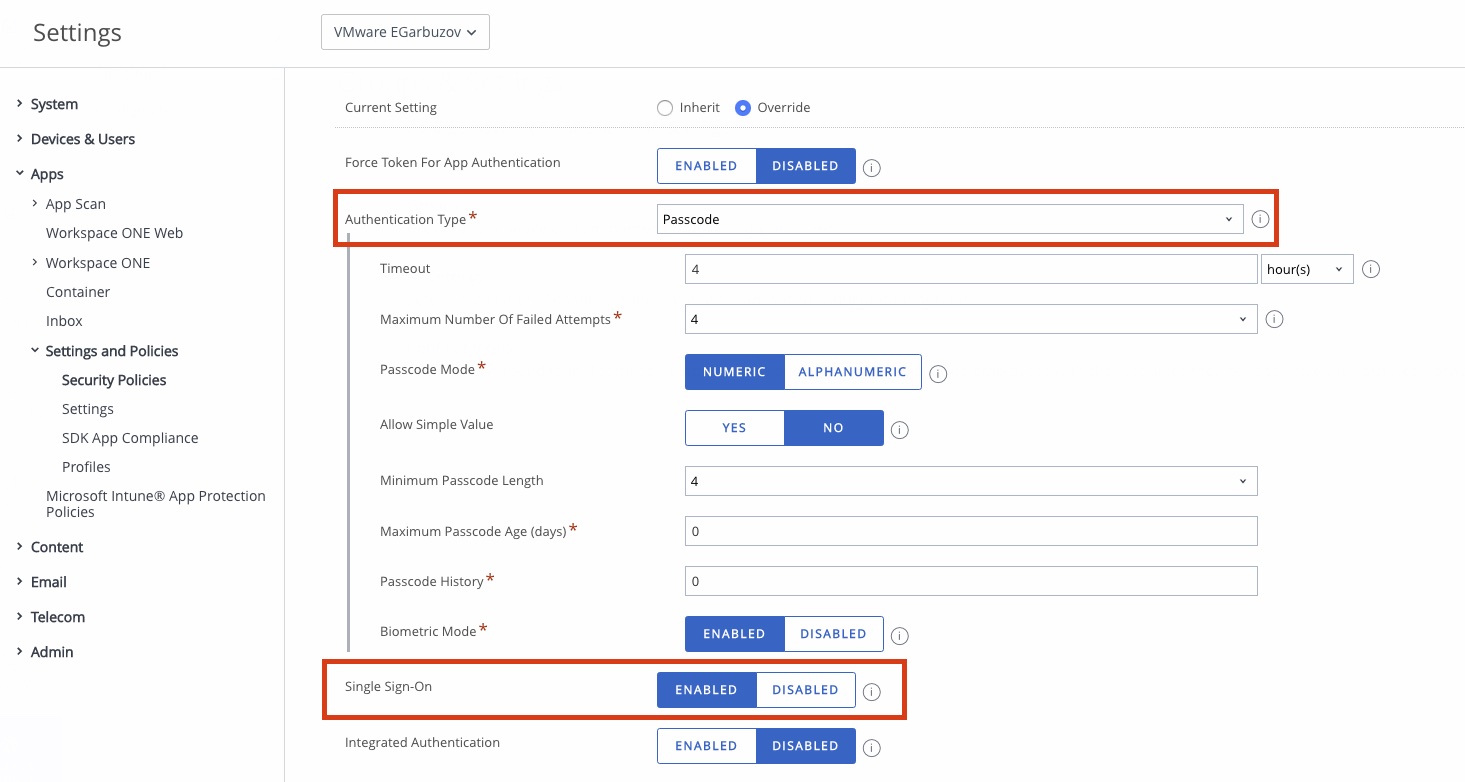
Before actual install Apps on devices, you need setup SDK-profile: Authentication Type =/= Disable; SSO must be enabled
In DLP section (Security Policies) you may enable Copy&Paste Into to get user possibility to copy from unmanaged messengers/notes/etc into Boxer emails
As a result, copy&paste functions will be denied only in the desired way: into or out from managed Apps
Following are the steps for fingerprint authentication on the Android Boxer app:
In the Apps SDK settings (Groups & Settings > All Settings > Apps > Settings and Polices > Security Polices), enable the Biometric Mode.
While deploying the Boxer app, enable the Application to use AirWatch SDK and Select the Global SDK for Android.
In the Email settings, enable the Application Configuration and enter “AppForceActivateSSO” (without the quotes) under Configuration Key and Value Type as Boolean and Configuration Type as True.
Make sure passcode is set as None
Push the boxer app to the device and download it from the Play Store
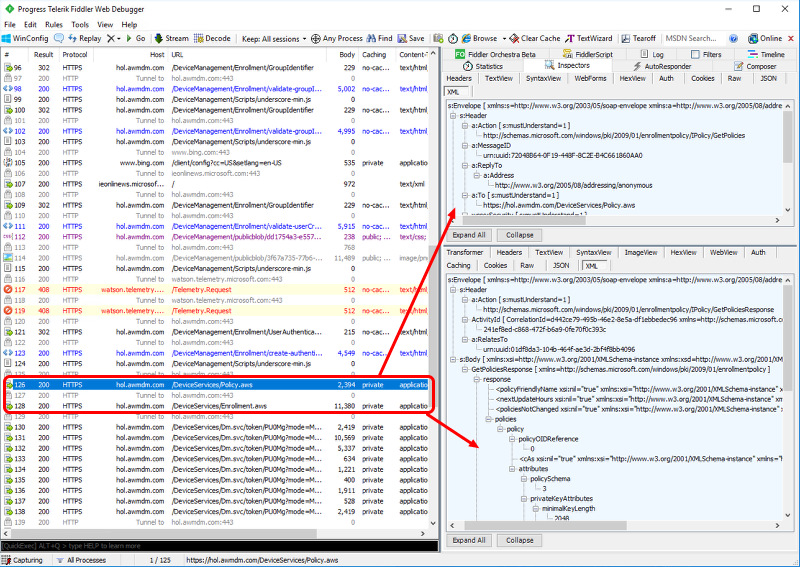
From time to time it may be useful to troubleshoot Boxer, Inbox, and native mail issues using Fiddler. Fiddler will let you log all of the traffic between the device and the email server/SEG, etc, end-point. This is useful in proving that communication is happening and that some errors are being generated externally from the device (401, 403, etc…).
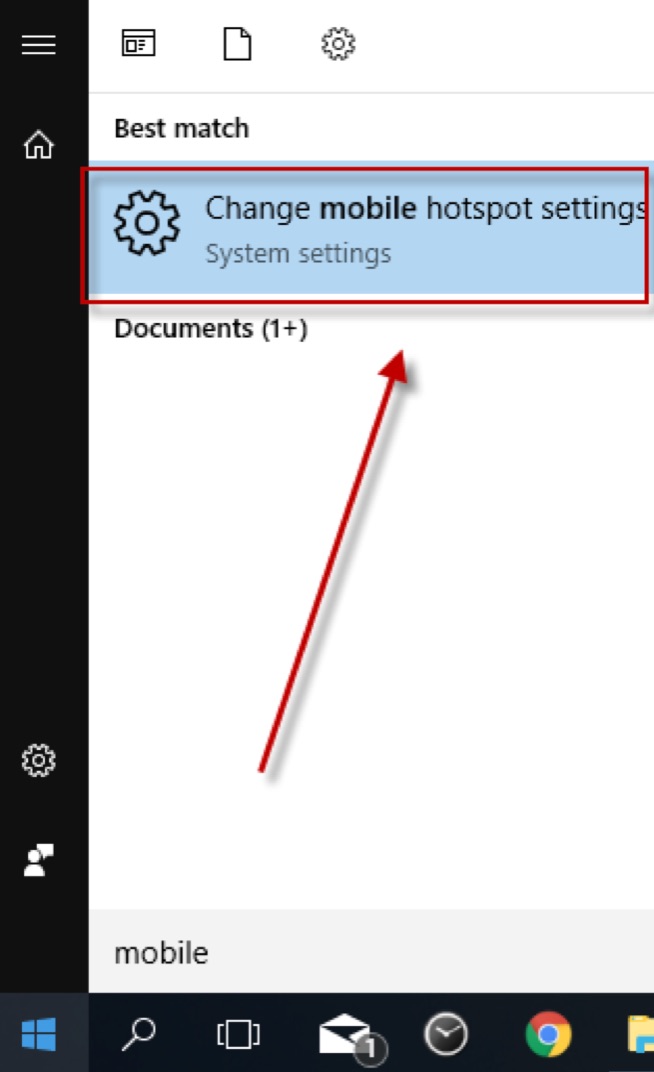
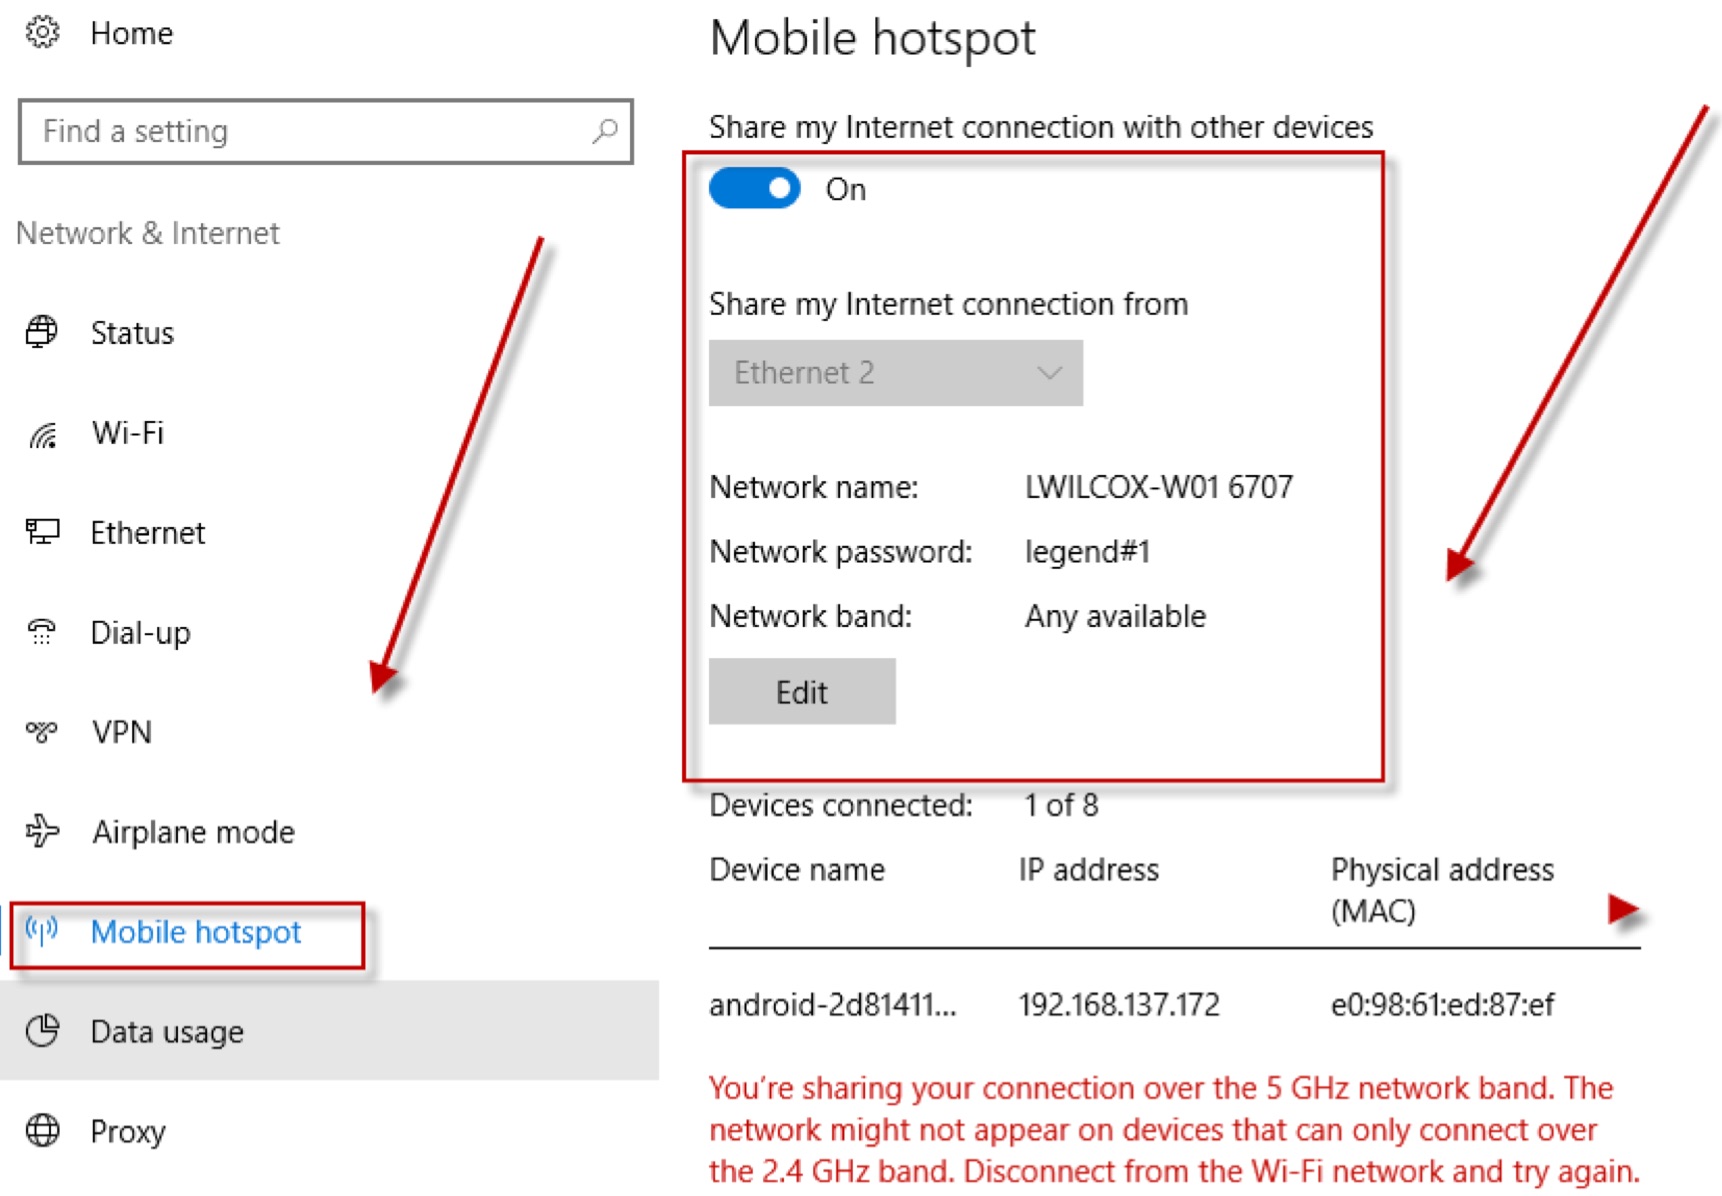
Configure the Windows 10 computer (which will act as the proxy) and an example Android device.
Set your Windows 10 computer up as a mobile hotspot. On Windows 10, click on the start menu and type in “Mobile Hotspot”.
Select “Change mobile hotspot settings”
• Configure your hotsptot settings and turn on the hotspot.
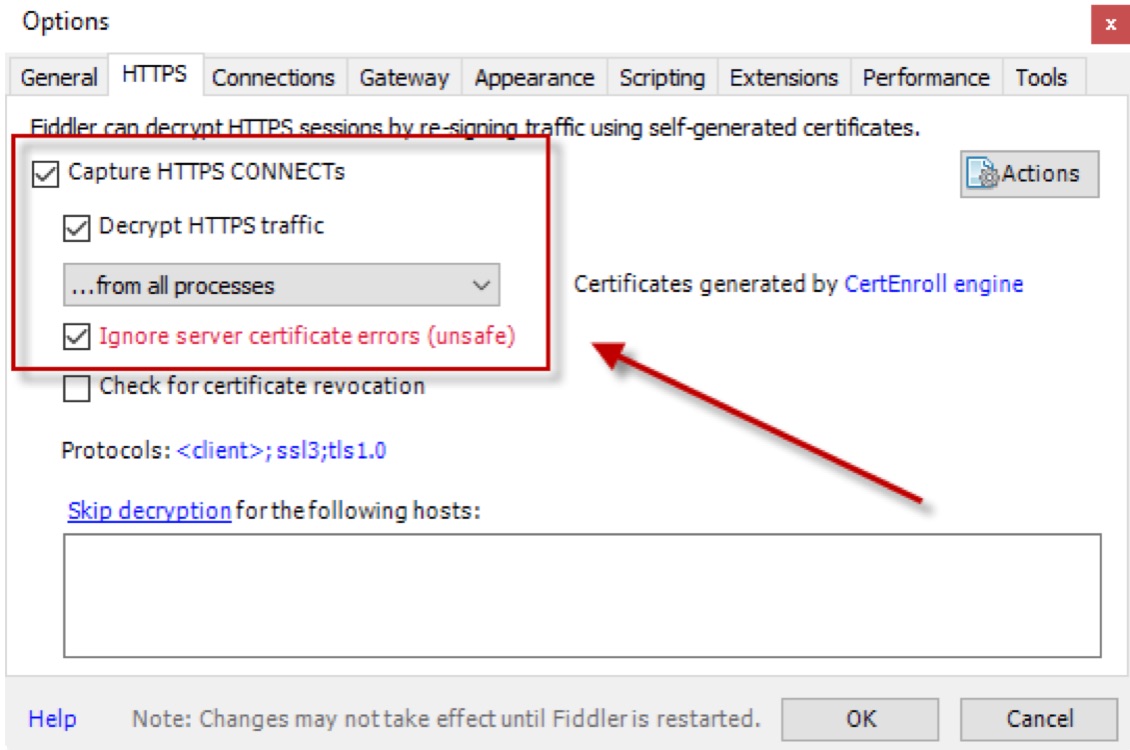
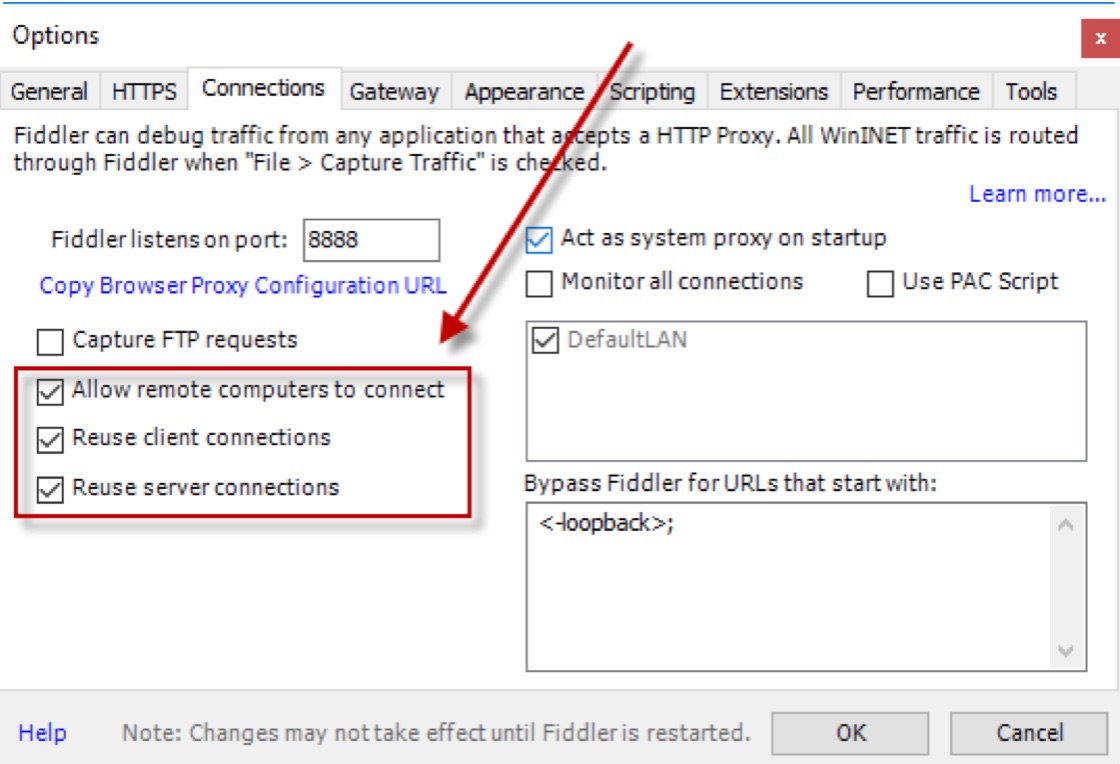
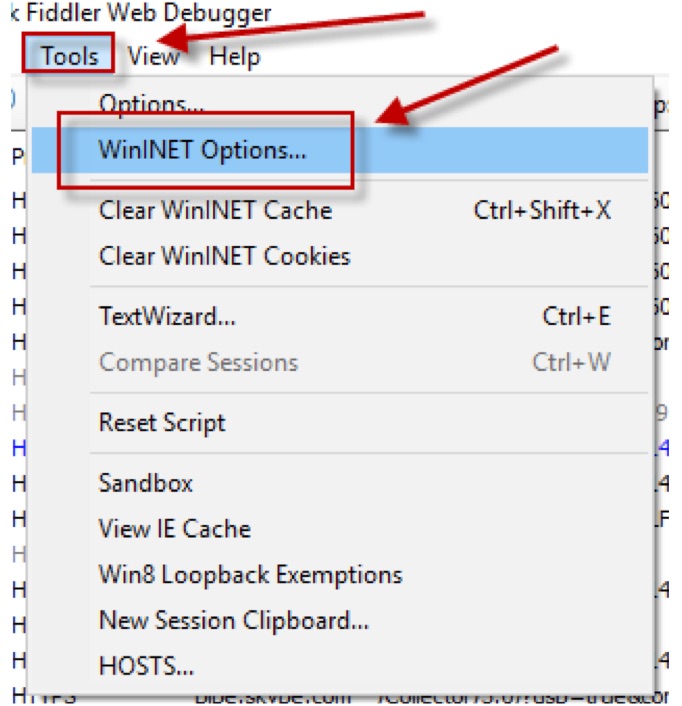
In Fiddler, go to Tools\Options make these changes. See HTTPS sub-option
Make these changes on the Connections sub-heading
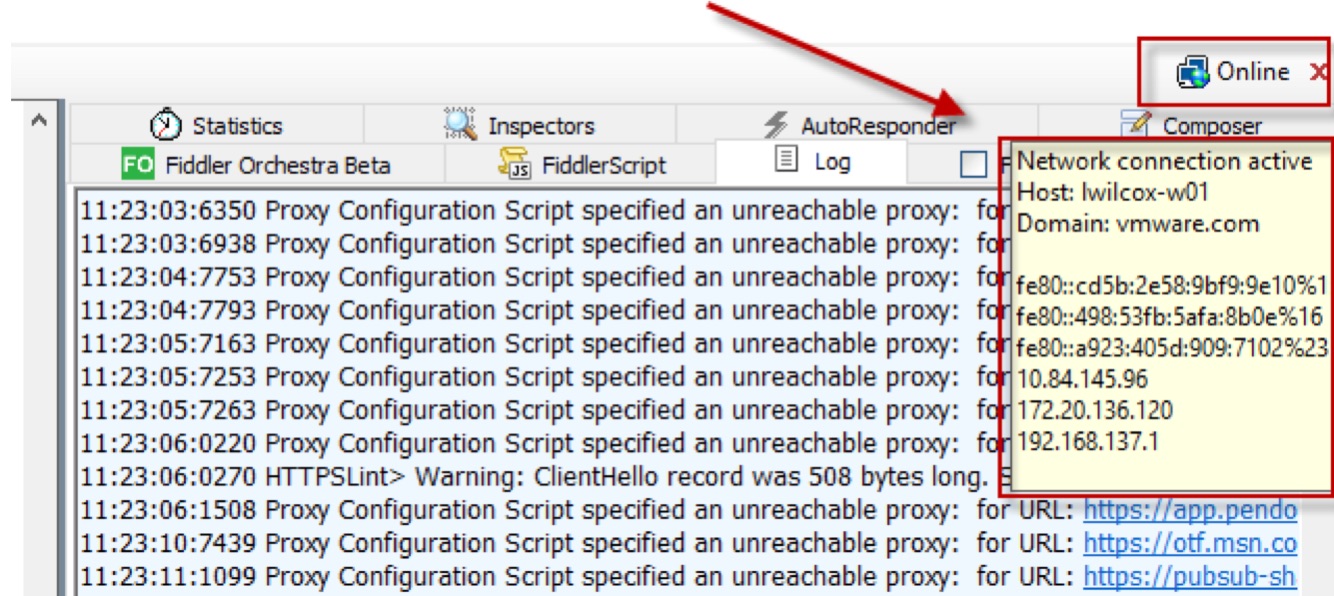
You will need your Proxy servers IP address to enter on the mobile device for later. To get this hover over the “online” option and view the list of IP addresses. In this example, I’ll be using 10.84.145.96.
Android
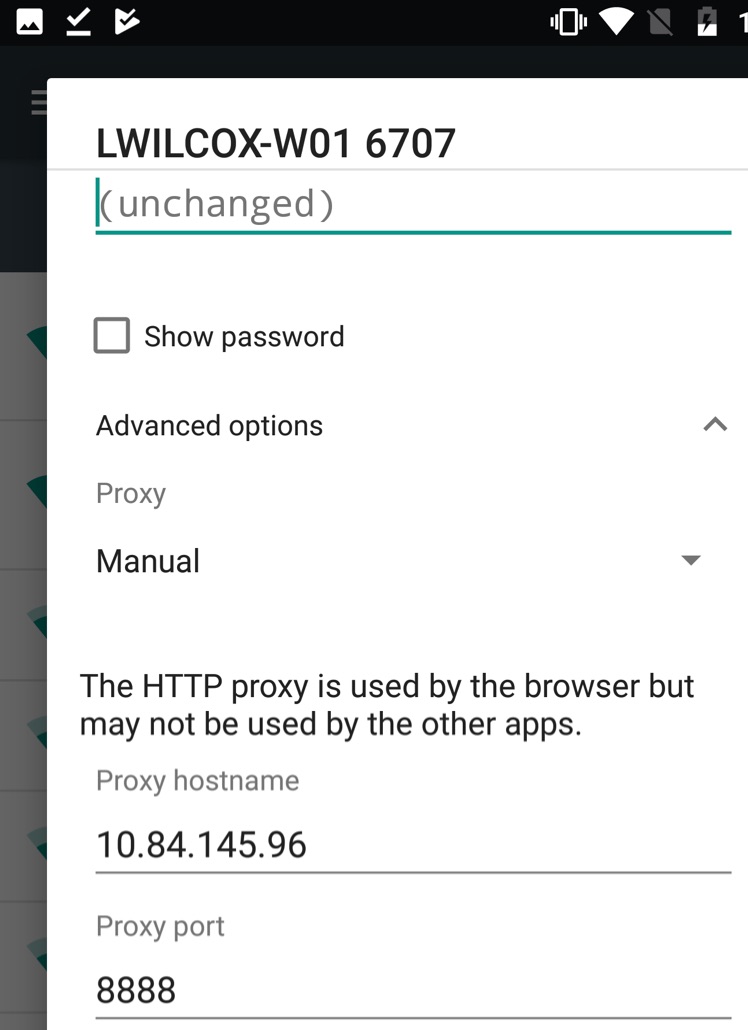
On the mobile device, go to your wireless settings and long tap the right-hand side of the connection you want to connect to. This will by the wireless connection you set up on your computer. On Android, click on “Modify Network”.
Enter the proxy hostname and proxy port information. The port will be 8888 if you kept the default settings for Fiddler.
iOS
On iOS use the following process to set the proxy
How to configure your iPad/iPhone proxy settings
Start the iPhone/iPad.
Tap on the Settings app. …
Tap on the Wi-Fi settings category. …
You will now be at the Wi-Fi network settings screen for the connected network. … 5. Tap on the Manual button. …
When you are done setting up your proxy server, tap on the Wi-Fi Networks button.
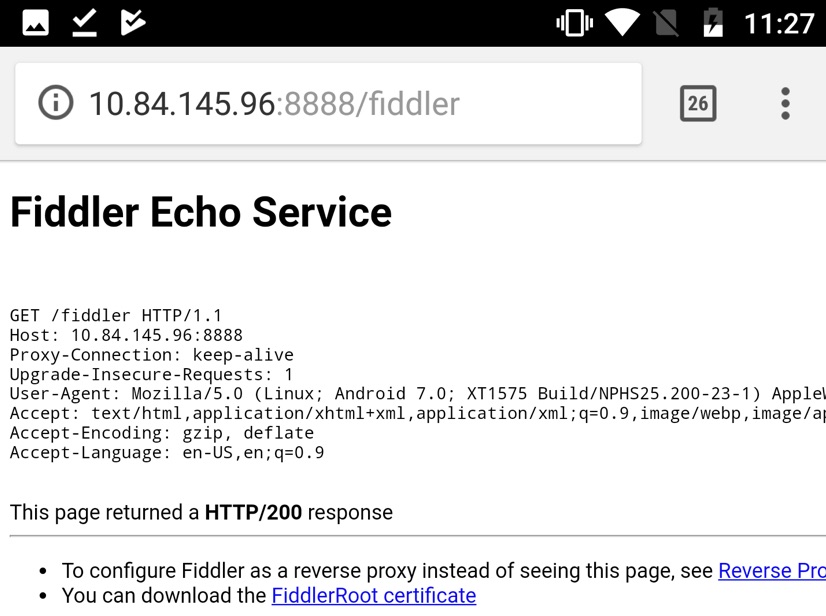
On the mobile device, go to the IP address of the proxy followed by :8888/fiddler. See the example below. Click on “FiddlerRoot Certificate” to download and install the certificate.
• In the Fiddler application, click on Tools\WinNet Options.
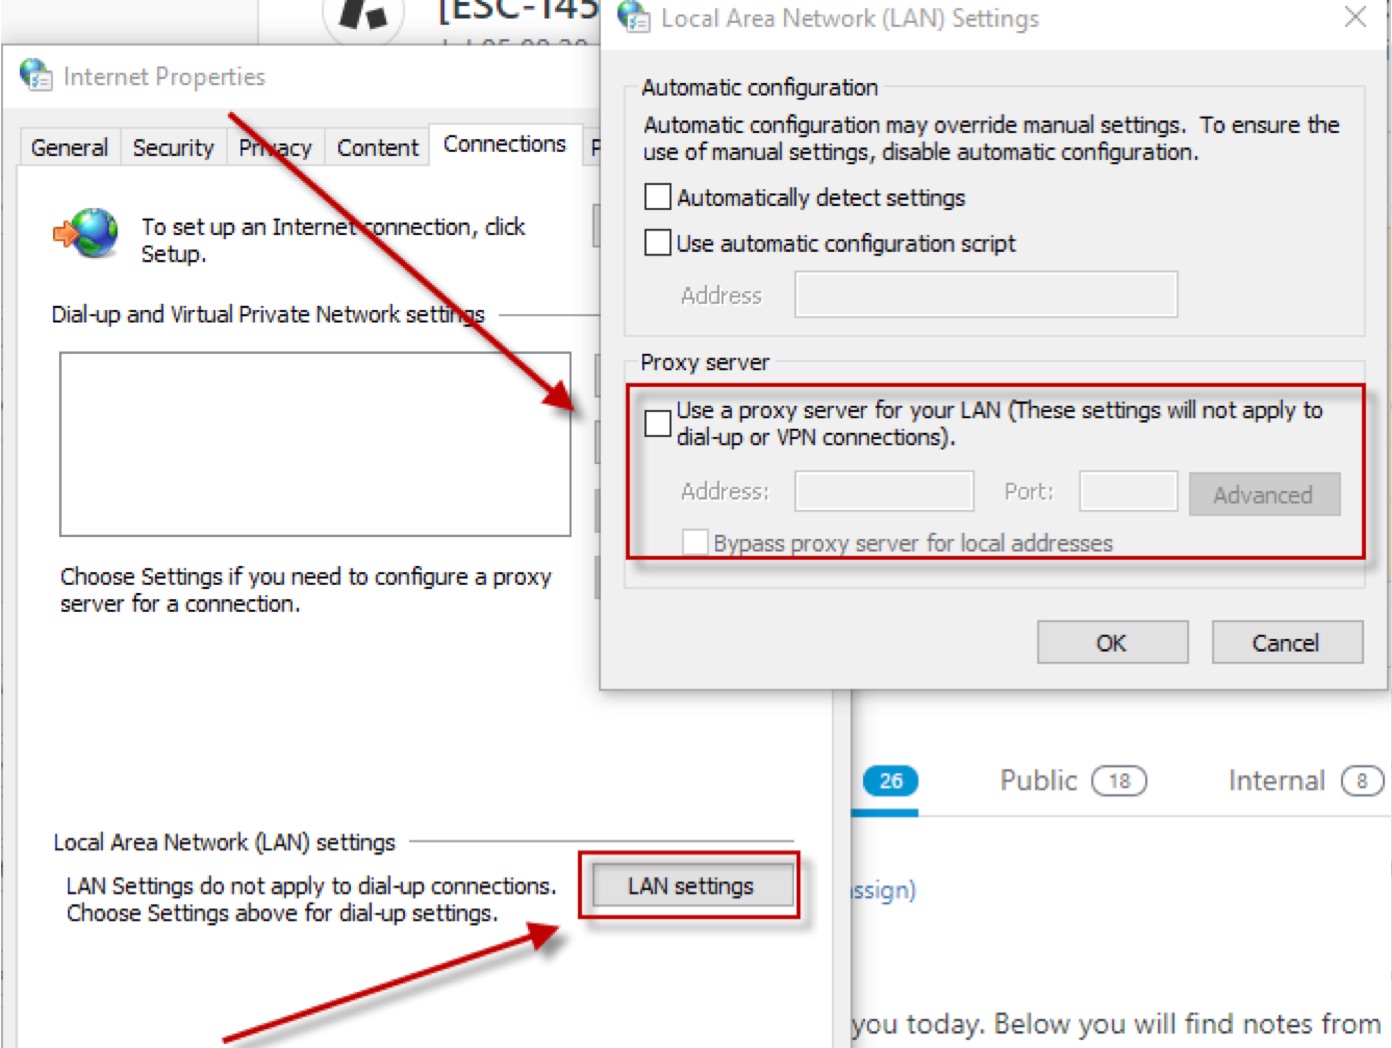
Click on “Lan settings” and uncheck the “Use a proxy server…” from the following window.
Click OK and OK. This will show a yellow bar on the Fiddler application indicating that it’s not collecting any traffic from the local computer in the logs. For your test, you will only want device traffic.
You can clear the current logs by doing a CTRL-A and selecting everything.
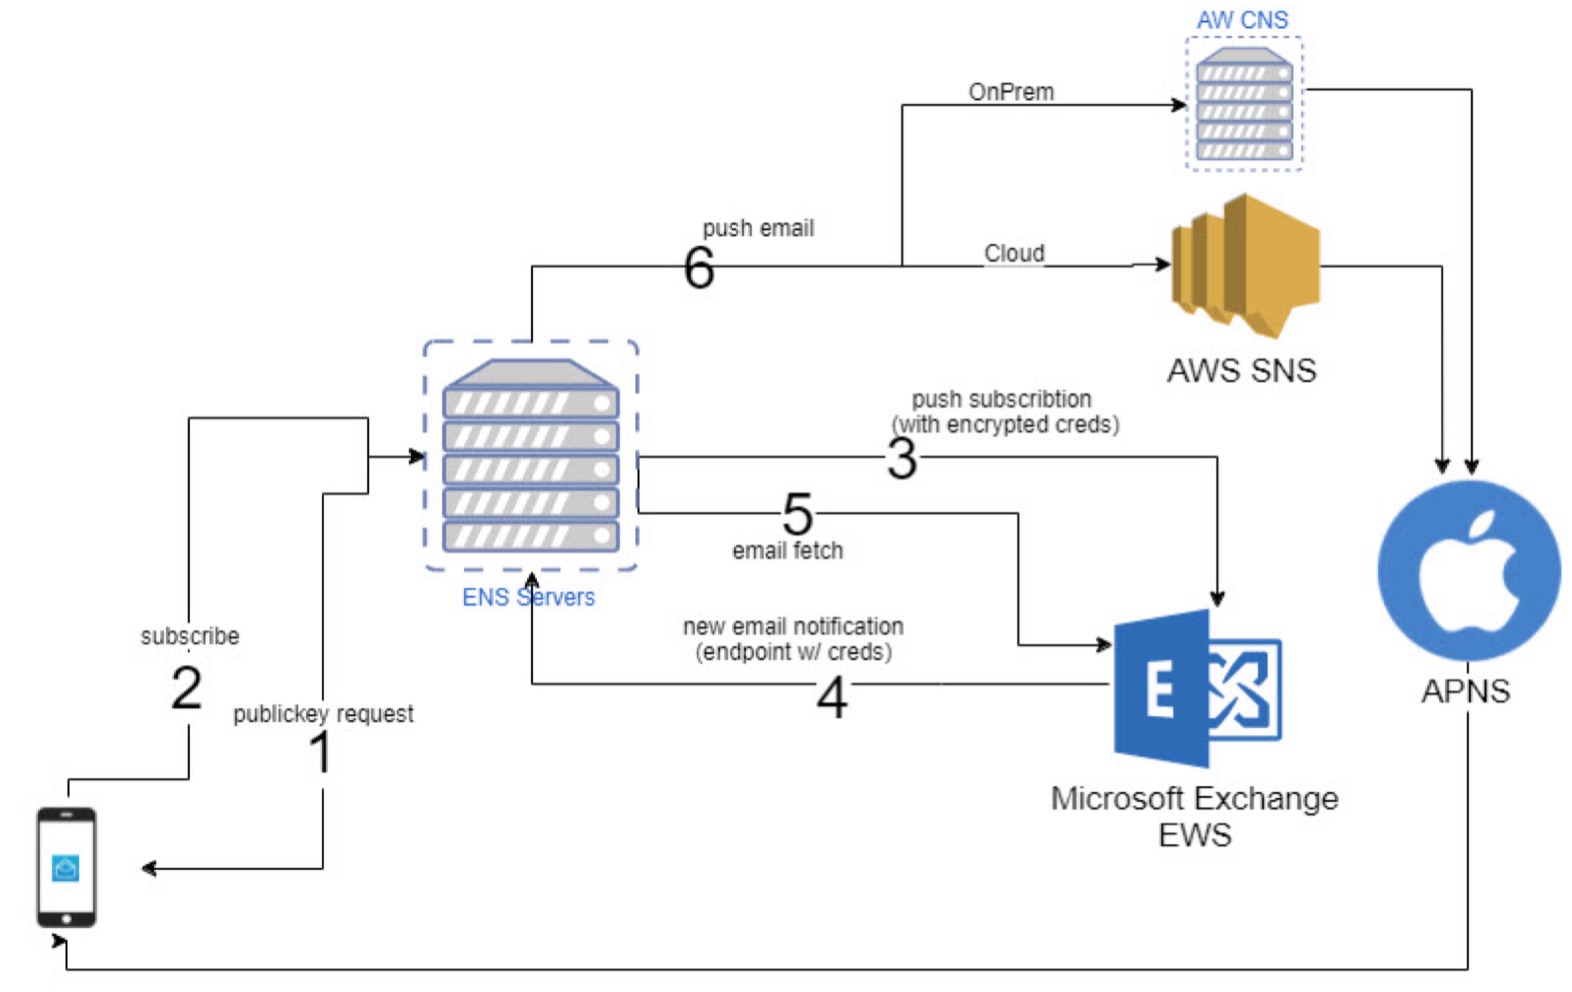
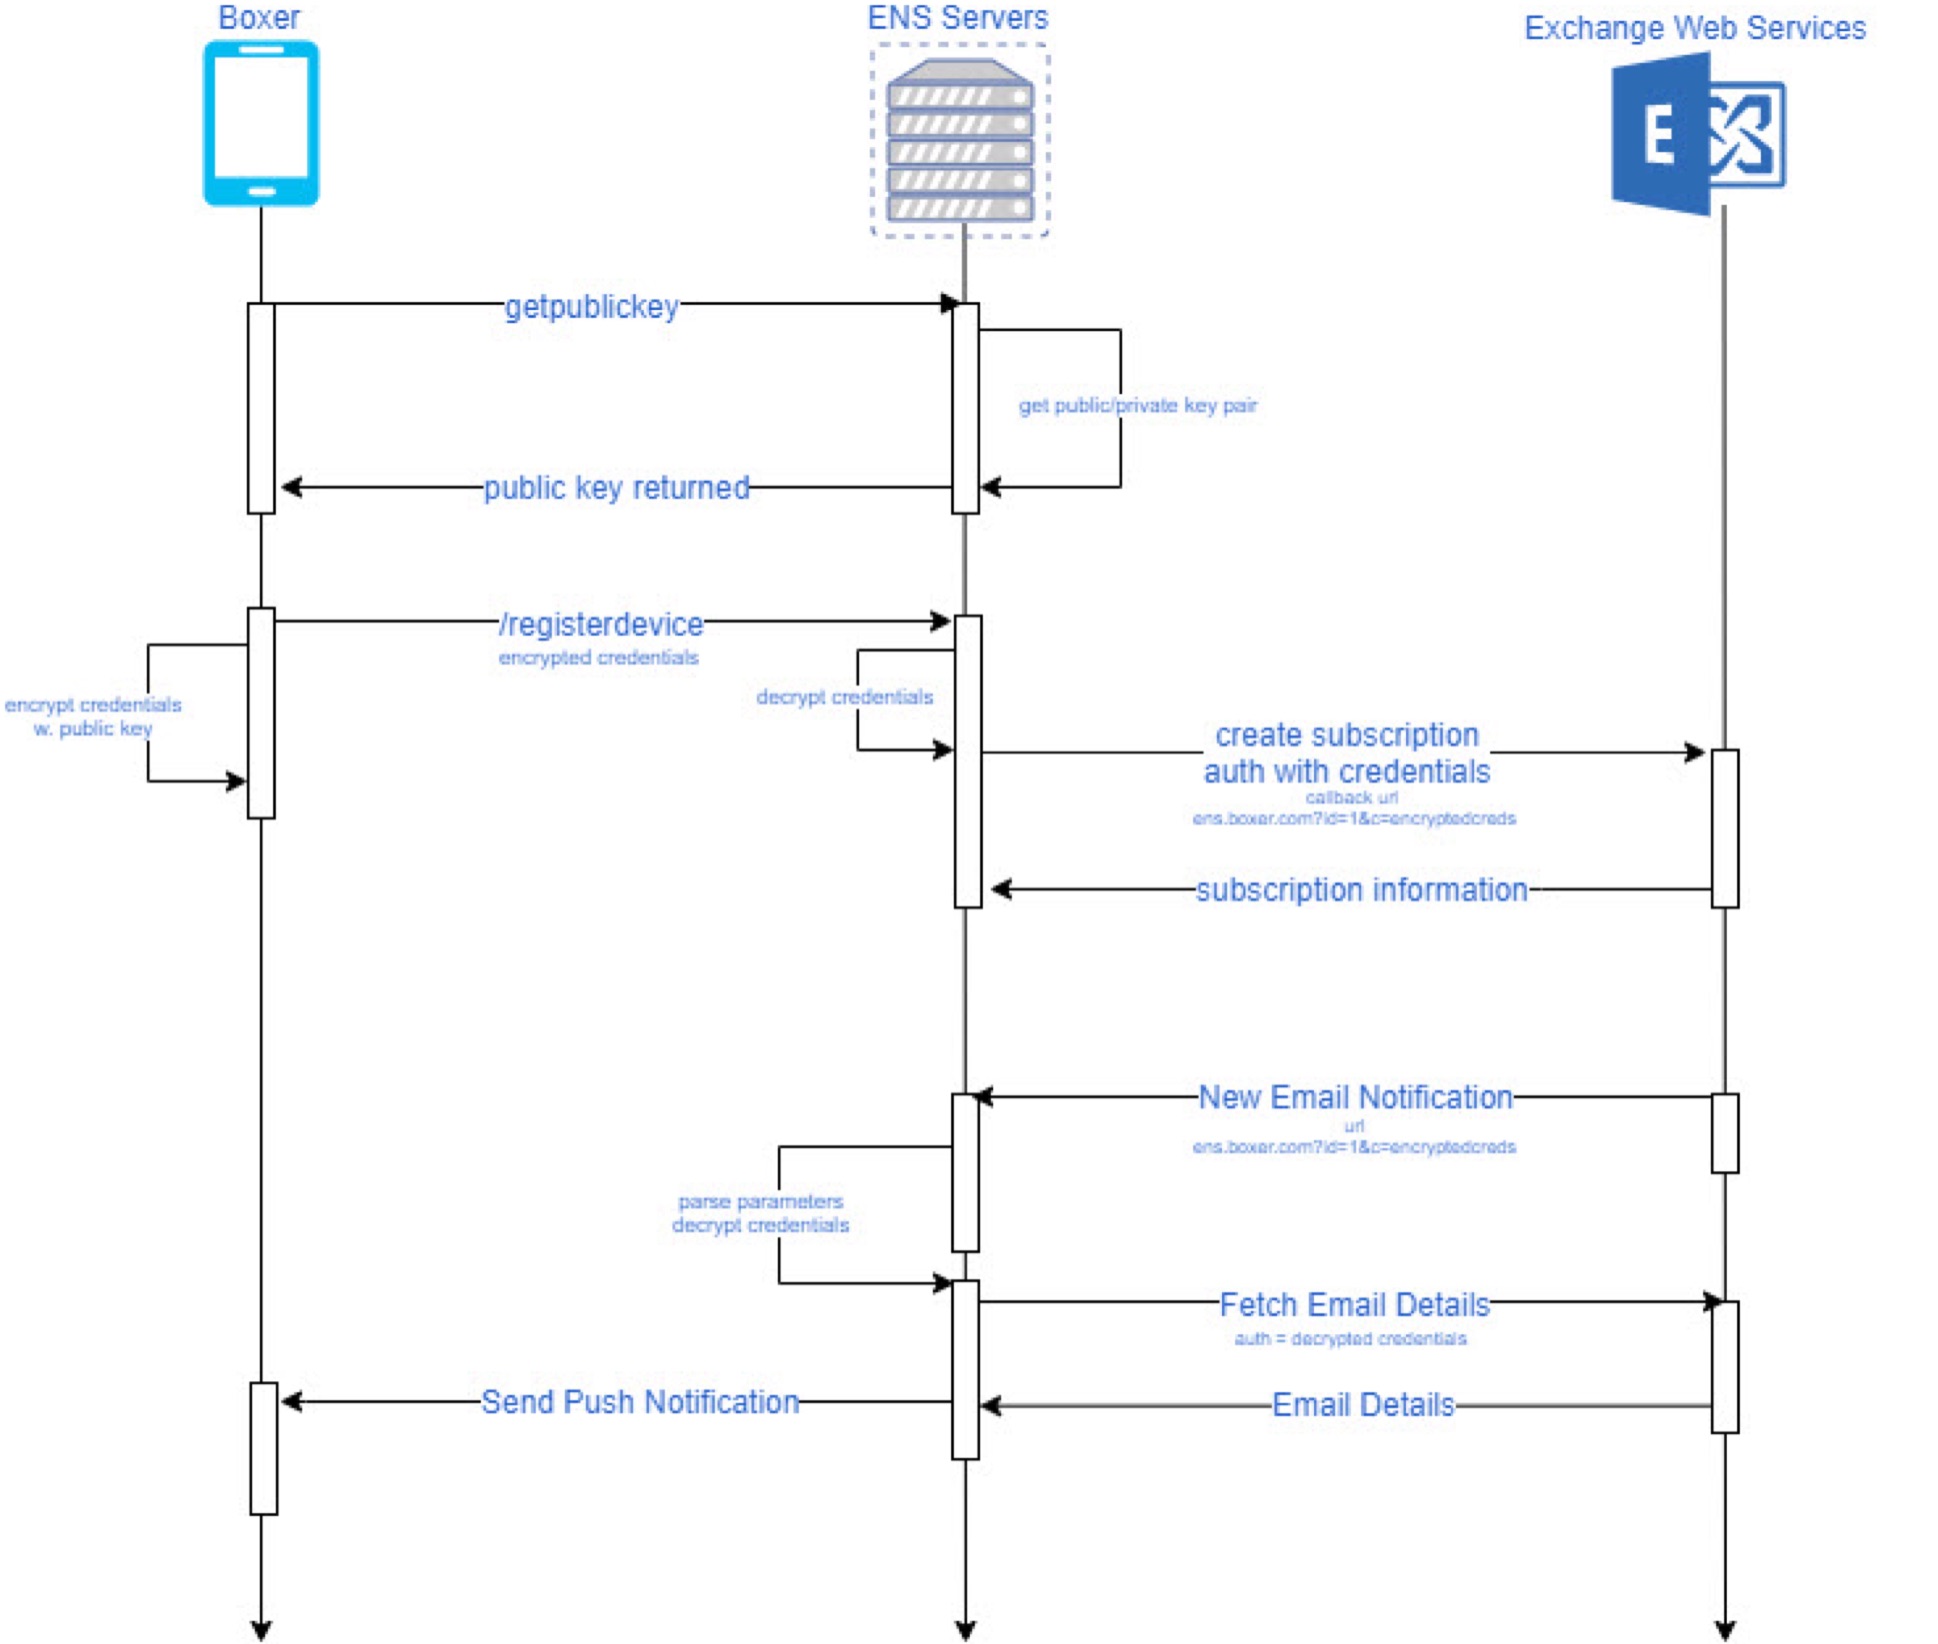
publickey request
a. The device requests a public key to encrypt the account credentials with. It sends a hash of the email address as the userid. This helps identify the user and link together all user devices
subscribe
a. device sends encrypted creds, user id (server created) and device apns token so ENS server has all the necessary pieces to subscribe and get notifications of new emails
push subscription
a. ENS discovers endpoint based on creds and subscribes to exchange using a webhook link that contains the encrypted credentials ie: ens.airwatch.com/notify?id=&creds=<Base64(RSAEncrypted(username:password))>
new email notification
a. Exchange sends notification of changes to the provided url.
b. ENS extracts and decrypt creds and prepares call to fetch email
email fetch
a. ENS performs a fetch for the email
push email
a. ENS finds user devices with the user id and pushes email details to CNS for delivery to all user devices
The following diagram shows in more detail a registration/new email interaction between the client, ENSv2 and the exchange server. This diagram shows in more detail how we can use credentials without keeping them saved inside the ENSv2 environment.
ENS may cause errors in case of date mismatch Ensure that server, DB, etc have US English locate!
Boxer - Add Assingment
Network
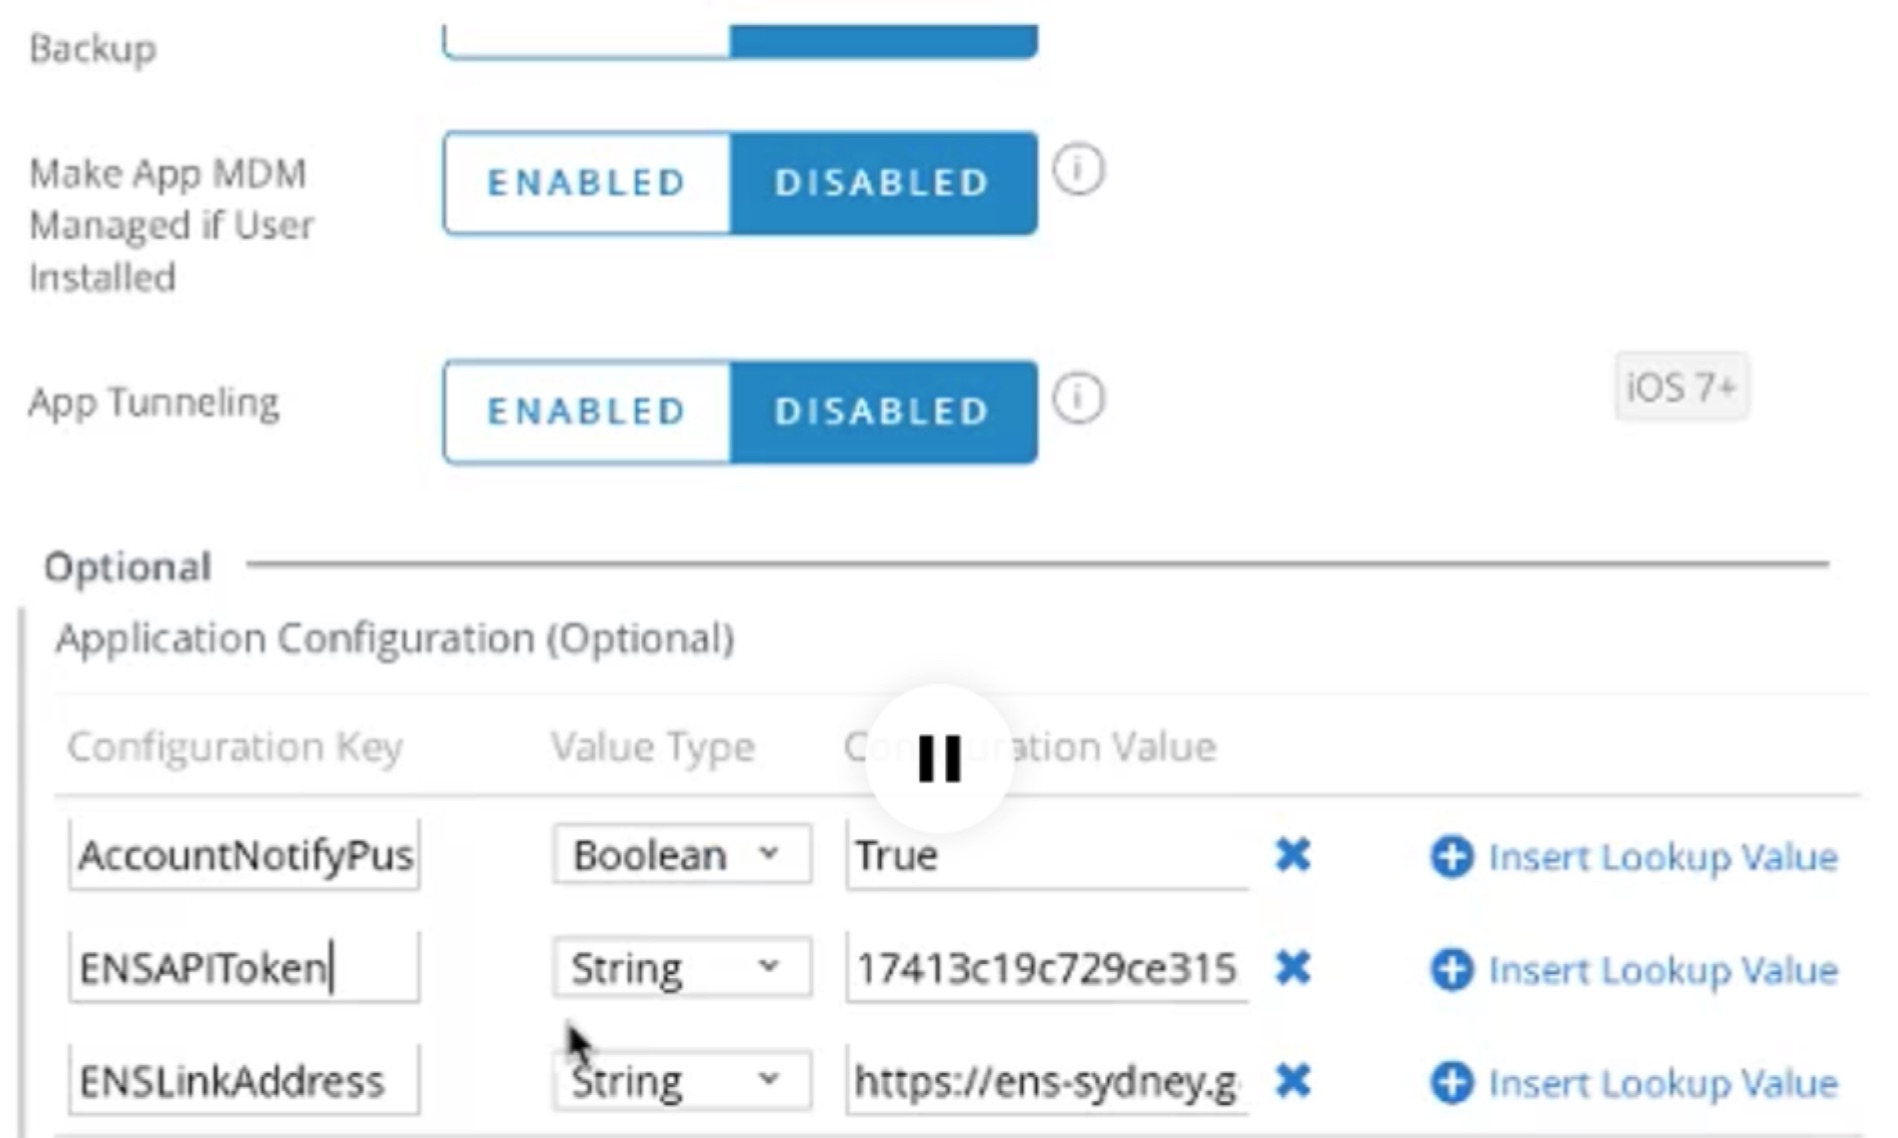
ENSLINKAddress On-Premise, should point to the externally accessible hostname pointed to ENS service. A support ticket has to be made with VMware Airwatch to request API token (internally the support reaches out to Boxer product manager and requests API key).
MS Exchange Server
User agent is configured for ENSv2 on MS Exchange Server CAS role. User agent must have access to receive data from MS Exchange, or ENS will not be able to receive PUSH notifications.
Troubleshooting
ENSLINKAddress for On-Premise installation should point it correctly to the customer’s externally accessible hostname pointed to ENS service.
Autodiscovery errors showing on logs.
Make sure that the EWSUrl key is configured in the console with a correct value for the EWS url for their exchange environments.
Test it out by opening it on the browser and making sure you are prompted for credentials.
Tip
Alternatively they can just turn ON autodiscovery on their environment.
Authentication errors (401s)
Check what type of authentication is enabled in EWS? Make sure it has parity with whatever they are using for ActiveSync (Basic, OAuth, CBA) as Boxer will be the one to pass whatever type of credentials it has to ENS to use against EWS.
Verify the EWSUrl is correct and resolves to Exchange environment and test the credentials used by navigating to the EWS URL and testing them there.
Try the Exchange Server or Office 365 tabs accordingly
ENSv2 not sending notifications but no logs found on help portal.
Verify the ENSAPIToken key is correct in the console configuration.
Verify the ENSLinkAddress key is correct in the console configuration
Tip
Try appending the “alive” endpoint for the environment and make sure it responds.
Verify the EWSUrl is correctly configured with a valid EWS value.
Verify that ENSv2 servers have inbound access to their EWS environment (firewall may be blocking access, they need to open the corresponding IPs)
Verify that EWS can send outbound traffic to the corresponding ENSv2 domain (https://.getboxer.com/api/ens)
General FAQ
**How are credentials or authentications tokens handled?
**
Although the client does share the credentials/tokens with the ENSv2 environment upon registration, they are not kept (saved anywhere) by AirWatch servers. Rather, the Exchange server passes them back to AirWatch, encrypted, as part of a notification it sends whenever a new email is available. From that notification (Exchange -> ENSv2), ENS decrypts the credentials and uses them to make any requests necessary to the Exchange server. After performing any necessary requests, the credentials are once again discarded.
Warning
Bug in MS Exchange detected: Exchange returns the email information even though the user is not the owner. This results in the notification payload being created for the wrong user and ultimately another user seeing the notification.
With ENSv2 1.2+, a new service object is created for each EWS request. This will prevent the application from making a request to the EWS endpoint with different credentials.
Patch for Exchange needed from Microsoft on this, since this is unexpected Exchange behavior.
If credentials are not persisted, is there any data persistent at all by ENS? How is it secured?
There is a secure database that keeps a list of devices and a list of public private key pairs used to unencrypt the credentials when they come from Exchange;
Logs are also kept to aide in debugging issues and monitoring the system. These don’t contain any customer’s private information and access to them is also tightly secured via account permissions.
What data is transmitted through the ENS server without being persisted? How is it secured?
User credentials (encrypted with RSA encryption)
Email subject and sender (sent via HTTPS)
All communication is done via HTTPS
What additional cloud services does ENS depend on?
AWS Simple Notification Service (SNS) for push notification handling.
Apple Push Notification Service (APNS) as it is the only way to pass notifications to Apple devices.
AWS Relational database service (RDS) for data persistence.
What is the user agent used by ENSv2 when sending requests to Exchange?
MailNotificationService/v2 (ExchangeServicesClient/15.00.0913.015+ (will change as new libraries from Microsoft are released)
What email folders does ENSv2 monitor for incoming messages and actions?
Currently, ENSv2 only monitors each user’s Inbox folder.
Load Balancing ENSv2
For HA, it is recommended to load balance several ENS web servers as needed following the Hardware Requirements. All web servers should point to the same database server as this will be their shared source of state for each of the clients.
Since the ENS web application itself is stateless there are no requirements to configure any session handling (stickiness) in the loadbalancer so a straightforward configuration should suffice.
According to Boxer User Guide for iOS 4.5.1, Boxer User Guide for Android 4.5.0
Main features
Edit
Reply
Reply All
Forward
Copy-Paste
Modify recipients
Extract
Print
Export
Content Expiry Date
Other Features
Press and hold an email message to copy and paste it into the application.
You cannot copy data from the Boxer application and paste anywhere outside the application. However, you can copy data from outside the application and paste into the Boxer application.
If your email message has contact number details, tap hold on the number to immediately dial it.
If restricted by your administrator, attachments may open through the VMware Content Locker and other AirWatch approved apps. Hyperlinks may open only through the VMware Browser.
If configured by your administrator, you can preview emails and their attachments within Boxer (See Boxer supported files’ types).
On the attachment preview screen, the Share icon will be unavailable. When tapped on Share icon, you are presented with a toast message “Disabled by your admin”.
After performing an action on an email while viewing it, you can have Boxer either advance to the next message, the previous message, or return to the conversation list. This setting can be configured from Mail settings (navigate to Settings > Mail > More mail settings > Auto Advance).
RMS Attachments
Boxer does not open RMS-restricted attachments - it transmits them to Content Locker. To use Content Locker on iOS device, the following has to be done:
Root certificate must be placed on device
In new iOS version the root Trust has to be ACTIVATED in a special menu option
In order for Content Locker to access RMS attachments, it must be registered on the ADFS server with this command:
Example:
Client ID for VMware Content Locker for iOS is e9fcfce0-a20b-4d34-b580-909332723090
Tip
Client ID of application can be found in ADFS logs: every error Content Locker gives while trying to read a RMS-secured attachment is followed by its’ current Client ID.
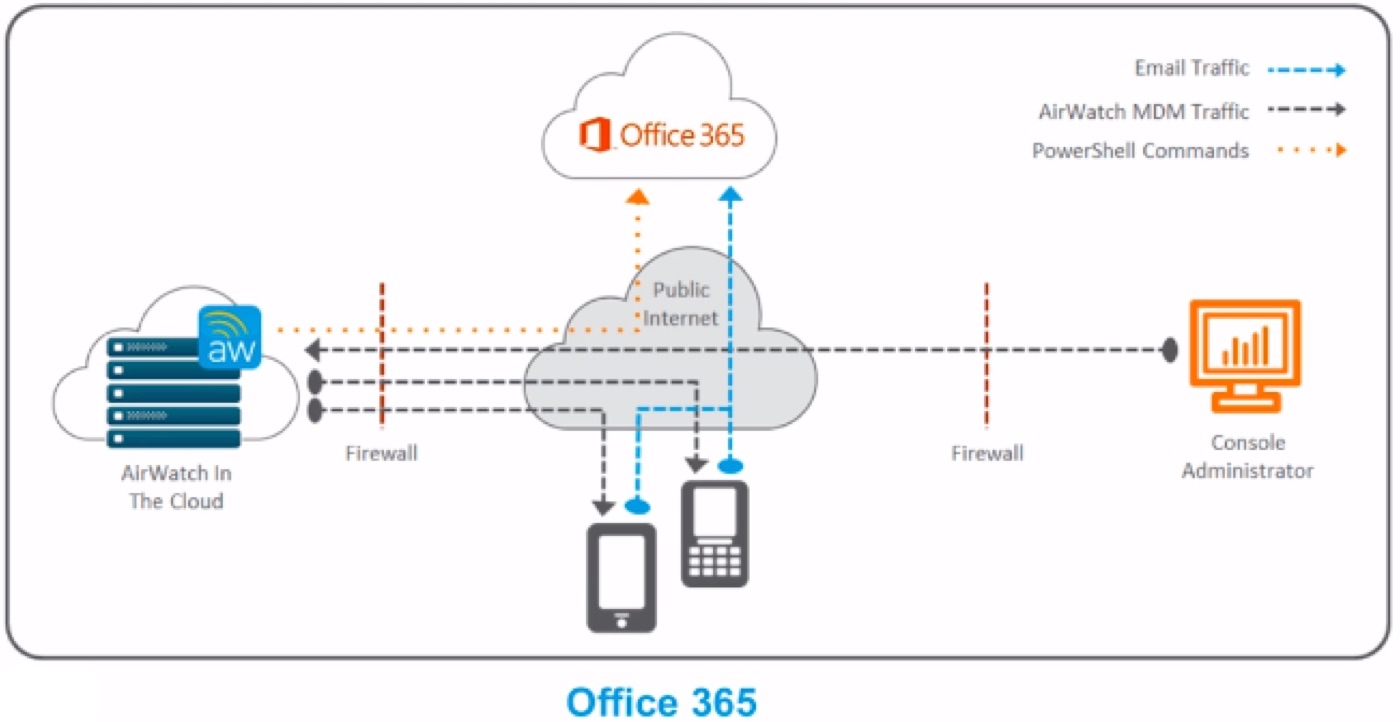
Disable the native access in O365 -> redirect to WS1 UEM
First-time access will be denied, PowerShell command will be sent to O365 to whitelist the device, 2-3min later the email will flow
Set WS1 UEM as IDP to control other ways of accessing (Exchange Web Access, OWA etc)
This lacks some features (encrypt attachments, strip attachments etc), but can be mitigated using Boxer Needs ESC between Cloud AW and On-Prem Exchange
AW-PS Service Account
Remote Shell access to the Exchange Server associated mailbox on the server to issue remote commands
Required PowerShell roles: Mail Recipients
Organization Client Access Recipient Policies
Settings –> Email –> Email Settings Configure - Direct
User selects device and clicks allowlist/ blocklist action
Meg Queue Service sendsends allowlist/ blocklist powershell command to Exchange server appropriately 3. Meg Queue Service updates database to show your device status on email dashboard
Webconsole Log
Blocklist event:
After admin click Blocklist action for device, webconsole receives blocklist event for processing. Log prints device properties as described below:
MEMConfig - Email Settings used
Device Count - Total number of devices blocklisted
MEG Queue receives blocklist event for processing from webconsole. Device properties are printed in log identifying your device as shown below.
MemConfig Id - Email Settings used
MEMDevice Id - Email Device Record Id
number of devices - Total number of devices blocklisted
EasDeviceIdentifier - Exchange Device ID
User - Email user
AccessLevel - Email access status
Reasons - Reason for allow\block device
Lg - Location Group ID
Device Id - AirWatch device id
Sync Mailboxes action is processed by webcosole and sent to MEG Queue for processing.
MEG Queue Service invokes powershell fucntion to retrive all mailboxes.
It then invokes powershell fucntion to retrive all EAS devices.
Mailboxes and devices and reconciled and MEG Queue saves EAS device data to AirWatch database.
WEB CONSOLE LOG
Sync Mailboxes Event processing:
After admin clicks Sync Mailboxes action, webconsole receives event for processing.
Webconsole writes Sync Mailboxes event to Microsoft Messaging Queue. MEG Queue will read the queue and will process event.
MEG Queue compare AirWatch MEM Devices with EAS devices retreived from exchange.
If EAS device retrived from exchange matches with one of AirWatch device, MEG Queue will update AirWatch MEM Device with latest status. Otherwise new unmanged device record is created.
MEQ Queue collects all mail client names and saves in AirWatch database. These mailclients are presented to user for selection in Mail Client policy for configuring policy rules.
MEQ Queue collects all User Accounts and saves in AirWatch database.
These User Accounts are presented to user for selection in User policy for configuring policy rules.
After admin clicks Run Compliance action, webconsole receives event for processing.
Webconsole writes Sync Mailboxes event to Microsoft Messaging Queue. MEG Queue will read the queue and will process event.
MEG Que evaluates policy and determine all devices that needs access state change (allow or block). Below log shows example of device evaluated to be blocked by user policy.
Problem: Users can gain access to Exchange ActiveSync from uncontrolled devices and mail clients on them. Usage of SEG solves the problem of uncontrolled devices access.
You can enforce using Boxer/Inbox by creating an email compliance policy from the AirWatch console:
Email> Compliance Polices > General Email Policies > Mail Client
SEG as MS Exchange OWA Proxy
Warning
Article is for OLD separate SEG. NOT about SEG on UAG.
You can restrict mobile traffic to seg.company.com by installing IP and Domain restrictions on the IIS on the Exchange server, and then enable IP filtering to deny everyone but the SEG on the ActiveSync endpoint on IIS. This will ensure all enrolled mobile devices will access email through SEG. You can also implement email policies to ensure that unmanaged devices do not access the SEG.
AirWatch cannot block access to OWA for unenrolled mobile devices since SEG does not manage OWA. The only way to do so would be checking through the AD for unenrolled users and preventing them from webmail access from there.
Note
OWA traffic can be routed through the SEG however it will act as a simple pass through.
Warning
The OWA through SEG & proxying Webmail through SEG is not a supported setup as it could lead to a single point of failure for email access.
SEG Java Keystore
Warning
Article is for OLD separate SEG. NOT about SEG on UAG.
Default password for SEG Java Key store = changeit
SEG on Windows Java Memory
Warning
Article is for OLD separate SEG. NOT about SEG on UAG.
Zulu is the new Java Corporate middleware.
Resolution
Upgrade to latest version of SEG (2.18+);
Set the max heap size to 5Gb;
Use Shenandoah as the garbage collection method.
Follow these steps to apply the settings:
Stop SEG service;
Go to SEG install directory and edit file SecureEmailGateway-2.18/service/conf/segServiceWrapper.conf
Update max heap to 5Gb, look for “Xmx” and update the property to:
wrapper.java.additional.3=-Xmx5120m
Use Shenandoah GC, look for “#wrapper.java.additional.38” and in the next line add:
If multiple SEG servers are load balanced, single policy broadcast messages apply to only one SEG. This includes the messages sent from the AirWatch Console to SEG upon enrollment, compliance violation, or correction. Use Delta Sync with a refresh interval of ten minutes to facilitate newly enrolled or compliant devices. These devices experience a waiting period of maximum ten minutes before email begins to sync. Benefits of this approach include:
Updated policies from the same API source for all SEG servers.
Smaller performance impact on API server.
Reduced implementation or maintenance complexity compared to the SEG clustering model.
Fewer failure points as each SEG is responsible for its own policy sets.
Improved user experience.
SEG Clustering is also available to facilitate the sharing of single policy updates to all nodes of a SEG cluster.
(&(objectCategory=person)(sAMAccountName=*)(memberOf={GroupDN})) (&(objectClass=Group)(memberOf={GroupDN})) -- For recursive member search {GroupDN} - Group's distinguishedName value
Test if LDAP server listens to ports TCP636 and TCP3269:
nc -v LDAP-SERVER-IP 636nc -v LDAP-SERVER-IP 3269
Integration
Go to Configuration > System Configuration > System > Enterprise Integration > Directory Services
Directory Type: Directory platform being utilized
Server: Address of the directory services server
Port: TCP Port for communication with directory services
Protocol Version: Version of LDAP being used
Bind Authentication Type: Protocol used to authenticate the LDAP session (GSS-NEGOTIATE recommended, gives auto-choice of Kerberos/NTLM)
Advanced config
Search Subdomains: Search subdomains by LDAP chase referrals
Connection/Request Timeout: Timeout setting per connection/request in seconds
Search without Base DN: Enable to search without sending a base DN
Use Recursive OID at Enrollment/Group Sync : Only supported by AD; used to obtain group membership during enrollment and not rely on the scheduler to run
Object Identifier Data Type: Set the object ID type to string or binary. AD is binary by default while most other LDAPs are strings.
Note
In AirWatch 7.3+, the AD group structure itself is stored in the sync table, and if the user is shown to be a member of a nested group whose External ID is already stored in the table, the group membership will be reflected. The only flow unaccounted for is the group structure itself changes between scheduler iterations, in which at most there will be up to a 12 hour delay from when the user enrolls and is associated with the group after the group structure has changed.
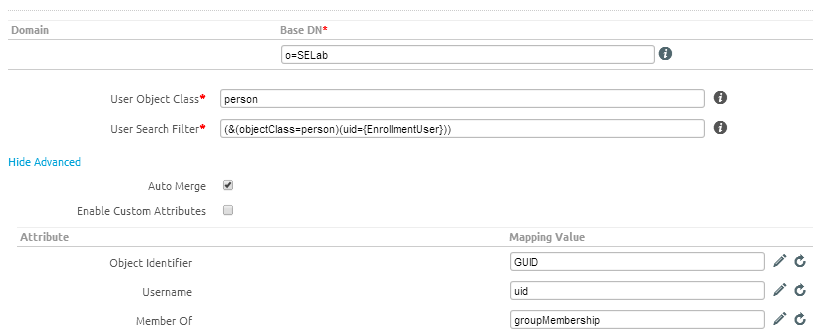
Directory users mapping
From Directory Services, navigate to User
Specify the Base DN AirWatch uses to find users in the directory
For User Search Filter, enter the parameters used to associate AirWatch user accounts with AD/LDAP accounts (&(objectCategory=person)(sAMAccountName={EnrollmentUser}))
Select Show Advanced to display additional options
Enable Auto Merge to consolidate changes made in the directory with AirWatch automatically
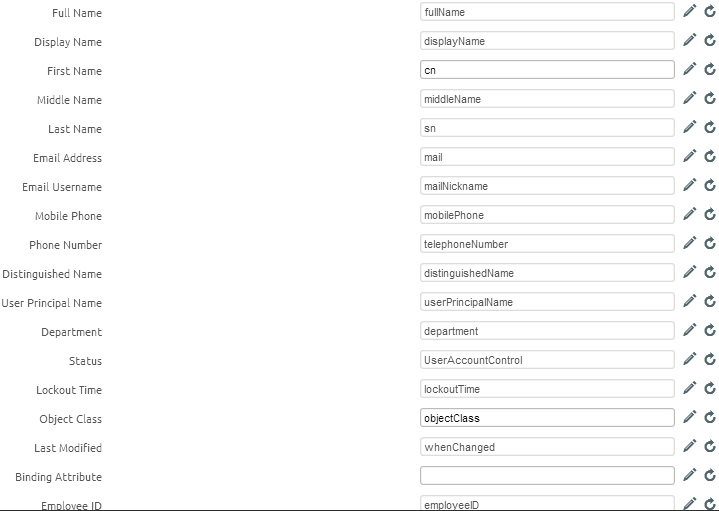
Use Attributes to assign directory services information to the correct AirWatch fields
Click Save
Note
All members of the Group or Organizational Unit from the directory are first synced into the dbo.UserGroupEnrollmentUserMapSync table by running the below LDAP query (for AD).
Another query is run for all of the DN’s in the sync table to pull the actual user information from the directory:
(&(objectCategory=person)(sAMAccountName=*)(|(distinguishedName={UserDN1})(distinguishedName={UserDN2})))
When we sync User attributes, we query the directory for the users based on their ExternalID: (&(objectCategory=person)(sAMAccountName=*)(|(objectGUID={ExternalID1})(objectGUID={ExternalID2})))
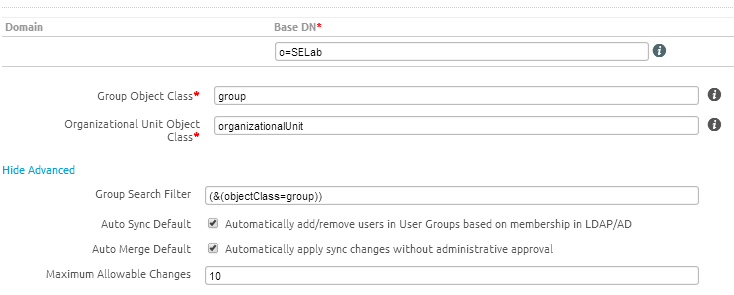
The User Group Membership Sync is the process by which we sync up the group membership for users from the directory. This will happen during a scheduler iteration if the Auto Sync option is enabled on the User Group and can be performed manually by clicking the Sync button on the User Group in the List View:
(&(objectClass=group)(|(objectGUID={ExternalID1}) (objectGUID={ExternalID2}))
Sync interval
There are three primary scheduler jobs that sync up the group membership and user attributes:
LDAP Sync – the LDAP Sync job will sync the User Group membership.
Sync Directory Users – this job will sync up user attributes.
Sync Admin Users – this job will sync up admin attributes.
Note
member vs. memberOf
Every object in AD has certain attributes like phone number, name, etc. In AD, membership to a group is determined by both the member and memberOf attribute, which is not the case in other directory types. Some directories only have member or only memberOf. The difference is key, memberOf is the attribute on the actual “member” or “user” object that says “I am a member of XYZ group”, this value is usually the Distinguished Name (DN) of the group the object is a member of. The Member attribute is on the “container” or “group”, and says “I have XYZ as a member”, which is also usually the DN of their members. Directories that use the Member relation will have groups with a list of Member attributes of all the users that are members of that group. Directories that use the MemberOf attribute will have users that list the groups they are members of on the actual user object.
Auto sync
In production all LDAP based scheduler jobs are set to fire every 12 hours. It is not recommended to lower these values for On-Premise or Dedicated SaaS customers as setting the scheduler interval too low may cause performance issues in versions older than 7.1. If a customer requires a lower interval, it is recommended to run at least one sync, and pull the LastSyncTimeInMinutes column from the dbo.LDAPDefinition table to determine how long it takes to sync the Organization Group.
Note
All issues that arise during a scheduler iteration will appear in the scheduler logs
Manual sync
The Add Missing Users, User Group Membership Sync, and Sync User Attributes processes can all be triggered manually by clicking a button in the console.
Note
Manual user attribute sync will only sync enrollment users, not administrator attributes
Warning
If any issues arise during one of these processes when they are triggered manually, the BulkProcessingServiceLogFile.txt in the Services folder will contain the backend information. If it appears there is a UI issue with the buttons, the WebLogFile.txt file in the WebConsole folder will contain the information needed to troubleshoot.
User enrollment
The mobileManagement.EnrollmentUser table contains information on all of the enrollment users in the environment:
ExternalID – the ExternalID column contains a hashed value of the attribute configured for Object Identifier. This value is used to match the AirWatch user with the customer’s directory user. If for whatever reason this value is null or incorrect, the AirWatch user will not sync.
SecurityTypeID – this column determines the type of user. 1 denotes a directory user, 2 denotes a basic user, and 3 denotes an authentication proxy user.
LocationGroupID – the Organization Group ID where the user is imported. Note that all directory users will always reside at the same level Directory Services is configured, even if imported or added at a child.
LDAPDefinitionID – the ID of the LDAP Definition the user is associated with.
dbo.LDAPDefinition table contains all of the configuration information from the Directory Services for an Organization Group
LastSyncDurationInMinutes – this column contains the time it took to sync the entire Organization Group in minutes.
LastSyncedOn – last date the Organization Group synced with the directory.
MemberPageSize – the MemberPageSize value can be configured, but should not exceed 5000 if the customer is using EIS. This value determines the chunk size of information being sent back and forth between ACC\EIS
IsSortControlSupported – determines if the directory type supports sorting results at the directory server before the response is sent.
The dbo.UserGroupEnrollmentUserMapSync table will contain only the ExternalIDs of both the users and the groups that are members of the AirWatch group that was added
The dbo.UserGroupSync table contains syncing information for directory User and Admin groups. It provides a few more columns of information that contain the settings you have configured per group in the console.
A user’s primary group in Active Directory cannot be added to AirWatch, as the primary group has no memberOf attribute on the user object. This is an AD limitation.
Query Troubleshooting
Tip
LDAP Admin is the LDAP browser most commonly used internally. An LDAP browser is an excellent way to troubleshoot certain queries and determine which attributes should be configured in Directory Services. The tool can be download at http://www.ldapadmin.org/
With some issues, AirWatch is not able to find certain users and/or groups. This is often due to an incorrect filter or lack of permissions in the directory. If we are unable to find the user and group objects with the LDAP Admin tool using the same settings from the console, we will be unable to find them using AirWatch. It will be necessary to test queries during troubleshooting. To run a custom query, click the magnifying glass icon in the toolbar, select the Custom tab in the window that appears, type the Base DN in the Path field, and type the query in the Filter field.
Connection Troubleshooting
Test connection failures are usually due to one of two error codes, either 49 or 81. An 81 error code indicates the console cannot find the directory server, which can happen if the hostname was entered incorrectly, ACC\EIS is not functioning properly, the directory server is firewalled, or there is no route to the directory server from the console server.
When an administrator encounters a 49 error it is important to note that this error is generated by the directory server, not AirWatch. In 99% of cases this is because the bind authentication type is not supported, or the account and passwords are incorrect. To verify that the console is not sending a bad username or password, SSL must be turned off and the authentication type must be set to basic so the bind request can be sniffed off the network in plaintext. Use Wireshark!
LDAP error 81 = The LDAP library can’t contact the LDAP server
AirWatch is not able to communicate with the LDAP server. Verify that Airwatch services are enabled in AirWatch Cloud Connector. If not, the AirWatch Cloud Connector may require re-installation after enabling.
Optimization
Warning
Optimization of slow enrollment into AD
Groups & Settings > All Settings > Enterprise Integration > Directory Services, Advanced section
Click the Server Manager icon next to the Start button to open the Server Manager window.
Click Roles in the left pane.
Click Add Role in the right pane. An Add Roles Wizard window displays.
Under Server Roles, select the Active Directory Certificate Services checkbox.
Click Next.
Select the Certification Authority checkbox and then select Next.
Select Enterprise and then select Next.
Select Root CA and then select Next.
Define CA Private Key Settings
Select Create a new private key and then select Next.
Select your preferred Key character length (for example 4096).
Select your preferred algorithm (for example SHA256) from the Select the hash algorithm for signing certificates issued by the CA and then select Next.
Click Common name for this CA and enter the name of the CA or use the default CA displayed and then select Next.
Make note of the name of the CA server. You will need to enter this information in AirWatch when setting up access to the CA.
Select the desired length of time under Set the validity period for the certificate generated for this CA and then select Next.
The length of time you select is the validity period for the CA ‒not the certificate, however, when the validity for the CA expires, so does the certificate.
Configure the ADCS Certificate Database
Click Next to accept the default information in the Configure Certificate Database screen.
Click Next to accept the Confirm Installation Selections screen.
Click Install. The installation begins. After the installation completes, the Installation Results window displays. Click Close.
Step 2a - Configure Microsoft CA, Basic
Warning
The following steps are applicable only if the Security Department allows a service account to have access to their CA
Add a Service Account on the CA
Launch the Certification Authority Console from the Administrative Tools in Windows.
In the left pane, select (+) to expand the CA directory.
Right-click the name of the CA and select Properties. The CA Properties dialog box displays.
Click the Security tab.
Click Add. The Select Users, Computers, Service Accounts, or Groups dialog box displays.
Click within the Enter the object names to select field and type the name of the service account (e.g., Ima Service).
Click OK. The CA Properties dialog box displays.
Select the service account you added in the previous step (e.g., Ima Service) from the Group or user names list.
Select the Read, the IssueandManage Certificates, and the Request Certificates checkboxes to assign permissions to the service account. Click OK.
Info
If Security Department does not allow the above, propose to use a separate child CA, and do the above configuration on it. Separate CA can be turned off in case of problems.
Warning
CA server must be in Enterprise Mode of operation. To install CA in Enterprise mode, Enterprise Admin account is needed. CA in Enterprise Mode is installed on forest level! This means Domain Controllers will have links to this CA, even if it is installed in a subdomain.
Step 2b - Configure Microsoft CA, Enroll On Behalf Of (EOBO)
Tip
Security Advantage!
The following steps are applicable if the Security Department DOES NOT allow a service account to have access to their CA;
As result of EOBO configuration, users will request certificates by themselves. If service account gets disabled, users will still be able to request certificates.
CA Step 0: Enable LDAP Referrals
Info
This action is only needed in multi-domain environment!
Run the following commands on the CA. This configuration is needed on ADCS CA since we are requesting certificates on behalf of some other user using service account.
This feature is only supported on Windows 2008 R2 Enterprise and later. See the link below for context and details: https://technet.microsoft.com/en-us/library/ff955842(v=ws.10).aspx
Use CMD to restart certificate services and enable cross-forest LDAP Referrals:
net stop certsvc
certutil -setreg policy\EditFlags +EDITF_ENABLELDAPREFERRALS
net start certsvc
CA Step 1: Create the Restricted Enrolment Agent Certificate Template
Open the Certificate Authority (CA).
Expand the CA Name, Right click Certificate Templates, and select Manage.
Right click the Enrollment Agent (Computer) template and select Duplicate Template (Do not choose Enrollment Agent user cert!). Name it per your preference.
Select Windows Server 2008+ Enterprise.
On the Request Handling tab, select Allow Private Key to be Exported.
In the Subject Name tab, make sure Build from this Active Directory Information is activated and Subject Name format is set to Fully distinguished name. Click OK.
Navigate back to the CA, right click Certificate Templates, select New, and select Certificate Template to Issue.
Select the duplicate copy of the template created in the previous step. Click OK.
CA Step 2 - Enroll a computer for the Signer Certificate
Substep A: Generate a new Restricted Enrollment Agent Signer Certificate
Tip
The following actions in this step can be done on any server that can connects to the Certificate Authority.
Hint: do it on the server with ESC/ACC connector.
Open MMC.
Warning
Use the same service user account to open MMC and import certificate, as the one used later for transmitting EOBO certificates. Using other user account, including admin accounts, will break the certificate request schema!
Click File and select Add/Remove Snap in.
Select Certificates.
Select Computer Account.
Select Local Computer and select Finish. Click OK.
Expand Certificates (Local Computer), double click Personal, right click Certificates, select All Tasks, and select Request New Certificate. Click Next.
Select Active Directory Enrollment Policy and select Next.
Check the duplicate template created in earlier steps and select Enroll.
Once completed, select Finish.
Warning
Service user account, which is used by AirWatch to create a certificate request, must be a domain account and have enough permissions to access Windows certificate store. Standard user will not work. Local admin rights on the computer is a simple solution.
Troubleshooting ESC service rights…
Run Services.msc
Stop VMware Enterprise Systems Connector Service
Right Click VMware Enterprise Systems Connector service.
Select Properties
Click on Log On
Use domain service account with admin permissions on local server. Make sure you are logged in with an account that has admin permissions both on the VMware Enterprise Systems Connector server and on the domain, or you may not be able to access the computer store and also add a domain user to manage the private keys
Substep B: Configure the issued certificate
Once the certificate has been issued, right click it and select All Tasks followed by Manage Private Keys.
Click Add.
Type Network Service and select Check Names. Once added, select OK twice.
Substep C: Export the Certificate
Note
If the certificate needs to be installed on multiple Device Services servers or AirWatch Cloud Connector servers, export with the private key. If not, skip to exporting just the public key.
Export the public key to .cer file
Only the public key needs to be exported for upload to the console:
Right click the issued certificate, select All Tasks followed by Export.
Select No, do not export the private key, select Next.
Select DER encoded binary X.509 (.CER), select Next.
Select a destination for the exported certificate and select Next. Click Finish.
Substep D: Import the certificate for Device Services and ESC/ACC servers
Open MMC.
Click File and select Add/Remove Snap in.
Select Certificates.
Select Computer Account and select Next.
Select Local Computer and select Finish. Click OK.
Expand Certificates (Local Computer) and select Personal. Right click Certificates, select All Tasks and select Import…
Select the .cer file exported in previous steps and select Next.
Ensure Place all certificate in the following store is set to Personal and select Next. Click Finish.
CA Step 3: Add a User Certificate Template on the CA
Open the CA (certsrv) window.
In the left pane, select (+) to expand the CA directory.
Right-click the Certificate Template folder and select Manage. The Certificate Templates Console window displays.
Select the desired template (User) under Template Display Name, and right-click Duplicate Template. The Duplicate Template dialog box displays. AirWatch will use the duplicate certificate template. The template you choose depends on the function being configured in AirWatch.
Tip
For Wi-Fi, VPN, or Exchange Active Sync (EAS) client authentication select User template.
Select the Windows Server that represents the oldest enterprise version being used within the domain to ensure backward compatibility of the certificate that was issued.
Click OK. The Properties of New Template dialog box displays.
CA Step 4: Configure Certificate Template Properties
Click the General tab.
Type the name of the template displayed to users in the Template display name field. The Template name field auto-fills with the template display name without spaces.
You may use this default value or enter a new template name if desired. The template name may not contain spaces. Make note of the template name. You will need to enter this information in AirWatch. You will enter the Template name you just configured with no spaces in the AirWatch Console in the Issuing Template field within the Configuring the Certificate Template screen.
Select the desired length of time for the certificate to be active from the Validity period entry field/drop-down menu.
Click Apply.
Click the Request Handling tab.
Select the appropriate client authentication method from the Purpose: drop-down menu. This selection might be based on the application of the certificate being issued, although for general purpose client authentication, select Signature and Encryption.
Select the Allow private key to be exported checkbox. For a certificate to be installed on an iOS device, this checkbox MUST be selected.
Click Apply.
Select the Subject Name tab.
Select Supply in the request or Build from this Active Directory
Note
Selecting Supply in the request means the certificate fields will be generated by AirWatch console. Doing this will give AirWatch admin control over the text in certificate request.
Selecting Build from this Active Directory allows to write something simple in the AirWatch console Request Template fields (DN). CA admin will control over the text in certificate request. Do this if multiple fields are required for customer to configure EMail etc., and add these:
Include e-mail name in subject name
Include this information in alternate subjject name: E-Mail name, User principal name (UPN), etc.
11 (optional). If Enrollment agent template is used, select the Issuance Requirements tab and select This number of authorized signatures = 1. Under the Application policy drop-down field, select Certificate Request Agent and select Apply.
Enable the Template for Certificate Authentication
Click the Extensions tab.
Select Application Policies from the Extensions included in this template: field. This allows you to add client authentication.
Click Edit. The Edit Application Policies Extension dialog box displays.
Click Add. The Add Application Policy dialog box displays.
Select Client Authentication from the Application policies: field.
Click OK. The Properties of New Template dialog box displays.
Provide the AD Service Account Permissions to Request a Certificate
Click the Security tab.
Click Add. The Select Users, Computers, Service Accounts or Groups dialog box displays. This allows you to add the service account configured in Active Directory to request a certificate.
Enter the name of the AirWatch service account in the Enter the object names to select field.
Click OK. The Properties of New Template dialog box displays.
Select the service account you created previously - for AirWatch on the CA, from the Group or user names: field.
Select the Enroll checkbox under Permissions for CertTemplate ServiceAccount. Click OK.
Enable the Certificate Template on the CA
Navigate to the Certificate Authority Console.
Click (+) to expand the CA directory.
Click Certificate Templates folder.
Right-click and select New > Certificate Template to Issue. The Enable Certificates Templates dialog box displays.
Select the name of the certificate template (e.g., Mobile User) that you previously created in Creating a Name for the Certificate Template.
Click OK.
(optional - if Enrollment Agent template is used) Link User template to Enrollment Agent
Open the Certificate Authority (CA).
Expand the CA Name, Right click Certificate Templates, and select Manage.
Choose the new Enrollment Agent (Computer) template created for AirWatch
Open the Superseded Templates tab.
Click Add..
Choose the created User Template, and add it to the list. Click OK.
Step 3 - Configure the AirWatch console
Configure the CA
Login to the AirWatch Console as a user with AirWatch Administrator privileges, at minimum.
Navigate to System > Enterprise Integration > Certificate Authorities.
Click Add.
Select Microsoft ADCS from the Authority Type drop-down menu. You need to select this option prior to populating other fields in the dialog so applicable fields and options display.
Enter the following details about the CA in the remaining fields:
Enter a name for the CA in the Certificate Authority field. This is how the CA will be displayed within the AirWatch Console.
Enter a brief Description for the new CA.
Select ADCS radio button in the Protocol section.
Note
If you select SCEP, note that there are different fields and selections available not covered in this guide
Enter the host name of the CA server in the Server Hostname field (FQDN or IP)
Enter the actual CA Name in the Authority Name field. This is the name of the CA to which the ADCS endpoint is connected
Tip
Authority Name can be found by launching the Certification Authority application on the CA server - the inner name of the CA.
Select the radio button that reflects the type of service account in the Authentication section. Service Account causes the device user to enter credentials. Self-Service Portal authenticates the device without the user having to enter their credentials.
Enter the service account Domain\Username and Password. This is the username and password of the ADCS service account which has sufficient access to allow AirWatch to request and issue certificates.
Note
If Enrollment Agent is used:
In Additional Options list choose Restricted Enrollment Agent.
Upload the public key file (.cer) exported in previous steps.
6. Click Save.
Configure the Certificate Template
For Enrollment Agent, data supplied by AD (in CA config)
Select the Request Templates tab. Click Add.
Complete the certificate template information:.
+ Name: a friendly name for the new Request Template. This name is used by the AirWatch Console
+ Description (optional): a brief Description for the new certificate template
+ Certificate Authority: choose the just created one from the certificate authority drop-down menu
+ Issuing Template: the name that you configured in CA in Configuring Certificate Template Properties in the Template name field. Make sure you enter the name with no spaces. AirWatch automatically places “certificatetemplate:” prefix afterwards. This is normal. Do not enter the word “certificatetemplate:” yourself!
+ Requester Name: put something simple here, since request attribs are handled at the CA level. Example: {EmailDomain} or {EnrollmentUser}
Click Save.
For direct User template, data supplied in request
Select the Request Templates tab. Click Add.
Complete the certificate template information.
+ Name: a friendly name for the new Request Template. This name is used by the AirWatch Console
+ Description (optional): a brief Description for the new certificate template
+ Certificate Authority: choose the just created one from the certificate authority drop-down menu
+ Issuing Template: the name that you configured in CA in Configuring Certificate Template Properties in the Template name field. Make sure you enter the name with no spaces. AirWatch automatically places “certificatetemplate:” prefix afterwards. This is normal. Do not enter the word “certificatetemplate:” yourself!
+ Subject Name: put specific fields, which will be in the certificate. Example syntax for multi-line Subject Name field:
+ Private Key Length: choose a value (This is typically 2048 and should match the setting on the certificate template that is being used by DCOM)
+ Private Key Type: +Signing, +Encryption (This should match the setting on the certificate template that is being used by DCOM)
+ San Type: enter fields for Subject Alternative Name. Email Address, User Principal Name, and DNS Name are supported by ADCS Templates by default, and AirWatch recommends that you use them.
Example of fields to match CA config:
User Principal Name = {UserPrincipalName}
Email Address = {EmailAddress}
- Select the **Automatic Certificate Renewal** checkbox to have certificates using this template automatically renewed prior to their expiration date. If enabled, specify the Auto Renewal Period in days.

- Select the **Enable Certificate Revocation** checkbox to have certificates automatically revoked when applicable devices are unenrolled or deleted, or if the applicable profile is removed.
Note
If you are making use of the Enable Certificate Revocation feature, go to Devices & Users > General > Advanced and set the number of hours in the Certificate Revocation Grace Period field. This is the amount of time in hours after the discovery that a required certificate is missing from a device that the system will wait before actually revoking the certificate.This will help to NOT identify certificate missing on device because of big Wi-Fi latency or network issues.
- Select the **Force Key Generation on Device** checkbox to generate public and private key pair on the device which improves CA performance and security.
Click Save.
Test the certificates
Create a new device profile
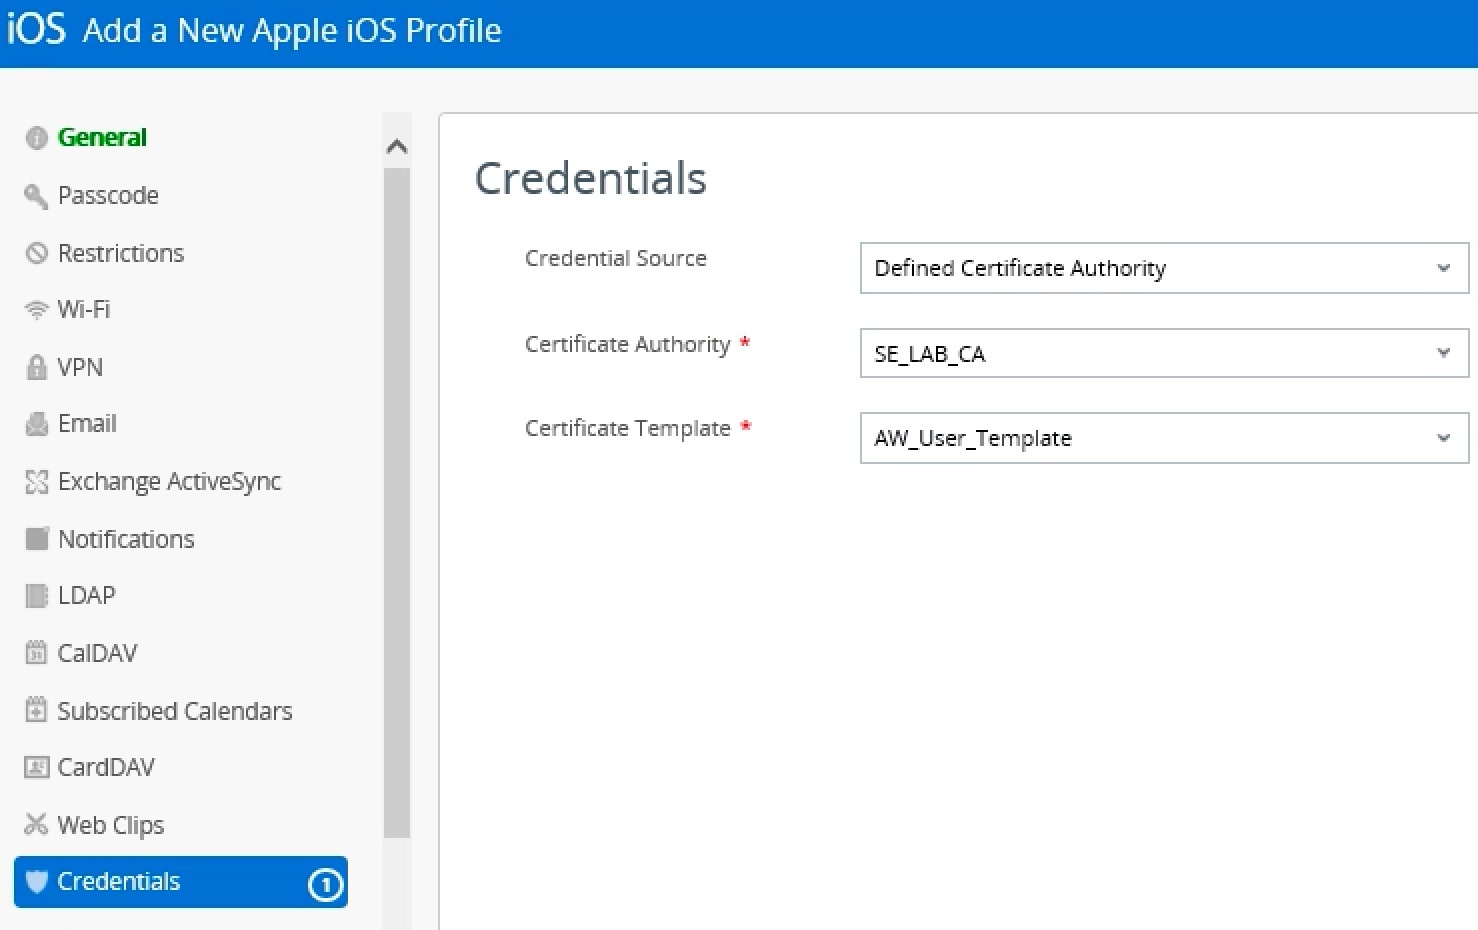
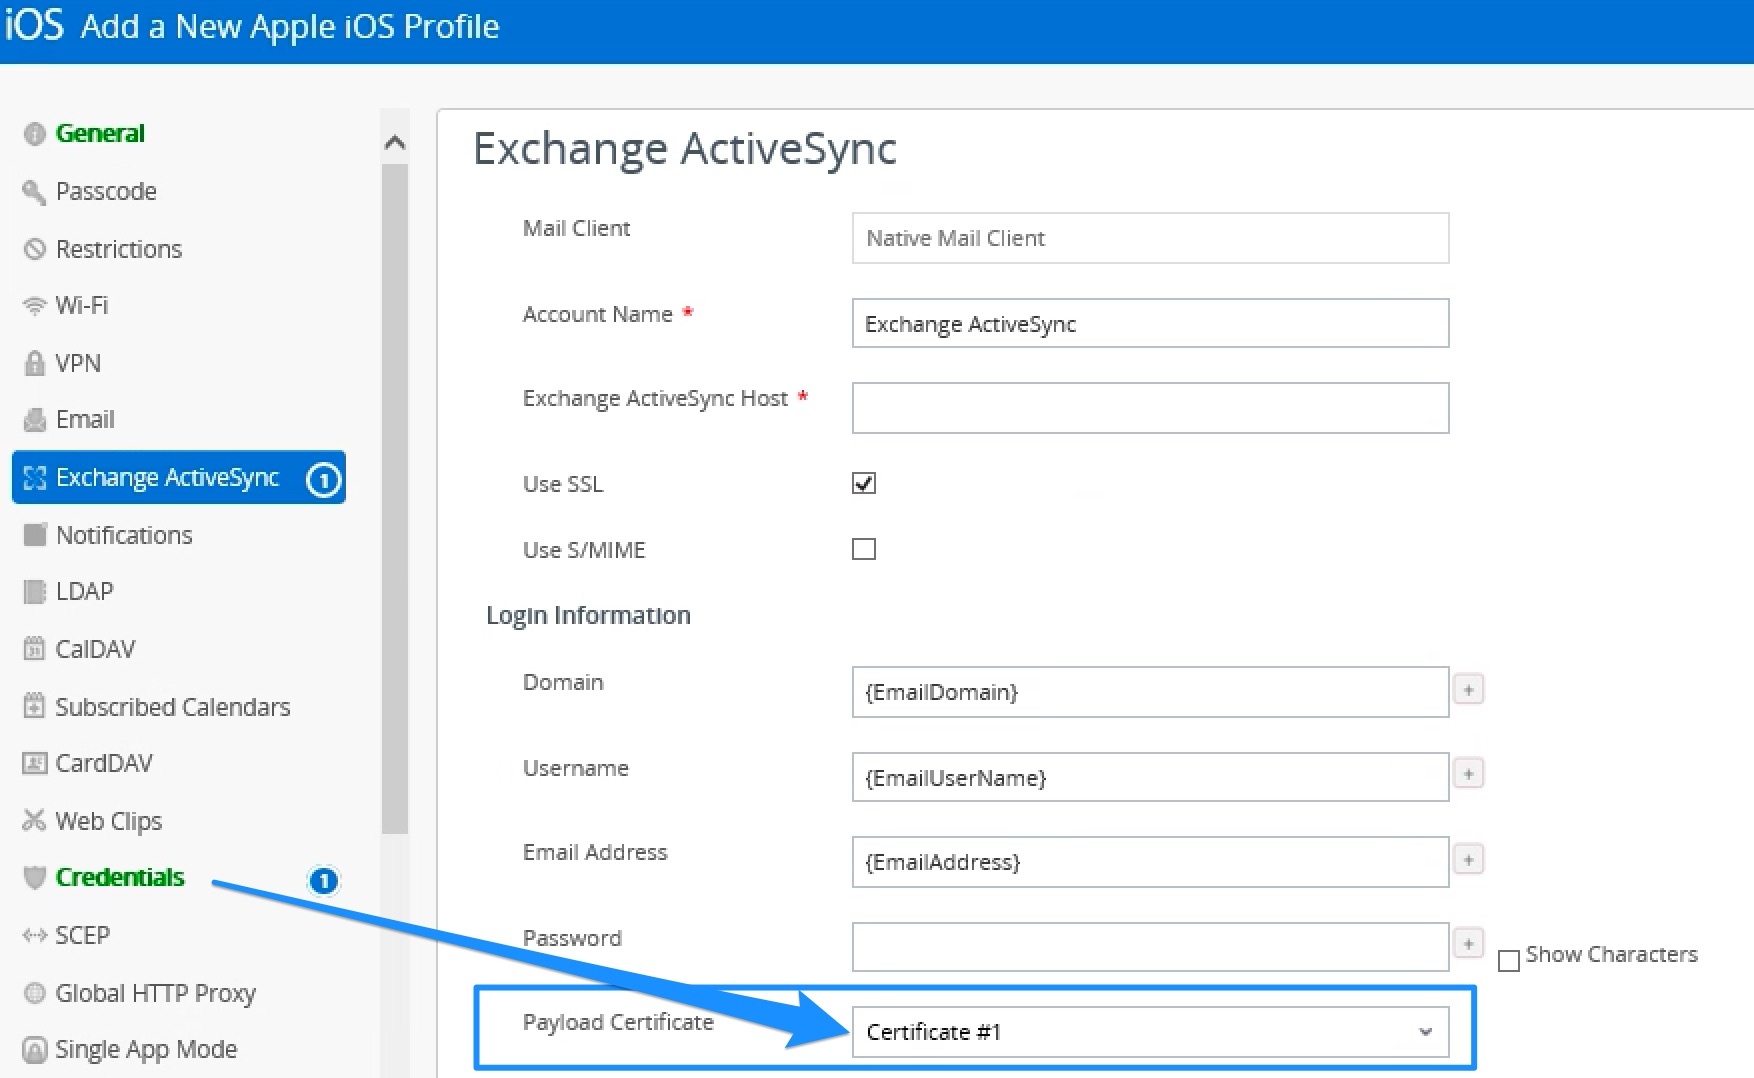
Configure EMail settings in profile to use the Certificate (automatically named “certificate #1”)
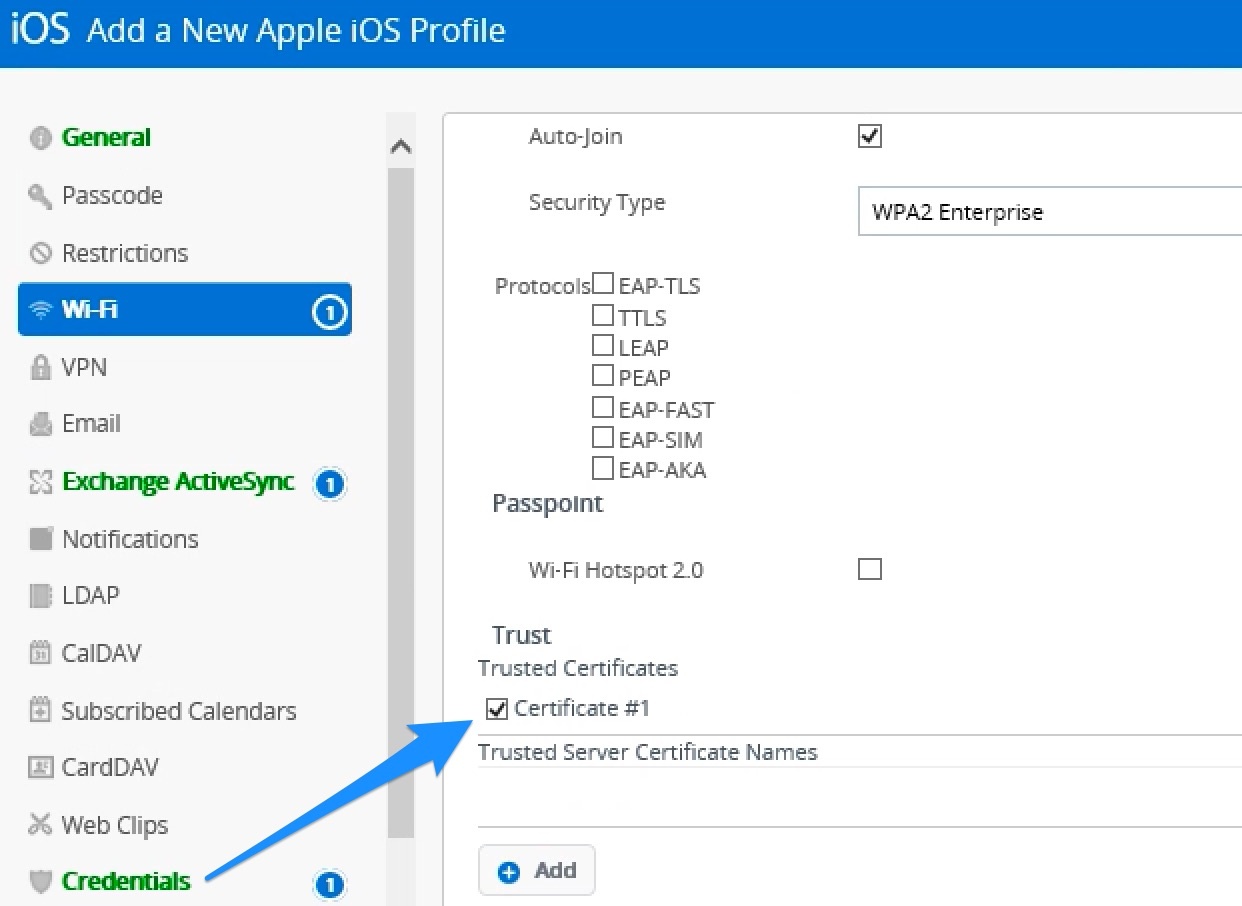
Configure Wi-Fi settings in profile to use Certificate (automatically named “certificate #1”)
Check the profile on iPhone/Android: you should see the Certificate profile applied, then certificate gets issued. Check the customized fields: Subject Name and Subject Alternative Name.
SCEP vs DCOM: SCEP does NOT support certificate revokation, unlike DCOM, so DCOM integration is the preferred method.
SCEP Workflow
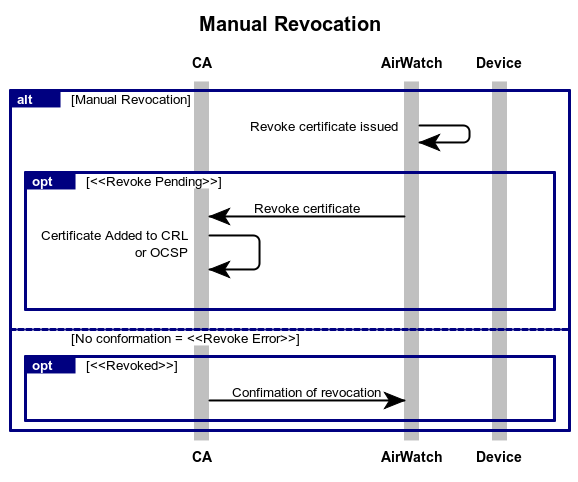
Manual Revocation
Manual Renewal
EOBO
Question: We trying to integrate AirWatch with CA authority (ADCS). Instead of creating the certificate for the user that enrolled his device, every certificate is created for the service account we used in the integration. Any config we missed?
Answer: This is expected behavior. If you need the certificate created for the user object you need to leverage Enrollement On Behalf Of(Eobo). Just be aware that you lose flexibility with the cert template and values you can use.
This is done in the template settings in Airwatch. The template in ADCS is configured with Subject Name = “supply in request”. So whatever you set up for the template in Airwatch will be requested from the CA. Including SN (can be username/email/serial number and so on) and SAN (again all kinds of values available in AW)
That is also the main difference to EOBO where you configure SN/SAN in the ADCS template and can only use attributes from the user object in AD.
Apps & Books → Internal. You can only deploy 3 versions of an application called “Alpha”, “Beta”, “Production”;
Devices → **Staging & Provisioning →**Product List View → Add Product. Add Manifest → Install Application. Difference between this method and the one below is not clear, except slightly easier config;
I recommend the 3rd method as the most descriptive and stable if several versions of an application are needed in one Organization Group.
Things to check in application deployment
Application ID
Check if there is a modification of the Application ID while uploading the application in the Console via Staging & Provisioning → Components → Applications or check while uploading the Application, is it fetching the Application ID and populating the same name in the Application ID field.
Application Metadata
Once the app gets uploaded, AirWatch SQL writes down its’ metadata to SQL. Parsing the data:
On AirWatch 9.2.3 version and lower, metadata provided by some build systems like Gradle 3 is incorrectly processed. Specifically a VersionHash is needed in the correct place for the app to see it.
Application Deployment Logs
Device receives command to install application
Device is directed to app destination for download via Manifest.plist file - so search for “manifest” in the logs:
Device is redirected to Manifest.plist URL
Device locates Blobhandler.pblob URL:
Device is redirected Blobhandler.pblob URL
Application download begins
Tip
You can copy the blob link (see picture) manually in the browser to check that download starts.
You are able to deploy apps on Mac OSX devices either from Apps & Books or from Product & Provisioning method. If you have a pkg or dmg file, then you could simply use Apps & Books. However, if you have multiple files to be executed or scripts to run then you could use Product & Provisioning. In AirWatch 9.3+, all macOS application file types (.dmg, .pkg, .mpkg, .app) can be managed through the Internal Applications section. This new framework leverages the popular Mac Admin community tool, Munki.
Provisioning with Munki
Enabling Software Management
Navigate to Settings > Devices & Users > Apple > Apple macOS > Software Management
Enable Software Management , there is a check in place to verify if File Storage is enabled at this page. If there is no File Storage, the admin will be requested to enable File Storage.
On-Prem deployments will need to enable CDN.
Before uploading macOS File to AirWatch
All primary macOS software file types will now be uploaded through Internal Applications (.pkg, .dmg, .mpkg). A .pkg file can be a Bootstrap Package or can be managed through full lifecycle management (this feature). In order to configure Advanced Management options for macOS software and for effective desired state management, which is achieved through the integrated Open-Source Munki library in the AirWatch Agent, a metadata file must be generated for the file separately before uploading it to the AirWatch Console. Munki’s deployment logic is built on the concept of pkginfo files, which are xml/plist files that contain metadata, configuration information, and more for a given application file. AirWatch requires this pkginfo file along with the application file to manage the deployment in the Console.
The pkginfo file is genetrated with VMware AirWatch Admin Assistant (see tools page for download). This is a GUI wrapper for a Munki command-line utility and is used to generate the pkginfo metadata file for a given application file.
Generating a pkginfo metadata file using VMware AirWatch Admin Assistant
Download and install the Admin Assistant tool to a macOS device or VM.
Open the Assistant. The Assistant dialog will ask for the application installer files to parse.
Upload an application installer file by dragging & dropping a .pkg, .dmg, .mpkg, .app file into the labeled field, or browse the local files on the machine in order to find an installer file.
Note
If the file is .app, it will be converted into a .dmg for deployment
Once the file is selected and uploaded, the Assistant will automatically start parsing process the process. Additional files can be added during this time if needed.
Once the parsing is complete, the tool will prompt to reveal the parsed metadata files in Finder. Store the metadata files in a local folder where they can be easily retrieved during the Software Distribution procedure.
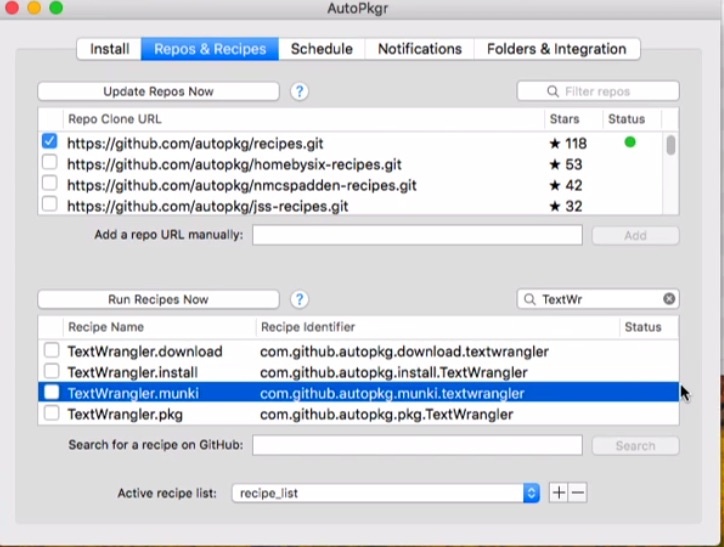
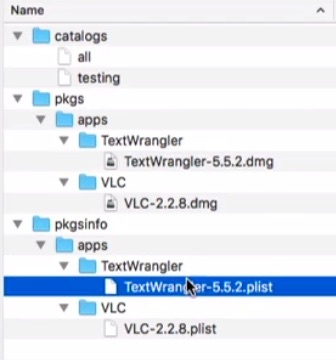
Generating a pkginfo metadata file using Autopkg
There are multiple ways to obtain the metadata/pkginfo file aside from using the Admin Assistant. One of them is to use Autopkg and its’ GUI tool Autopkgr.
Continue to the next screen and Upload the pkginfo .plist file
Continue to customize the app deployment. The proceeding screens will display any available configurations present in the pkginfo file (for example, a pkginfo from AutoPkg may contain an install_check script). Additional deployment configurations can be defined, and will be merged with the existing configurations
If the pkginfo file has one or more key and configuration that are not exposed in the UI, they will not be affected. This feature is important as it allows administrators to upload pkginfo files with keys that would be supported by the Munki client but would not be configurable in the UI. Any changes in the UI will be merged with the existing keys.
Pre/Post Install Scripts
A common reason to repackage software is to perform additional configuration tasks or to install additional items. A technique to avoid repackaging is to add pre-install scripts and/or post-install scripts to the configuration of an item. These scripts can take care of some of the tasks which previously may have required repackaging to implement.
An Exit Code of 0 will define the script as successfully executed in order to allow Munki to continue.
Note
Failure of the pre-install script will abort the installation attempt. Failure of the post-install script will log errors, but the installation will be considered complete.
Note
SCRIPT LOG
echo statements will be logged to /Library/Application Support/AirWatch/Data/Munki/Managed Installs/Logs/ManagedSoftwareUpdate.log
Uninstall Methods
There are multiple options available for uninstallation of software. The appropriate option will be selected by default by the VMware Admin Assistant tool based on the software’s file type. If needed options to override the default values are available in the AirWatch Console.
Remove Copied Items
Used primarily for software installed from a .dmg
Pulls from items_to_copy array[dicts] in the pkginfo file
All file paths in this array will be deleted
Future Console release will show the paths in the items_to_copy array in the UI
Remove App
Pulls from installs array[dicts] in the pkginfo file
All file paths in this array will be deleted
Future Console release will show the paths in the installs array in the UI
Remove Packages
Used primarily for software installed from a .pkg
Uses receipts and analyzes the packages to remove
Tries to determine what files were installed via the Bom file
Deletes receipt
Will only remove if package is not associated with any other files or programs
Future Console releases will show the receipts that Munki check for in the UI
Uninstall Script
Can be used for any installer type
Written in shell script
Used to perform custom uninstall operations if needed
If the Admin has a customized deployment of an app, they will need to also write a corresponding uninstall script to remove their custom configurations
Install or Uninstall Verification
With some software, the Admin needs to configure what exactly defines a Successful Install or Uninstall. Munki allows this through setting an Install or Uninstall Check Script
Install Check Script - If present, this script is executed to determine if an item needs to be installed. A return code of 0 means install is needed; any other return code causes install to be skipped.
Uninstall Check Script - If present, this script is executed to determine if an item needs to be uninstalled. A return code of 0 means uninstall is needed; any other return code causes uninstall to be skipped.
Conditions
Conditions can defined on a per-application level so that they are evaluated prior to the download and installation of a software.
Warning
Custom conditions will be created in a later version of AirWatch.
Built-in Conditions
Currently available built-in attributes for conditional comparison:
Attribute
Type
Description
Example Comparison
hostname
string
Hostname
hostname == "Lobby iMac"
arch
string
Processor architecture. e.g. 'powerpc', 'i386', 'x86_64'.
arch == "x86_64"
os_vers
string
Full OS Version e.g. "10.7.2"
os_vers BEGINSWITH "10.7"
os_vers_major
integer
Major OS Version e.g. '10'
os_vers_major == 10
os_vers_minor
integer
Minor OS Version e.g. '7'
os_vers_minor == 7
os_vers_patch
integer
Point release version e.g. '2'
os_vers_patch >= 2
machine_model
string
'Macmini1,1', 'iMac4,1', 'MacBookPro8,2'
machine_model == "iMac4,1"
machine_type
string
'laptop' or 'desktop'
machine_type == "laptop"
ipv4_address
array of strings
This contains current IPv4 addresses for all interfaces.
ANY ipv4_address CONTAINS '192.168.161.'
munki_version
string
Full version of the installed munkitools
munki_version LIKE '*0.8.3*'
serial_number
string
Machine serial number
serial_number == "W9999999U2P"
date
UTC date string
Date and time. Note the special syntax required to cast a string into an NSDate object.
date > CAST("2013-01-02T00:00:00Z", "NSDate")
Example:
machine_type == “laptop” AND os_vers BEGINSWITH “10.7”
date > CAST(“2016-03-02T00:00:00Z”, “NSDate”)
Dates in conditions:
The date string must be written in UTC format, this format is interpreted as a local date/time. The condition date > CAST("2013-01-02T00:00:00Z", "NSDate") is True if the local time is after midnight local time on 02 Jan 2013.
Literal types in comparisons
Strings are delimited by either single or double-quotes: os_vers BEGINSWITH "10.7"
Integers have no quotes: os_vers_major == 10
Booleans are indicated as TRUE or FALSE (and have no quotes, or they’d be strings!): some_custom_condition == TRUE
Dates are possible, but they must be cast from ISO 8601 strings: date > CAST("2013-01-02T00:00:00Z", "NSDate")
Updates
Updates can be managed similarly to the other platforms in the AirWatch Console. If a new version of the file needs to be added, perform the following:
Navigate to Apps & Books > Native
Click on the App that requires an update. Clicking the app will navigate to the Details View page.
In the top right side, click “Add Version”
Upload the new installer for the new app version
Upload the new pkginfo file for the new version
Make any additional changes and then save the configuration
Troubleshooting
The AirWatch Console will show report macOS app installation data from a device in several locations:
Apps & Books > Applications > Native > Internal. Click onto the Application to drill into Application Details > Devices Tab. The grid in this tab will display installation statuses for each device.
Devices & Users > Devices > List View. Click on a device to drill into Device Details > Troubleshooting Tab. The grid on this tab will show activity on the device and provides filtering options to show information relating to Software Distribution.
Munki Logs can also be directly accessed on the device:
/Library/Application\ Support/AirWatch/Data/Munki/Managed\ Installs/Logs/ManagedSoftwareUpdate.log
Once software has been published and installed on a few devices, if any of the configuration options such as “install script”, “uninstall script” etc.. are changed, devices which already have the application installed successfully will not receive the updated options as these can only be updated when an “InstallApplication” command. This is the only command that can update the locally cached PKGInfo files on the device. In order to update the scripts, administrators will have to manually select all of the devices which have the software installed and repush the command. Repushing the command will update the respective cached PKGinfo file with the latest information. Note: Repushing the command will NOT reinstall the application unless there is a change in the software version. Munki is has mechanisms in place to not reinstall software when the application is already installed.
If a package has a dependency on another package or software then an administrator will have to manually provide a required key in the pkginfo of the package with a dependency. Providing the key in the pkginfo is the only way for Munki to recognize if there are any dependencies, and determine the sequence of installation steps for such dependent packages. Unless otherwise specified, packages are installed in random order. Such package installation will fail if a package dependency is not met during the installation. Example: Netbeans requires that Java be present and installed on the machine. Netbeans will not implicitly install Java while installing the Netbeans software package. Even if administrators attempt to install Netbeans without utilizing M****unki or using standalone Munki, the installation will fail and will prompt the administrator to first install Java before installing Netbeans.
For packages which have the same receipts array with same version even on an upgraded package, Munki will not be able to detect that a new package is an upgraded package. The reason is that the receipt array has the same version as the previous package. The impact of duplicated receipts arrays is that the packages will not be installed on User machines as Munki cannot determine that a new version needs to be installed. Note: The best solution for packages with duplicate versions in the Receipts Array is to use an Autopkg Recipe, which adds an installs array in the pkginfo. This method allows Munki to detect upgraded packages; alternatively an administrator can manually add an installs array into the pkginfo.
Example: Wireshark is an example of a package which has identical receipts which contain the same version, thus Munki cannot detect the when upgraded packages are deployed.
Legacy methods (AirWatch 9.2 & older)
Apps & Books
Go to Groups & Settings > All Settings > Devices and Users > Apple > MAC OS > Software Distribution.
Enable Software distribution.
Now go to Apps and Books > Native > Internal > Add Application.
Upload the .pkg or .dmg file.
Once uploaded, click on Continue. You will get an option to download VMware AirWatch Admin Assistance tool.
Download the tool.
Upload the .pkg or .dmg file there.
You will see that it will open the package into .dmg file, .plist file and .png file.
Go back to the Console and upload the .plist file for metadata.
Click on upload and you will see the application description.
You will get an option to upload the image. Upload .png file there.
Now assign the application to the required Smart Group.
Click on Save and Publish.
Product provisioning
It allows you to create, through AirWatch, products containing profiles, applications, and files/actions (depending on the platform you use). These products follow a set of rules, schedules, and dependencies as guidelines for ensuring your devices remain up to date with the content they need.
Navigate to Files> Add Files and enter the specific path
Navigate to Manifest. Under Install Manifest, click Add Action. Choose the action type Install and provide the specific path.
Under Uninstall Manifest, click Add Action and set the action type as Install, again providing the specific path.
Under Uninstall Manifest, click on Add Action and choose the action type Uninstall, and provide the exact application name with the extension as ‘.app’.
Select Save
Navigate to Staging & Provisioning > Product List View and select Add Product.
Under General, verify the details and assignment group are filled in.
Navigate to the Manifest tab and click on Add. Choose the created component after selecting Install/Action.
With this configuration, the application will first be downloaded to the Downloads folder on the Mac. You can then install the application, which will be available in the Applications folder. If you want only to uninstall the application which was previously installed, you may choose the Delete Files option while creating files and actions.
Recipes
Script recipies
TextWrangler Post Install Script
Implement a post-install script that copies the command-line tools from the TextWrangler bundle to their intended locations.
After uploading the appropriate files to AirWatch, pre/post install scripts can be configured for the app in the Scripts tab of the Application Details. Simply paste the script into the appropriate field and AirWatch will format it to be used by Munki.
App recipes
Adobe Reader DC…
Adobe Reader DC
Files:
Upload the Acrobat DC Installer.pkg file and set to download to /tmp/Acrobat DC Installer.pkg
Install Manifest:
Action Type - Install: /tmp/Acrobat DC Installer.pkg
Uninstall Manifest:
Action Type - Run: rm -rf /Applications/Adobe\ Acrobat\ Reader\ DC.app/
Action Type - Run: rm -rf /Library/Application\ Support/Adobe/Reader/
Action Type - Run: rm -rf /Library/Application\ Support/Internet\ Plug-Ins/AdobePDFViewer.plugin/
Action Type - Run: rm -rf /Library/Application\ Support/Internet\ Plug-Ins/AdobePDFViewerNPAPI.plugin/
Apple Enterprise Connect…
Apple Enterprise Connect
Files:
Upload the Enterprise Connect 1.6.3.pkg file and set to download to /tmp/Enterprise Connect 1.6.3.pkg
Install Manifest:
Action Type - Install: /tmp/Enterprise Connect 1.6.3.pkg
Uninstall Manifest:
Action Type - Uninstall: /Applications/Enterprise Connect.app
McAfee Endpoint Protection…
McAfee Endpoint Protection
Files:
Upload the install.sh and set it to download to /tmp/install.sh
Install Manifest:
Run Command: chmod +x /tmp/install.sh
Run Command: sudo /tmp/install.sh -i > /dev/null 2>&1
Uninstall Manifest:
Action Type - Run: sudo /Library/McAfee/cma/scripts/uninstall.sh
Microsoft Skype For Business…
Microsoft Skype For Business
Files:
Upload the SkypeForBusinessInstaller-16.1.0.456.pkg file and set to download to /tmp/SkypeForBusinessInstaller-16.1.0.456.pkg
Install Manifest:
Action Type - Install: /tmp/SkypeForBusinessInstaller-16.1.0.456.pkg
Palo Alto GlobalProtect…
Palo Alto GlobalProtect
Files:
Upload the GlobalProtect-3.1.3.pkg and set it to download to /tmp/GlobalProtect-3.1.3.pkg
Install Manifest:
Install: /tmp/GlobalProtect-3.1.3.pkg
Uninstall Manifest:
Action Type - Run: sudo /bin/bash /Applications/GlobalProtect.app/Contents/Resources/uninstall_gp.sh
RSA SecureID…
RSA SecureID
Files:
Upload the RSASecurIDTokenAutoMac412x64.pkg and set it to download to /tmp/RSASecurIDTokenAutoMac412x64.pkg
Install Manifest:
Install: /tmp/RSASecurIDTokenAutoMac412x64.pkg
Uninstall Manifest:
Action Type - Run: sudo /usr/bin/python /Library/Application\ Support/SecurID/uninstall-rsasecurid.py &>/dev/null
Sophos Antivirus…
Sophos Antivirus
Files:
Upload the SophosInstall-Mac.zip and set it to download to /tmp/SophosInstall-Mac.zip
Install Manifest:
Install: /tmp/SophosInstall-Mac.zip
Run Command: chmod a+x /tmp/TEMPDIR-SophosInstall-Mac\Sophos\ Installer.app/Contents/MacOS/Sophos\ Installer
Run Command: chmod a+x /tmp/TEMPDIR-SophosInstall-Mac\Sophos\ Installer.app/Contents/MacOS/tools/com.sophos.bootstrap.helper
Run Command: /tmp/TEMPDIR-SophosInstall-Mac\Sophos\ Installer.app/Contents/MacOS/Sophos\ Installer –install > /dev/null 2>&1
Symantec Removal Tool…
Symantec Removal Tool
Files:
Unpack the SymantecRemovalTool.zip.
Upload the SymantecRemovalTool.command and set it to download to /tmp/SymantecRemovalTool.command
Install Manifest:
Action Type - Run: chmod a+x /tmp/SymantecRemovalTool.command
Action Type - Run: sudo /tmp/SymantecRemovalTool.command > /dev/null 2>&1
Set “Lock Pages in Memory” privilege for the service account
Open Windows Local Group Policy Editor
Open Computer Configuration > Windows Settings > Local Policies > User Rights Assignment, find Lock Pages in Memory
Disable “Named Pipes” and Enable “TCP/IP” network protocol
Open SQL Server Configuration Manager tool
Open SQL Server Network Configuration > Protocols for MSSQLSERVER, set Named Pipes to Disabled, set TCP/IP to Enabled
Increase Maximum Worker threads in server properties to “7500”
Open Server Properties from SSMS and go to Processors tab, find Maximum Worker threads field
Set “Max Degree Of Parallelism” to 2 and “Cost threshold for Parallelism” to 50
Open Server Properties from SSMS and go to Advanced tab, Parallelism section in the right pane
Enable “Received Side scale” setting for Network Adapter on SQL server
Run DEVMGMT.msc from CMD
Expand Network adapters, right click on your adapter and select Properties
Select the Advanced tab and find Receive Side Scaling. Set this to Enabled
Set “Delayed Durability” under database properties = “Forced” to reduce WriteLog waits
Open Database Properties from SSMS and go to Options
Update “Minimum and Maximum Server Memory” allocation in Server Properties
Open Memory from SSMS → Server Memory Options section
Minimum Server Memory (in MB): 256000
Maximum Server Memory (in MB): 1500000
Performance Tweaks
Example Architecture
Update Workspace ONE UEM application server to latest version
In WS1 UEM Console go to Settings > Installation > Performance Tuning:
Set Certificate Profile Publish Frequency: 100
Set Apple Profile Installation Batch Size: 300
Set iOS Device Invites Per Second: 30
Set FastLaneMessageRateMultiple: 1.5
Run Real-Time Compliance is set to Disabled
Check Windows Sample Frequency (for managing Windows Desktops):
Go to Settings > Devices & Users > Windows > Windows Desktop > App Settings
Go to Settings > Devices & Users > Windows > Windows Desktop > Windows Sample Schedule
Override the default value in Systemcode table for FastLaneMessageRateMultiple to 1.5 by updating Systemcodeoverride table in DB.
Add the below config to AW.Send.Messaging.Service.exe.config file in Services folder of all console servers under appSettings:
This logic is only applicable for profiles that contain certificates issues through a defined Certificate Authority (CA) in the AirWatch Console.
Prior to the certificate batching logic, when a defined-CA profile is published to a large number of devices, it can result in significant performance issues on Airwatch Cloud Connectors in the AirWatch environment. This is due to the extra processing required to issue each device a certificate from the CA, as well as the normal processing required to push the profile to the device. The performance issues generally lead to CPU spikes and high memory usage on ACC or DS (if no ACC is configured) servers because:
Certificate generation is a CPU intensive task. Too many concurrent certificate generation requests spike the CPU usage.
Certificates are stored in memory of the process (w3wp - devicesservices) so that they can be reused for the same device.
AirWatch 7.1+ has certificate batch logic to throttle the deployment of all defined-CA profile publish jobs. These profile publish jobs will be broken into multiple batches at the environment level and a next batch will only be executed if the previous batch has been completed.
Certificate Batching Logic
The deployment of defined-CA certificate profiles will follow the steps outlined below:
AirWatch Administrator publishes a profile that contained a defined CA certificate
Install profile commands are queued for all assigned devices in the Device Command Queue in the AirWatch Database. These commands are queued in the Held status. Commands in the Held status will not be processed by devices.
A ProfilePublishBatchJob is created to process these commands.
The ProfilePublishJobScheduler selects a batch and batch size, based on the settings configured in the AirWatch Console (under Settings → Installation → Performance Tuning for On-Premises environments).
A batch detail entity is inserted into the AirWatch DB; the mobilemanagement.CommandQueueHeldBatch_Update stored procedure is called to “release” a number of the Install Profile commands that are currently in the Held status. The number released will be equal to or less than the overall batch size.
Periodically, more batches of the Install Profile command will be released until all commands are active (or have successfully been issued to devices). Three scenarios are outlined below that describe this step in more detail. This time period is defined by the Profile Publish Batch Job in the AirWatch Scheduler (Settings → Admin → Scheduler for On-Premises environments).
In SaaS and on-premise environments, the default Batch Size is set to 50, and the Profile Publish Batch Job interval is set to 3 minutes.
Scenario 1: All devices are consistently active
Devices=24000
Batch size=200
When a profile is published, all 24000 commands are queued in the Held status (status = 7). The scheduler released the first 200 commands based on the batch size. The commands are sent to devices (through APNs/Firebase), and devices consume the commands and install the profile. At the interval defined by the Profile Publish Batch Job, the system will view how many pending install commands are still active. As all devices are currently active and check in regularly, all of the previously queued commands will be processed, and another batch of 200 will be released. This process repeats until all 24,000 install commands are released.
Scenario 2: Devices frequently check in (within 30 minutes)
Devices=24,000
Batch size=200
During any particular iteration of the Profile Publish Batch Job as outlined above, if {X} number of commands are still in Pending Install state for a period of less than 30 minutes, then only ({batchSize} -{X}) commands will be released in the current iteration. For example, if the previous batch released 200 commands, but at the time of the next batch only 50 commands have been processed by devices (so that 150 are still active), then only 50 commands will be released at the current batch. At the time of this iteration, it will ensure that the “active” batch size returns to 200.
Scenario 3: Devices periodically check in (within 12 hours)
Devices=24,000
Batch size=200
During any particular iteration of hte Profile Publish Batch Job, if {Y} number of commands are still in Pending Install state for a period of more than 30 minutes, then {batchSize} number of commands will be queued up to maximum limit of *{batchSize}10 commands in queue. This means that at a single point in time, the maximum of *{batchSize}10 Install Profile commands can be queued in Pending Install status.
Following Scenario 2 above, if a new batch iteration is occurring, and all active Pending Install commands are over 30 minutes old, then a full batch size will be released. If there are {X} pending commands less than 30 minutes and {Y} pending commands greater than 30 minutes, then {batchSize} - {X} commands will be released, up until a total of *{batchSize}10 overall active commands are queued.
Scenario 4: Devices do not check in for over 12 hours
Devices=24,000
Batch size=200
After a pending install command has been queued for over 12 hours, it no longer counts toward the *{batchSize}10 limit specified in Scenario 3. The logic outlined in the first 3 Scenarios will continue, not counting any of these older commands. These “older” commands remain in the command queue and are active, but no longer affect the batching logic.
Relevant Database Tables
dbo.BatchJob - Profile Publish places an entry with “profileVersionID”
dbo.BatchJobDetail - Every Batch Job iteration will place an entry with the number of commands released as “Count”
deviceCommandQueue.DeviceQueue - Stores commands (profile install commands in this case) for every device
API Workflow
Batch Processing
Entity Change Queue Monitor
EventLog Processor Service
Integration Service
MEG Service
Messaging Service
Outbound Queue Monitor Service
Smart Group Service
Agent Builder Service
Background Processor Service
Compliance Service
Content Delivery
Device Scheduler
Directory Sync Service
GEM Inventory Service
Policy Engine
SMS Service
Google Play Service
Data Platform Service
Interrogator Queue Service
Provisioning Package Service
MSMQ
“# of Exceps Thrown”, “# of Exceps Thrown / Sec”, “# of Filters / Sec”, “# of Finallys / Sec”, “Throw to Catch Depth / Sec”
.NET CLR LocksAndThreads
“# of current logical Threads”,"# of current physical Threads","# of current recognized threads", “# of total recognized threads”,“Contention Rate / Sec”,“Current Queue Length”,“Queue Length / sec”, “Queue Length Peak”,“rate of recognized threads / sec”,“Total # of Contentions”
.NET CLR Memory
“% Time in GC”,"# Bytes in all Heaps","# Gen 0 Collections","# Gen 1 Collections","# Gen 2 Collections", “# Induced GC”,“Allocated Bytes/sec”,“Finalization Survivors”,“Gen 0 heap size”,“Gen 1 heap size”, “Gen 2 heap size”,“Large Object Heap size”,"# of Pinned Objects","# GC Handles","# of Sink Blocks in use", “# Total committed Bytes”,"# Total reserved Bytes",“Finalization Survivors”,“Gen 0 Promoted Bytes/Sec”, “Gen 1 Promoted Bytes/Sec”,“Large Object Heap size”,“Process ID”,“Promoted Finalization-Memory from Gen 0”, “Promoted Memory from Gen 0”,“Promoted Memory from Gen 1”
AirWatch Enterprise Systems Connector (ESC) / Cloud Connector (ACC)
To verbose the ACC log, perform the following:
Open Windows Explorer on the ACC server, and browse to the C:\AirWatch\CloudConnector\folder
Note the presence of two folders: Bank1 and Bank2. Every time the Cloud Connector software is updated, the update is applied to the inactive bank folder. The updated bank folder then becomes the active bank folder.
Open each Bank folder and sort the file list by date modified. Compare the most recent date modified in each file. The current bank file has the most recent date modified.
Within the current bank folder (C:\AirWatch\CloudConnector\Bank#), open the CloudConnector.exe.config file and change the level value in the from error to verbose and save the file.
After reproducing the error, open Windows Explorer on the ACC server and browser to the C:\AirWatch\Logs directory. Copy the appropriate log to a new location for use in support/troubleshooting.
Be sure to change the loggingConfiguration level value from verbose to error and save the file to prevent unnecessary impact to the ACC server.
AirWatch API Services (API)
To verbose the API Service Log, perform the following:
On the server running API services, open Windows Explorer and browse to C:\AirWatch\AirWatch #.#\Websites\AirWatchApi. Note: You can determine the API server by browsing to Groups & Settings > All Settings > System > Advanced > Site URL’s.
Open the web.config file, and look for the loggingConfiguration key.
Change the value for level from error to verbose and save the web.config file.
Restart IIS services.
Reproduce your issue and then copy the log from C:\AirWatch\Logs\AirWatchAPI\webserviceapi.log.
Change the value for level from verbose back to error and save the web.config file.
Restart IIS Services.
AirWatch Cloud Messaging (AWCM)
To verbose the AWCM logs, please perform the following steps:
Open the logback.xml file. The path to access the file:\AirWatch\AirWatch x.x\AWCM\config\logback.xml.
Search for the following:
Change the state from error to debug.
Save the file and restart the AWCM services.
Note
Once the issue is reproduced, return logging level back to info and restart the AWCM services. Or the AWCM disk may overflow with logs.
Folder = AWCM
Log name = Awcm.log
Contains information on AWCM such as status, history, properties, and additional sub-services.
Log name = AWCMservice.log
Contains log information on AWCM Java service wrapper.
ACC Logs
Use these steps below to verbose ACC logs:
On the ACC server navigate to *\AirWatch\AirWatch #.#\CloudConnector\Bank#*
#.# will be the AirWatch version you are using, if there are multiple choose the most recent.
ACC utilizes two distinct banks: one active and one is used for installation of automatic updates. If you are unsure of which bank is active, make changes to the CloudConnector.exe.config file in each bank. If one bank is empty or does not have the file, it is not the active bank.
Locate the log by looking at the filePath attribute from the line above. The path is included below as well \AirWatch\Logs\CloudConnector\CloudConnector.log
ACC doesn’t need to be restarted to pick up the logging level configuration change.
Console Services (CS)
To enable verbose logging for console and scheduler services, please perform the following steps:
Log in to the AirWatch console in question.
With the Global organization group selected, browse to Groups & Settings > All Settings > Admin > Diagnostics > Logging.
Change the logging level for the services in question to verbose and click Save.
Admin Console
Self-Service Portal
API
Scheduled Services (such as Inventory, Workflow, and Monitor services)
Reproduce your error, then open Windows Explorer and browser to C:\AirWatch\Logs_Service Folder_ and look for the latest log.
Change the Device Services logging level back to Error. This prevents logging from impacting system performance.
Device Services – Targeted
Depending on the version of AirWatch, it is possible to collect verbose logs for an individual device without having to verbose the logs for all devices. This is particularly helpful when troubleshooting a single device in a large production deployment. To do this, perform the following steps:
From within the AirWatch console device list view, click on your device to take you to the device details page.
Click More > Targeted Logging. If necessary, click the Continue Targeted Logging File Path to ensure the logging path is configured.
From the targeted logging page, click Create New Log and select the timeframe you want the logs to collect. Click Start. At any point, you can click Stop Logging to stop log collection for the device (such as after you have reproduced the issue).
Once the tests are completed, go to the appropriate server and look for the TargetedLogging folder.
Inside the folder is a zip file with the current date and time. Unzip the file to view the files.
Device Services – General
When you wish to verbose device services logging for all devices, perform the following:
Log in to the AirWatch console in question.
With the Global organization group selected, browser to Groups & Settings > All Settings > Admin > Diagnostics > Logging.
Change the Device Services logging level to verbose and click Save.
Reproduce your error, then open Windows Explorer and browser to C:\AirWatch\Logs\DeviceServices\ and look for the latest log.
Change the Devices Services logging level back to Error. This prevents logging from impacting system performance.
SEG Console, Setup, and Integration Logs
To verbose the SEG logs for console/setup/integration, please perform the following steps:
Open Windows Explorer on the SEG server and browser to C:\AirWatch\Logs
Note the following Folders and change the appropriate config log level from error to verbose:
Services – Contains the AW.EAS.IntegrationService.log file which details communications between the AirWatch API server and SEG server. Note: This log is verbosed by changing the level value in the key of the AW.ES.IntegrationService.Exe.config file in the C:\AirWatch\AirWatch #.#\AW.Eas.IntegrationService folder.
SEG Setup – Contains the AW.EAS.Setup.log file which details activity related to the http://localhost/SEGSetup website. Note: This log is verbosed by changing the level value in the key of the web.config file in the C:\AirWatch\AirWatch #.#\AW.Eas.Setup folder.
SEG Console – Contains the AW.EAS.Web.log file which details activity related to the http://localhost/SEGConsole website. Note: This log is verbosed by changing the level value in the key of the web.config file in the C:\AirWatch\AirWatch #.#\AW.Eas.web folder.
Before reproducing your issue, making the necessary change to the LoggingConfiguration key for the service in question.
After reproducing the error, open Windows Explorer on the SEG server and browse to the appropriate subfolder in the C:\AirWatch\Logs\ directory. Copy the appropriate log to a new location for use in support/troubleshooting.
Be sure to change the loggingConfiguration level value (currently verbose) in the appropriate configuration file back to error to prevent unnecessary impact to the SEG server.
SEG Exchange ActiveSync (EAS) Listener Logs
To verbose the SEG EAS Listener logs, please perform the following steps:
In the “Log Level” drop down, select verbose and click Save. Note: This changes the level value in the key of the web.config file in the C:\AirWatch\AirWatch #.#\AW.Eas.Web.Listener folder.
Copy the AW.Eas.Web.Listener.log to a new location for use in support/troubleshooting.
In your Internet browser, change the “Log Level” drop down back to error and click Save.
FTP Relay Server (Rugged Management)
Logging for the relay server is saved in the following location:
Browse to the C:\AirWatch\Logs\Service folder.
The logging for the Relay Server is saved in the ContentDeliveryService.log file.
Collecting logs from the Admin Console
If you do not have immediate access to the on-premise servers to access the logs, you can retrieve SEG/ACC logs directly from the console from the following page:
Navigate to System > Admin > Diagnostics > System Health. Click on the installed service you wish to pull the logs from.
In the pop-up box now displayed, click on the “Acquire Logs,” for the required service, from the four-button menu on the right.
Now the “Download” button is activated and you can click on it to download and view logs remotely.
Note: The System Health dashboard will be populated only if you have any of the services (ACC/SEG) already installed and running.
EMail Notification Service (ENS)
ENSv2 is a Windows Service ‘AWSubscription’. Like other AirWatch services, relevant logs can be found in the path {Installation Path}/Logs, and the logging level can be configured by editing parameters to traceEnabled=“true” Level=“Verbose” in the app config ({Installation Path}\Config\WebSites\Web.config) file located in the installation folder
ENSv2 Errors are in ENS.log and ReSubscriptionMechanism.log
Note
The service must be restarted for logging changes to take effect.
When set to verbose, you will be able to identify log messages pertaining to both new subscriptions being created, as well as any device compliance state-changes being identified. For example, if a device becomes compromised and is then marked as non-compliant. In the logs, a message indicating that a device’s access state is True indicates that the device is allowed, whereas False means the device is blocked.
Boxer communicates with a few different systems to provide these services.
The flow of the Android Boxer log file looks like this:
Boxer reaches out to the console to get the profile information;
Boxer reaches out to the console to get any S/MIME certificates and client authentication certificates available from the console;
Boxer reaches out to the Exchange ActiveSync(EAS) email endpoint to make the options, provision, foldersync, and ping request;
Boxer reaches out to the Email Notification S ervice (ENS) and provides the Exchange Web Services (EWS) credential information that was used for ActiveSync so it can subscrib e to email notifications.
Boxer logs are in GMT. That means the entries there are 5 hours ahead of EST time. In addition, the logs are in 24 hour time so you will need to subtract 12 if you want am/pm.
The very first line in the Boxer logs has the last date of the logs in the file. For example 2019-01-08T21:28:04.539Z - [-] - ###--HEADER--###
Boxer logs can persist in the app for up to 3 days, so they can be pulled for review even if the issue hasnt occurred recently, but at least within the 3 day period.
This is useful for intermittent types of issues, or where there is a delay in an affected user reporting the issue to their techsupport.
Boxer Communication Logs
Here is an example of what you might see in the logs followed by notes (in bold) that detail what the log entry tracks:
On the console where you configure your Boxer profile, you will have places where you can enter profile information like Account Name, Domain, User, etc… However, in the Boxer logs, when you are looking for the corresponding data there, the wording might be slightly different. You can use the mapping information below to see what this would say in the Boxer logs. The value on the left is what you will see in the console. The value after “=” is what you will see in the Boxer logs.
Boxer reaches out to the console to get the profile information
2019-02-07T15:21:55.345Z I [18459-BoxerWorker-5] - App initialization step complete: 12019-02-07T15:21:55.578Z E [18459-main] - FLF.setSelectedAccount(null) called! Destroying existing loader.
2019-02-07T15:21:55.589Z I [18459-BoxerWorker-3] - Waiting for app restrictions
This entry is the best example we have of when Boxer reaches out to the console. You can use Fiddler to further determine when Boxer is reaching out to the console. In the Boxer logs, you can’t directly see this. The other place you can see this is in the ADB device logs. The line here that says “waiting for app restrictions” just indicates that Boxer is waiting to read from the database. Boxer reaches out to the console to get any S/MIME certificates and client authentication certificates available from the console.
2019-02-07T15:21:56.256Z I [18459-IntentService[AirWatchAccountSetupService]] - Fetching S/MIME signing certificate
2019-02-07T15:21:58.021Z I [18459-AsyncTask #2] - Certificate being fetched for : AccountAuthenticationCertificateId2019-02-07T15:21:59.013Z I [18459-AsyncTask #2] - Certificate fetch successful 2019-02-07T15:21:59.755Z I [18459-Thread-7] - TrackingKeyManager: requesting a client cert aliasfor 66.170.96.7
2019-02-07T15:22:05.776Z I [18459-Thread-9] - Registering socket factory for certificate alias[AW-be6fad91fe2b4291b1d392c9eabf90be]2019-02-07T15:22:05.846Z D [18459-Thread-9] - Found cert chain: [[0] Version: 3SerialNumber: 468315651040541492877707779630191635557515624IssuerDN: DC=local,DC=milkyway,CN=milkyway-SUN-CA Start Date: Thu Feb 07 10:11:47 EST 2019Final Date: Sat Mar 09 10:11:47 EST 2019SubjectDN: CN=lwilcox
Public Key: RSA Public Key
modulus: ccbf28975eafd49dedfcfc43f9d66a309d36c4c636fbece2bf9faa87fe6544c8e025c3da260eb4bc28096f665a231202c5cf53dbb5f1d08ceac4d9af90f0605ee2951e6239576749d39d17e8d411b39c03e6a68e155083866a69de610853ab83d149c0228b6f0b0d67d4e9e1093ce8a3316a563c48d91fcc000bae01c150644113a527d611d83f7303825a58a4382c1818d8fd56b2064ef495c709e4ae4366e7793e29cd3b376e9660028269c8233ba8cd9a42e57dc2f07087d25fc6ce536d3bcbc8fabe2f6c408ddb2fefd8b80fdc029ba16237b48d26072d0f88f9e982ab37720883ff7bfb35bc409637fb314c00cbc1cb262e7406732c45c400ca45d9357b
public exponent: 10001
Boxer reaches out to the Exchange ActiveSync (EAS) email endpoint to make the options, provision, foldersync, and ping request.
Making the Options Request
Boxer Options Request…
2019-02-07T15:22:05.859Z D [18459-Thread-9] - EasServerConnection about to make request OPTIONS https+clientCert+aw-be6fad91fe2b4291b1d392c9eabf90be://nas98.airwlab.com:8002/Microsoft-Server-ActiveSync HTTP/1.1 X-VMware-Boxer-RequestId:5bde2467-38bc-4a8e-9599-256217cb8c6d
2019-02-07T15:22:05.859Z V [18459-Thread-9] - query: uri=content://com.boxer.email.provider/account/1, match is 12019-02-07T15:22:06.080Z I [18459-Thread-9] - Requesting a client cert aliasfor[RSA, EC]2019-02-07T15:22:06.081Z I [18459-Thread-9] - Requesting a client private key foralias[AW-be6fad91fe2b4291b1d392c9eabf90be]2019-02-07T15:22:06.082Z I [18459-Thread-9] - Requesting a client certificate chain foralias[AW-be6fad91fe2b4291b1d392c9eabf90be]2019-02-07T15:22:06.178Z V [18459-Thread-9] - SSL socket using protocol: TLSv1.2
2019-02-07T15:22:11.485Z V [18459-Thread-9] - Response headers:
Header [Strict-Transport-Security], value [max-age=31536000;includeSubDomains] Header [X-Frame-Options], value [sameorigin]Header [X-XSS-Protection], value [1;mode=block]Header [X-Content-Type-Options], value [nosniff]Header [Content-Security-Policy], value [default-src 'self'; font-src 'self' data:; script-src 'unsafe-eval''self'; style-src 'unsafe-inline''self'; object-src 'none';] Header [Cache-Control], value [private]Header [Allow], value [OPTIONS,POST]Header [Content-Type], value [application/vnd.ms-sync.wbxml]Header [Server], value [Microsoft-IIS/8.5]Header [request-id], value [73ab0f67-308f-45d2-a76b-04eb72fde4e8]Header [X-CalculatedBETarget], value [earth.milkyway.local]Header [MS-Server-ActiveSync], value [15.0]Header [MS-ASProtocolVersions], value [2.0,2.1,2.5,12.0,12.1,14.0,14.1]Header [MS-ASProtocolCommands], value [Sync,SendMail,SmartForward,SmartReply,GetAttachment,GetHierarchy,CreateCollection,DeleteCollection,MoveCollection,FolderSync,FolderCreate,FolderDelete,FolderUpdate,MoveItems,GetItemEstimate,MeetingResponse,Search,Settings,Ping,ItemOperations,Provision,ResolveRecipients,ValidateCert] Header [Public], value [OPTIONS,POST]Header [X-MS-BackOffDuration], value [L/-470]Header [X-DiagInfo], value [EARTH]Header [X-BEServer], value [EARTH]Header [X-AspNet-Version], value [4.0.30319]Header [Persistent-Auth], value [false]Header [X-Powered-By], value [ASP.NET]Header [X-FEServer], value [MERCURY]Header [WWW-Authenticate], value [Negotiate YIGVBgkqhkiG9xIBAgICAG+BhTCBgqADAgEFoQMCAQ+idjB0oAMCAReibQRr1j3vRSNgnWRAjRmh9+c4H68rnNGVHQxp2bq87jvJsxPfGt+Wi1ciWxUKztM5Rjq2HiDSiMttELVzigj9rrUB00pGrB/LemrzZeB1NU3oyWSlYfGMd1uvo96mRGykkn8vA0kW3mlXDKacEz0=]Header [Date], value [Thu, 07 Feb 2019 15:22:00 GMT]Header [X-AW-SEG-SERVER-INFO], value [***.***.***.43|2.9.0.1|JSEG-SEG368-JOB1-2|Tue 08 Jan 2019 03:32:23 PM EST -0500]Header [X-AW-SEG-TRANSACTION-ID], value [c42418f6-55a1-4ffc-b4fd-6e94c2d70fe3]Header [X-Correlation-ID], value [c42418f6-55a1-4ffc-b4fd-6e94c2d70fe3]Header [Content-Length], value [0]Header [Set-Cookie], value [ClientId="NGLCEUYUWLVTAAWHW";$Path="/";$Domain="nas98.airwlab.com:8002";HttpOnly]Header [Set-Cookie], value [X-BackEndCookie="S-1-5-21-174156188-4291662551-709137977-1610=u56Lnp2ejJqByprLzcrHyMzSx8aantLLz8ic0p7Kmc7Sz52bnZqZy8nIy8mZgYHNz87G0s/M0s/Gq87Kxc3Nxc/P";$Path="/Microsoft-Server-ActiveSync";Secure;$Domain="nas98.airwlab.com:8002";HttpOnly]2019-02-07T15:22:11.535Z D [18459-Thread-9] - Server supports versions: 2.0,2.1,2.5,12.0,12.1,14.0,14.1
2019-02-07T15:22:11.625Z V [18459-Thread-9] - <SyncKey>
2019-02-07T15:22:11.625Z V [18459-Thread-9]-0
2019-02-07T15:22:11.625Z V [18459-Thread-9] - </SyncKey>
2019-02-07T15:22:11.625Z V [18459-Thread-9] - </FolderSync>
Perform a FolderSync
Boxer FolderSync…
2019-02-07T15:22:11.634Z D [18459-Thread-9 ] - EasServerConnection about to make request POST https+clientCert+aw-be6fad91fe2b4291b1d392c9eabf90be://nas98.airwlab.com:8002/Microsoft-Server-ActiveSync?Cmd=FolderSync&User=milkyway%5Clwilcox%40milkyway.local&DeviceId=1D62C4D972BB4A4799474C5C0E5BA437&DeviceType=BoxerManagedAndroid HTTP/1.1 X-VMware-Boxer-RequestId:572f2ab2-cdf1-4960-b30a-6b078365b3aa
2019-02-07T15:22:11.805Z V [18459-Thread-9 ] - SSL socket using protocol: TLSv1.2
2019-02-07T15:22:15.574Z V [18459-Thread-9 ] - Response headers:
Header [Strict-Transport-Security], value [max-age=31536000;includeSubDomains] Header [X-Frame-Options], value [sameorigin]Header [X-XSS-Protection], value [1;mode=block]Header [X-Content-Type-Options], value [nosniff]Header [Content-Security-Policy], value [default-src 'self'; font-src 'self' data:; script-src 'unsafe-eval''self'; style-src 'unsafe-inline''self'; object-src 'none';] Header [Cache-Control], value [private]Header [Content-Type], value [application/vnd.ms-sync.wbxml]Header [Vary], value [Accept-Encoding]Header [Server], value [Microsoft-IIS/8.5]Header [request-id], value [3cd7bb11-e3c4-4292-be4a-87cb5d388473]Header [X-CalculatedBETarget], value [earth.milkyway.local]Header [MS-Server-ActiveSync], value [15.0]Header [X-MS-BackOffDuration], value [L/-469]Header [X-DiagInfo], value [EARTH]Header [X-BEServer], value [EARTH]Header [X-AspNet-Version], value [4.0.30319]Header [Persistent-Auth], value [false]Header [X-Powered-By], value [ASP.NET]Header [X-FEServer], value [MERCURY]Header [WWW-Authenticate], value [Negotiate YIGVBgkqhkiG9xIBAgICAG+BhTCBgqADAgEFoQMCAQ+idjB0oAMCAReibQRrSwxIlKGW3nSAU46FtN7BJ3AO5tTFRrU/dbnLqIXVdl6/ySBXRFmuQ/AsFOP95xNJf0ze6ZG5Vrk/KeCaxlmsaSqlShiRmjPAxAyuIzJ8vKnjzQFf6MPFepwruykQpNDqjdGtRs7RV1/uy8M=] Header [Date], value [Thu, 07 Feb 2019 15:22:04 GMT]Header [X-AW-SEG-SERVER-INFO], value [***.***.***.43|2.9.0.1|JSEG-SEG368-JOB1-2|Tue 08 Jan 2019 03:32:23 PM EST -0500]Header [X-AW-SEG-TRANSACTION-ID], value [51e38c4f-5114-4465-a956-6f66f86c967d]Header [X-Correlation-ID], value [51e38c4f-5114-4465-a956-6f66f86c967d]Header [Set-Cookie], value [X-BackEndCookie="S-1-5-21-174156188-4291662551-709137977-1610=u56Lnp2ejJqByprLzcrHyMzSx8aantLLz8ic0p7Kmc7Sz52bnZqZy8nIy8mZgYHNz87G0s/M0s/Gq87Kxc3Nxc/L";$Path="/Microsoft-Server-ActiveSync";Secure;$Domain="nas98.airwlab.com:8002";HttpOnly] Header [content-encoding], value [gzip]Header [transfer-encoding], value [chunked]2019-02-07T15:22:15.667Z V [18459-Thread-9] - <Status>
2019-02-07T15:22:15.668Z V [18459-Thread-9] - Status: 1442019-02-07T15:22:15.671Z V [18459-Thread-9] - </Status>
Perform a provision request
Boxer provision request…
2019-02-07T15:22:15.681Z I [18459-Thread-9 ] - Received needs provision response in EasOperation.performOperation
2019-02-07T15:22:15.723Z D [18459-Thread-9 ] - EasServerConnection about to make request POST https+clientCert+aw-be6fad91fe2b4291b1d392c9eabf90be://nas98.airwlab.com:8002/Microsoft-Server-ActiveSync?Cmd=Provision&User=milkyway%5Clwilcox%40milkyway.local&DeviceId=1D62C4D972BB4A4799474C5C0E5BA437&DeviceType=BoxerManagedAndroid HTTP/1.1 X-VMware-Boxer-RequestId:08e64270-501d-4732-9675-5309dd6a3675
2019-02-07T15:22:15.834Z V [18459-Thread-9 ] - SSL socket using protocol: TLSv1.2
2019-02-07T15:22:19.828Z V [18459-Thread-9 ] - Response headers:
Header [Strict-Transport-Security], value [max-age=31536000;includeSubDomains] Header [X-Frame-Options], value [sameorigin]Header [X-XSS-Protection], value [1;mode=block]Header [X-Content-Type-Options], value [nosniff]Header [Content-Security-Policy], value [default-src 'self'; font-src 'self' data:; script-src 'unsafe-eval''self'; style-src 'unsafe-inline''self'; object-src 'none';] Header [Cache-Control], value [private]Header [Content-Type], value [application/vnd.ms-sync.wbxml]Header [Vary], value [Accept-Encoding]Header [Server], value [Microsoft-IIS/8.5]Header [request-id], value [dcda9893-be8c-4b17-8fe5-067f71dd57e0]Header [X-CalculatedBETarget], value [earth.milkyway.local]Header [MS-Server-ActiveSync], value [15.0]Header [X-MS-BackOffDuration], value [L/-469]Header [X-DiagInfo], value [EARTH]Header [X-BEServer], value [EARTH]Header [X-AspNet-Version], value [4.0.30319]Header [Persistent-Auth], value [false]Header [X-Powered-By], value [ASP.NET]Header [X-FEServer], value [MERCURY]Header [WWW-Authenticate], value [Negotiate YIGVBgkqhkiG9xIBAgICAG+BhTCBgqADAgEFoQMCAQ+idjB0oAMCAReibQRr9huiSZNPIN39dB0GIaIF4gSACDj8yrV879OKH5dUeSEQzFnRcPGIShPvLFbDCrDS+ii/N9SAvk/B20xq+MXtxXRBsHyJXFJo5vIRjkWq+3Qis5c/4+gP5Vi0bsvlVSKIW4yqRyGe5ZfGoNc=] Header [Date], value [Thu, 07 Feb 2019 15:22:08 GMT]Header [X-AW-SEG-SERVER-INFO], value [***.***.***.43|2.9.0.1|JSEG-SEG368-JOB1-2|Tue 08 Jan 2019 03:32:23 PM EST -0500]Header [X-AW-SEG-TRANSACTION-ID], value [13206ae4-e2c0-4579-a992-a3d9664a5763]Header [X-Correlation-ID], value [13206ae4-e2c0-4579-a992-a3d9664a5763]Header [Set-Cookie], value [X-BackEndCookie="S-1-5-21-174156188-4291662551-709137977-1610=u56Lnp2ejJqByprLzcrHyMzSx8aantLLz8ic0p7Kmc7Sz52bnZqZy8nIy8mZgYHNz87G0s/M0s/Gq87Kxc3Nxc/H";$Path="/Microsoft-Server-ActiveSync";Secure;$Domain="nas98.airwlab.com:8002";HttpOnly] Header [content-encoding], value [gzip]Header [transfer-encoding], value [chunked]2019-02-07T15:22:19.882Z D [18459-Thread-9 ] - Provision status: 1
Perform another FolderSync, this time it works. Start email sync.
Boxer another FolderSync…
2019-02-07T15:22:24.586Z I [18459-AccountsUpdateListener] - Accounts changed - requesting FolderSync for unsynced accounts
2019-02-07T15:22:24.975Z I [18459-SyncAdapterThread-1] - Calendar sync for account lwilcox@labmail.airwlab.com, with extras Bundle[{}]2019-02-07T15:22:25.236Z I [18459-SyncAdapterThread-1] - Email sync for account lwilcox@labmail.airwlab.com, with extras Bundle[{}]2019-02-07T15:22:29.810Z I [18459-Thread-10] - Initial sync requested for account: [nas98.airwlab.com:8002:lwilcox@labmail.airwlab.com:Legend Wilcox]2019-02-07T15:22:30.430Z I [18459-BoxerWorker-9] - requestSync EmailProvider startSync Account {name=lwilcox@labmail.airwlab.com, type=com.boxer.exchange}, Bundle[{do_not_retry=false, __userRequest__=true, callback_method=sync_status, force=true, expedited=true, callback_uri=content://com.boxer.email.provider}]2019-02-07T15:22:30.447Z I [18459-SyncAdapterThread-2] - Email sync for account lwilcox@labmail.airwlab.com, with extras Bundle[{ignore_settings=true, do_not_retry=false, __userRequest__=true, callback_method=sync_status, force=true, expedited=true, ignore_backoff=true, callback_uri=content://com.boxer.email.provider}]2019-02-07T15:22:34.950Z I [18459-pool-21-thread-4] - Starting sync command2019-02-07T15:22:34.993Z I [18459-pool-21-thread-2] - Syncing account 1 mailbox "Sent Items"(class Email) with syncKey 0, operation name= HtmlMailSync
2019-02-07T15:22:39.191Z I [18459-pool-21-thread-2] - Committing new sync key (684740726)for mailbox (Sent Items)2019-02-07T15:22:39.216Z I [18459-pool-21-thread-2] - Sync command finished with result 12019-02-07T15:23:00.737Z I [18459-SyncAdapterThread-2] - Initial sync completed
Ping example
2019-02-07T15:40:12.911Z I [18459-PingTask-lwilcox@labmail.airwlab.com] - Ping task starting for12019-02-07T15:40:12.912Z I [18459-PingTask-lwilcox@labmail.airwlab.com] - Exchange ping starting
2019-02-07T15:43:00.125Z I [18459-PingTask-lwilcox@labmail.airwlab.com] - Changes found in: 82019-02-07T15:43:00.126Z I [18459-PingTask-lwilcox@labmail.airwlab.com] - Ping found changed folders for account 12019-02-07T15:43:00.137Z I [18459-PingTask-lwilcox@labmail.airwlab.com] - requestSync EasOperation requestSyncForMailboxes Account {name=lwilcox@labmail.airwlab.com, type=com.boxer.exchange}, Bundle[{__mailboxCount__=1, force=true, expedited=true, __mailboxId0__=5, PING_ERROR_COUNT=3}] 2019-02-07T15:43:00.139Z I [18459-PingTask-lwilcox@labmail.airwlab.com] - Exchange ping finished with result 22019-02-07T15:43:00.200Z I [18459-SyncAdapterThread-8 ] - Email sync for account lwilcox@labmail.airwlab.com, with extras Bundle[{ignore_settings=true, __mailboxCount__=1, force=true, expedited=true, ignore_backoff=true, __mailboxId0__=5, PING_ERROR_COUNT=3}] 2019-02-07T15:43:00.316Z I [18459-SyncAdapterThread-8 ] - Starting sync command
Boxer reaches out to the Email Notification Service (ENS) and provides the Exchange Web Services (EWS) credential information that was used for ActiveSync so it can subscribe to email notifications.
2019-02-07T15:23:08.315Z I [18459-AsyncTask #4 ] - Ens registration for account (id=1) is successful!
2019-02-07T15:43:30.041Z I [18459-main ] - Sync triggered from distance
You can use Notepad++ to search the logs using the following search terms.
• “error” - This is a very general way to look for errors. You will have a lot of false/positives when using this search criteria.
• “exception “ - You can use this to search the file for exceptions that are generated when the application runs into an error.
• “Current Network” - This will show you what network connection the mobile device was connected to 4g, wi-fi, etc…
• “distance” - This shows you each time the ENS server has reached out to the mobile device to wake it up, send a notification, and trigger a sync • “transitioning” - Use this search term to tell when the application is transitioning from background to foreground and vice versa.
• “requestPing” - This will show you when the device reaches out to the OS to use the Android SyncAdaptor which it uses to request the ping. The response to this request will be “Email sync for account”.
• “Email sync for account” - This will be a response from the OS for a command “requestPing” or “requestSync “. Take note of how long between the request and the reply from the OS. If it’s a long time, it’s likely being throttled by the OS due to battery optimization or a third party product.
• “Changes found in: “ - is the response to a ping request. This tells us if the ping found any changes in the inbox. If it did, we will now do a “requestSync " to bring those emails or changes into Boxer.
• “requestSync” - This will show you when the device reaches out to the OS to use the Android SyncAdaptor which it uses to request email sync. The response to this request will be “Email sync for account”.
• “Q-AppInitialization “ - This shows you when the application is starting up. You will see this when you force close and reopen the application or when you start the application after a crash.
• “PingTask “ - shows you all activities related to pings
• “SyncAdapterThread “ - shows you all activities related to sync operations.
• “Email sync for account “ - The response from the OS after a “requestSync” or “RequestPing” operation.
• “ens” - Search the log files for ens errors and settings.
Collecting Boxer Logs When You Can’t Get Into Android Boxer
Depending on what model phone you have, you can follow one of the processes below to collect Boxer logs in the event that you can’t get into Boxer due to an error. You may have a different model device than the ones listed, but the process will be very similar.
Samsung S9+
• Go to “Settings” on the phone followed by “Apps” • Select “Boxer”
• Select “Mobile Data”
• Select “View App settings”
• Select “Send logs”
• Use one of the other mechanisms to send the logs (either by copying the logs out or another email client).
On Motorola X Pure
• Go to “Settings” on the phone followed by “Apps”
• Select “Boxer”
• Select “Data Usage”
• Select “App settings”
• Select “Send logs”
• Use one of the other mechanisms to send the logs (either by copying the logs out or another email client).
To gather logs using ADB, please perform the following steps (see the following page for details):
Download and set up the Android SDK per the SDK documentation.
Open Windows Explorer and browse to the \platform-tools folder. Ensure you see the adb.exe file.
Open a CMD window and navigate to the platform-tools folder. Or, in Windows 7, navigate back to the SDK folder, then Shift + Right-Click on the platform-tools folder, and select Open Command Window Here.
In your Notification Center, you may need to make sure the device is not connected in USB Media Device mode.
In the CMD window, type adb logcat –v long > androidlog.txt
On the Android device, recreate whatever error you are trying to log.
When complete, from within the CMD window use CTRL + C to end the logging.
Go back to the platform-tools folder and find the log file (androidlog.txt) that you just created.
Windows 7/8/8.1/10/11
To gather logs, please perform the following steps:
Click on Start > Run, type eventtvwr.msc and click OK. On Windows 8/8.1, from the start menu you can simply start typing Event and select the View Event Logs item returned from universal search.
Expand Event Viewer (Local) > Windows Logs and select the Application log.
You can filter logs by Event ID or Source if desired.
To export for support, click on either Save All Events As or Save Selected Events to export the log entries as an *.evtx file which can be sent to support.
You can also find logs in the following location: \AgentUI\Logs
AwclClient.log - AWCM-related Issues
AWProcessCommands.log - Issues with sending commands to the device
NativeEnrollment.log - Issues with Enrollment
TaskScheduler.log - Issues with samples sent to console
Windows Phone 8.1 (deprecated)
To gather logs, please perform the following steps:
Ensure you have Visual Studios 2013 Update 3 installed. If not, perform the following:
Download the Visual Studio Express 2013 for Windows and Install it.
From within Visual Studios, click on Tools > Windows Phone 8.1 > Developer Unlock. Follow the prompts to unlock your Windows Phone 8.1 device.
From within Visual Studios, click on Tools > Windows Phone 8.1 > Developer Power tools.
Select Device from the Select Device dropdown, then click Connect. If prompted, click Install to install the Phone Tools Update Pack.
Select the Performance Recorder tab, then check the Enterprise Management option under the Extras profile category.
Click the Start button in the Developer Power Tools window to start a log.
Run your scenarios and re-create the issue you’re experiencing.
Click the Stop button in the Developer Power Tools window to stop logging and save the ETW to a local location.
You will need to download the Windows Performance Analyzer to view the logs. This can be found in the Windows Performance Toolkit included in the Windows Assessment & Deployment Toolkit (ADK) and Windows Software Development Kit (SDK).
Windows Performance Toolkit
Open the Windows Performance Analyzer and Open the ETL file.
In the Graph Explorer window, expand System Activity and view the Generic Events window.
Double-click the graphic bars in the Generic Events window to display an Analysis window.
In the Analysis window, click Open View Editor to show a Generic Events View Editor window.
In the Generic Events View Editor window, ensure the Message box is checked and click Apply:
The Message field in the analysis window provides the MDM specific log message under various providers.
Microsoft-WindowsPhone-Enrollment-API-Provider – ETW logs for MDM Enrollment and MDM Client Cert Renew Process.
All log settings are configured in the log_config.cfg file in the \Program Files\AirWatch directory on the device. The file will resemble the following:
In general, the following notes apply to Windows Mobile device logging:
The logging level can be modified as a whole, or on an individual basis:
The asterisk configuration is the default config for all logs. Trace levels vary from 1 (basic) to 5 (verbose/debug).
Each individual section, which can be used to increase logging to override the default setting from the asterisk section.
The log files which are available can vary (based on configuration and OEM), but the following are the most common:
aw_setup - Provides logging information relating to the AWMasterSetup utility, which is responsible for initiating the agent install and uninstall process on a device. This is the only log file that is not located in the “\Program Files\AirWatch” directory and is instead located in the root of the file system.
awacmclient - Provides logging information relating to the AWCM client on the device
awapplicationmanager - Provides logging information relating to product provisioning
awprocesscommands - Provides logging information relating to the execution of MDM commands and installation of profiles
AWService - Provides information about the AWService.exe component, which is responsible for managing beacon and interrogator samples
awapplyprofile - Relates to installation of the agent settings xml file which occurs during the enrollment process
awregisterdevice - Provides information about the registering of the device that occurs during the enrollment process
awapplauncher - Provides information about the Application Launcher executable. This log will only be present if the App Launcher utility is assigned to and being used by a device.
fusionwlansetup - Provides information about configuring and setting up the Fusion WiFi driver on Motorola devices.
The general process for configuring log files is as follows:
Transfer the log file to your machine. This can be done through the file manager utility in device details or through remote management if a client has that configured.
Open the log file via a basic text editor such as notepad.
Edit the desired trace level to the needed value.
Save the log file.
Transfer the log file back down to the “Program Files\AirWatch” directory on the devices. This can be accomplished via file manager, remote manager, or product provisioning. To be safe, you may elect to first delete the old log_config.cfg file.
Restart AWService on the device once it has the updated log_config.cfg file. This can be accomplished by directly restarting the AWService through the “Restart AirWatch Agent” or the “Warm Boot” MDM commands that are available in the AirWatch Console.
Once the AWService has been restarted, the new logging configuration will take effect. Reproduce your issue and then repeat the steps to turn the logging back down on the device.
Collecting Service/Functionality Specific Logs
Product Provisioning
Review the AirWatch Agent Logs and look for the following items to help you troubleshoot what is occurring:
If the device is newly enrolled, you’ll see the following in the logs: A message from [AWProductHandler sendProductResponses] stating “Products: No products with results to be sent!”
A message from [AWEnhancedProductsHandler handleCommand:] stating “Got Products New Manifest”
Note: In the manifest will be a line entry called ProductID". You’ll want to save this for later on.
Depending on the number of products being installed, you may see an entry for each product that is required.
Messages from [AWAppDataManager readJobProduct:] looking to see if the product is downloaded to the local cache
Messages from [AWOSXUtils deleteFile:] where it attempts to delete any pre-existing plist file for the products.
Messages from [AWJob printJob] which show the sequence number assigned to the Product which will be installed.
From this point forward you can search the log by the sequence number assigned to the product install job:
Messages about the job being queued
Messages about the job being started.
The line will look like this: airwatchd[PID] : - [AWJobQueue doJob] [Line 98] THREAD: Current Job: where PID is the AirWatch Agent Process ID and the JobID is the Sequence Number assigned to the product.
You can get additional information about the product actions occurring by searching from that point forward for entries from the process ID!
Messages about any files being downloaded to the product cache
Messages about Job Status Change. You’ll want to search for a line ending in Job Status changed ========> :AWJobStatusFailed!" From that point, search up in the log for messages relating to the JobID and/or the ProductID (as found in the manifest). All these messages should be coming from the Process ID of the Airwatch agent that initially started the install.
3. Open a new terminal and install frida, this will be the main framework that will be used by the underlying scripts
pip install frida
4. Once the frida is installed successfully, make sure to download the frida-server binary depending on the device type. The frida-server binary version and the frida version must match for proper dump.
Once the correct device frida-server binary is downloaded, unarchive the compressed file. The frida-server binary file should look like “frida-server-10.7.5-android-x86_64” which will be different depending on the device architecture.
5. Put the frida-server binary in to the Android device (using ADB tool):
adb root # might be requiredadb push frida-server /data/local/tmp/ # push the binary frida-server file into the deviceadb shell "chmod 755 /data/local/tmp/frida-server"# make the binary file executable via permissionsadb shell "/data/local/tmp/frida-server &"#run
Check if frida-server is running properly, type the following in the terminal:
frida-ps -U
This command will show you all the process running inside the mobile device.
6. At this point, we have frida-server as well as our application running on the device. It is time to download the fridump library that will allow us to dump the process memory in the device.
7. Now lets go ahead and try to dump the memory using fridump
Provide flag -s so that at the end of the dump process, there will be a separate script which will capture all the strings in generated dump files.
python fridump.py -s com.example.name
Dump files will be located under fridump/dump/*
strings.txt file is located under fridump/dump/strings.txt
For generating dump files in another location, please provide flag -o with the full path.
8. At this point, you will be able to analyze all the strings that reside in memory in strings.txt. However what if you are looking for something that consists of set of random bytes? For this purpose, you will need a separate python script that will analyze the dump files.
Go to the fridump repo and make sure you are at the root.
Download the python script MemDumpAnalyzer.py and copy the script to fridump folder root. For this script to work properly, your dump files must be located at the original destination which is fridump/dump/*.
The script supports two functionality which are to search a string in dump files or a file with hex encoded strings to be searched in the file separed with new lines. The string option allows you to search normal strings while file option will let you search random byte in hex. This is particularly useful since our keys are randomly generated keys which fail during encoding. Here are some examples of usages.
-f : file path to search for
-s : string to search for
-h : help for usage
9. Generate hex encoded keys and store them in a file shown below. All the keys will have to be separated by new lines and have to hex encoded. The scripts supports file with upper and lower case or with ‘0x’ suffix in hex encoding.
To document click-through steps on Windows machines, perform the following:
Click on Start > Run and type psr.exe to bring up the Problem Steps Recorder (or PSR, a built-in Windows utility).
Click on Start Record to begin capturing steps. Note: PSR captures screenshots of ALL monitors; no scoping.
Each Mouse-Click you make captures a screenshot. At any time during the session, click on Add Comment to provide more details about the screen, error, etc.
When finished, click Stop Record.
Choose where to Save the PSR file – it outputs a zip file containing a pre-compiled HTML (*.mhtml) file with all your screenshots and comments.
macOS
To document click-through steps on macOS machines, perform the following:
Launch QuickTime Player. You’ll find it in the Other folder within Launchpad.
From the QuickTime menu bar, click File > New Screen Recording. Click the red record button.
Optionally you may wish to select View > Float on Top before you start recording.
Optionally, you can select the upside-down triangle in the record screen to include audio recording during the screen capture for annotation.
Click the screen (or Click-Drag to select part of the screen) for recording.
When complete, click the Stop button that appears in the menu bar of the screen where you’re recording.
Click File > Save (or simply quit QuickTime) to be prompted with a location to save the screen capture. Note: Keep it moving when you record these; they create full-blown movies and the file gets large quickly.
### URI

Old API URI example: https://host/api/v1/mam/apps/public/{applicationid}/addsmartgroup/{smartgroupid}

New API URI example: https://host/api/mam/apps/public/{applicationid}/smartgroup/{smartgroupid}
You need a user account to run scripts in AirWatch REST API. Create a local account, take its’ credentials: domain\login:password, and go encode it at https://www.base64encode.org/
For example, 'lab\restguy:P@ssw0rd' ==> 'bGFiXHJlc3RndXk6UEBzc3cwcmQ='._
Turn API access ON for this account in the AirWatch console System -> Advanced -> API -> REST, we also should get an API Key for it.
Warning
AirWatch requires all requests to be made over SSL.
AirWatch limits the number of API requests that can be made during certain time periods. Rate limiting is done per Organization Group (OG) based on the API key used in the request.
**Server Throttling** - The limit imposed on an Organization Group for a 1 minute interval.
**Daily Quota** - The limit imposed on an Organization Groupvfor a 24-hour interval.
Local REST API Help
REST API Help is built into the AirWatch API Server host, go to link: https:///api/help/
Examples of using REST API
Let’s take some device from those enrolled in AirWatch and check out the apps list on it.
46 is the device ID inside AirWatch. How do you find the ID of a device? - simplest way to do this is open AirWatch console, device list page, and hover your mouse over any device name: you will see the ID in the browser URL status bar. Now, let’s see where the device has been for the last 2 days:
If there are any GPS points recorded for the device, we will get a list of them here. How can we use this? For example, customers say they hate Bing Maps embedded in AirWatch console. So we can build a little portal for searching devices, embed Google Maps into it and use the coordinates list to draw points.
One step deeper: suppose we need to show a customer how GPS coordinates are being collected, but the device enrolled is fresh, did not catch any sattelites yet or has problems with GPS module. Since GPS data is actually stored and taken from the SQL database, we can insert some coordinates there manually and see them right away on the Bing map in the console. See article on inserting false GPS history for a device in SQL section
Last example in this article I got from a cool client. They give out corporate iPhones to their employees, and all of those devices are supposed to be supervized. Only supervized devices are to be enrolled in AirWatch and get corp data, no personal gadgets coming through! AirWatch does have a tag for Apple device status (is it Supervized/DEP/Education?), but uses it only for reporting - there is no Compliance rule or filtering around this currently (a ticket in Jira on the topic is promised to be closed in AirWatch 9.6+). So the client gets a list of all enrolled devices and filters them manually:
importjsondevicelist=requests.get(consoleURL+'/api/mdm/devices/search',headers=basic_headers)foriindevicelist.json()["Devices"]:ifi["Platform"]=="Apple"andi["IsSupervised"]==Falseandi["EnrollmentStatus"]=="Enrolled":# Tag the toxic devices, or enterprise wipe them
By running this script every half-hour, all unsupervised devices are Enterprise Wiped shortly after they are enrolled.
Several typical functions of working with REST API:
Searching for devices in a tenant
Filtering devices by OS (Win/Linux)
Getting a list of tags for the tenant
Scanning a file with list of Notebook/Smartphone/Tablet serial keys, then checking if enrolled devices have such serials, and writing the result in a file
Tip
Default tags have ID 1-8. User-created tags have ID=10000+
Assigning devices to a chosen tag
Code is for Python version 3.7+, and is bundled into a dataclass as methods, with error-catching and logging support.
'''Version 0.3
Created by Alexei Rybalko aka Aagern.
22.05.2021'''importrequests,json,base64,logging,sysfromdataclassesimportdataclassfrompprintimportpprintlogging.basicConfig(filename="DeviceControl.log",level=logging.DEBUG,format="%(asctime)s:%(levelname)s:%(message)s")@dataclassclassDeviceControl:API_URL:str='https://mdm.example.local'API_Key:str='oxGI6OORljw/Qsql1OFBycjHvzQzEXVXa/tyEcCfIPI='API_User:str='defaultDomain\\api_user:VMware1!'Serials_File:str='S.csv'Output_File:str='DeviceSerials.csv'API_User_B64=base64.b64encode(API_User.encode('utf-8'))# convert to Base64API_User_UTF8=API_User_B64.decode('utf-8')Platforms={'Windows':12,'Linux':21}Header={"Authorization":"Basic "+API_User_UTF8,"aw-tenant-code":API_Key,"Accept":"application/json"}Devices={}Serials=[]defgetMDM(self,request):"""Get data from MDM Server. Input: API request text. Output: response data in JSON."""try:dataMDM=requests.get(self.API_URL+request,headers=self.Header)dataMDM.raise_for_status()data=dict(dataMDM.json())exceptrequests.exceptions.RequestExceptionase:logging.error(f'Get request failed with {e}')sys.exit(1)logging.debug(f'Data received from {self.API_URL}')returndatadefpostMDM(self,request,data):"""Post data to MDM Server. Input: API request text. Output: HTTP response status and details."""try:responseMDM=requests.post(self.API_URL+request,headers=self.Header,json=data)# Important to do json= here, rather than prepare data with json.dumps()exceptrequests.exceptions.RequestExceptionase:logging.error(f'Post request failed with {e}')sys.exit(1)logging.debug(f'Data sent to {self.API_URL}')returnresponseMDMdefscanSerialsFile(self,file=Serials_File):"""Input file with device serials. Output list of serials from file"""try:withopen(file,encoding='utf-8')asf:forserial_lineinf:self.Serials.append(serial_line)Serials[0]=Serials[0][1:]# Omitting special symbol at file startlogging.debug(f'Serials file {file} processed.')exceptOSErrorase:logging.error(f'File opening error with {e}')print('File not opened. Serials list empty')self.Serials=[]returnself.SerialsdeffilterDevices(self,platform='Windows'):"""
Method filters out Devices by Platform.
Inputs: Platform name.
Outputs: File with serials, Dictionary of Device:[Serial,ID]
"""PlatformID=self.Platforms[platform]dataDict=self.getMDM('/api/mdm/devices/search')fordeviceindataDict['Devices']:ifdevice['PlatformId']['Id']['Value']==PlatformID:self.Devices[device['DeviceFriendlyName']]=[device['SerialNumber']ifdevice['SerialNumber']else'Not set',device['Id']['Value']]try:withopen(self.Output_File,mode="wt",encoding='utf-8')asoutput_file:fordevice,serialinself.Devices.items():print(f"{device},{serial},",file=output_file)ifserialinSerials:print("Registered\n",file=output_file)else:print("NOT Registered\n",file=output_file)logging.debug(f'Output file {self.Output_File} written.')exceptOSErrorase:logging.error(f'File opening error with {e}')print('File not written.')sys.exit(1)returnself.DevicesdefgetMDMTags(self,tenant='570'):"""Get all tags in tenant. Input: tenant ID. Output: list of tags and their IDs."""tagsDict=self.getMDM(f'/api/system/groups/{tenant}/tags')fortagintagsDict['Tags']:print(f"Name={tag['TagName']}\t\tID={tag['Id']}")defsetTagDevices(self,tagID='10000',DeviceIDs=['3']):"""Method assigns devices to tag. Input: tag id, devices ID list. Output: total of assigned devices"""FuncDeviceIDs={"BulkValues":{"Value":DeviceIDs}}response=self.postMDM(f'/api/mdm/tags/{tagID}/adddevices',FuncDeviceIDs)print(f'Status code: {response.status_code}, \n{response.text}')# Examples of usageDevice=DeviceControl()data=Device.filterDevices()Device.getMDMTags()Device.setTagDevices()
Check device profile has VPN section and Per-App-VPN enabled:
View profile in XML, record VPN profile unique identifier (VPNUUID):
Verify the Application has “Use Per-App VPN” enabled:
Verify on device: check-in command is delivered to device, device receives App Install command:
Verify on device: Device receives Managed Application Attributes command
Managed Application Attributes command links app with VPN profile
Verify on device: (on iOS) Settings → General → Profiles & Device Management → MDM Profile → Apps
Application displays VPN information under Device Management settings: ”App will use a VPN for all network access”
Device Services (DS) server (front-end communication with managed device) logs:
Add application details (Example: add chrome and Firefox ) and DTR rules from that added application to Block, Tunnel ,By Pass or Proxy and provide destinations ( like *company-site.com)
Set default rule action to the Tunnel.
Create a user VPN profile and publish it to the device.
Check for application to be whitelisted in DTR, if not then add it with proper spelling/format
Check the logs for registration status of application
No Traffic Rules configured
Check for addition of application in Device Traffic Rule configuration in Windows Registry
Open \HKLM\SOFTWARE\VMware, Inc.\VMware Tunnel
Open the DeviceTrafficRules file
Check for the application to be whitelisted
Mutli-Auth. failure or compliance failures
Device must be whitelisted in Tunnel Configuration in Registry
Check for Device to be compliant
Check for validation of certificates
Go to Manage Compute Certificate → Trusted Root Certificate Authorities → Certificate → Check for Tunnel Server Authorized certificate
Whitelisted App’s traffic is not getting tunneled
The app’s executable may not be the one which is creating the connection.
Turn off the tunnel service, open the app in question and browse to an end-point. Run command netstat -aonb to check what executable is connecting to the end point. If this executable is different than the whitelisted exe then use this exe instead.
Warning
DO NOT whitelist svchost.exe. This is the common service used for many functions in windows. This may lead to BSOD.
Unable to open internal website (in configured domain) from whitelisted application
NRPT may be corrupted. Stop the vmware tunnel service. This should ideally clear all NRPT entries. Now open NRPT- Edit Group Policy → Windows Settings → Name Resolution Policy.
Check if there any entries left, if there are, then delete them.
Browsing experience via whitelisted app seems to be staggered. And unable to access configured domain websites
Turn on Debug logs for tunnel client. It is possible there is an issue with tunnel connectivity. Either tunnel client cannot reach tunnel server (there is an SSL error while trying to connect to server) or there is Multi-Auth Failure/ Whitelist failure for the device in server.
IKE2 cipher must be configured as well as CHILD cipher. Or else XML of config will be incorrect! Error example: ChildSecurityAssociationParameters does not specify keys ‘EncryptionAlgorithm’ and ‘IntegrityAlgorithm’ in the dictionary on the console XML.
Configure IKE as follows:
Configure Child as follows:
Warning
If configuring Always-On mode, the same thing applies to WIFI/Cellular radio buttons and IKE2/Child in this mode: both must be configured for correct XML to be formed!
CleanPC is the ability to remotely execute a PC Refresh (via MDM) which users can do manually on their device by going to Settings > Update & Security > Recovery > Reset this PC > Get Started, then you are presented with Keep my Files or Remove Everything.
This best explains the differences between Retaining User Data and without Retaining User Data. Calling these CSPs will un-enroll your device. If you are using the AirWatch Agent this will also be removed when calling retaining user data option. When the AirWatch Agent is removed this will un-enroll your device.
AppLocker contains capabilities and extensions that allow you to create rules to allow or deny applications from running based on unique identities of files and to specify which users or groups can run those applications.
Using AppLocker, you can:
Control the following types of applications: executable files (.exe and .com), scripts (.js, .ps1, .vbs, .cmd, and .bat), Windows Installer files (.msi and .msp), DLL files (.dll and .ocx), and packaged apps (.appx).
Define rules based on file attributes derived from the digital signature, including the publisher, product name, file name, and file version. For example, you can create rules based on the publisher attribute that is persistent through updates, or you can create rules for a specific version of a file.
Assign a rule to a security group or an individual user.
Create exceptions to rules. For example, you can create a rule that allows all Windows processes to run except Registry Editor (Regedit.exe).
Use audit-only mode to deploy the policy and understand its impact before enforcing it.
Import and export rules. The import and export affects the entire policy. For example, if you export a policy, all of the rules from all of the rule collections are exported, including the enforcement settings for the rule collections. If you import a policy, all criteria in the existing policy are overwritten.
Note
AppLocker is only supported on Windows 10 Enterprise and Education SKUs when using GPOs, however, when configuring via MDM (AirWatch) all versions are supported
Create AppLocker Rule (Windows side)
Use a test Windows 10 device.
Creating the AppLocker Configuration File
Click on the Windows logo
Enter “group policy”
Click Edit group policy
AppLocker GPO
Go to Windows Settings → Security Settings → Application Control Policies →AppLocker
Click Configure rule enforcement
Enforce Packaged App Rules
In this example we will block the Xbox application (.appx). If you wanted to block RegEdit then you would configure the Executable rules.
Check Configured under Package app Rules; Enforce rules option is default,
You should ALWAYS test the rules before applying them, to do so, change the “Enforce rules” option to “Audit mode”. Once you’ve confirmed that the policy you’ve created at the end of the lab is working as expected then you return and change this back to “Enforce rules”
Click Apply & OK
Create Default Rules
Click Packaged app Rules, to start configuring the rules.
Right click in the white space to the right of the window
Select Create Default Rules
Edit Default Rule
For blacklisting only a few apps, start with an Allow rule and add your blacklisting exceptions. If you want to only allow a few apps then convert the default to a Block and whitelist your exceptions.
Right click on the default rule
Click Properties
Exceptions
Click Exceptions
Click Add…
Packaged App Reference
Select Use an installed packaged as a reference
Click Add…
Select Packaged Application
Using the scroll bar, scroll to the bottom
Check the Xbox app with Package Name of Microsoft.XboxApp& click OK
Package Name
All of the package’s information is pre-populated. You can block the Xbox app based on the specific version, package name, or by the publisher. We want to block any version of the Xbox application.
Raise the lever from Package version to Package name & click OK
Confirm Exceptions
Click Apply & OK
Now is the time to test if the policy is functioning correctly, if you can no longer access the xbox application on the device then you know that the policy working as expected.
As long as you do not see any other issues with the current configuration, go back to the app locker settings referred to in section 1.2 and change the “Audit mode” option to “Enforce rules”
Export AppLocker Policy
Right click AppLocker
Click Export Policy…
Save Policy as XML
Clear Policy
Now that we have exported our policy, we want to remove it from our test device.
Right click AppLocker
Click Clear Policy & Yes & OK
Create AppLocker Profile (AirWatch side)
Creating the Application Control Profile
In the AirWatch console go to click Device → Profiles → AddProfile → Windows → Windows Desktop → Device
Enter a profile name and select a Smart Group for the Assigned Groups
Select Application Control at the bottom of the policy list
Check the Import Sample Device Configuration box & click Upload
Upload the XML file create in the previous steps
Save & Publish the profile
Verify Profile
You should now see your Block Xbox Application Control (AppLocker) profile.
Manifest - permissions to run script with, folder where script is downloaded and run from, and type of action. To circumvent a bug in AirWatch 9.1.1 a batch file can be run by using the “Install” command instead of the “Run” command…
Note though that the ECHO command is always suppressed on the endpoint and even the pause command is escaped.
The script is run using System, Admin or User permissions - defined in the script Manifest.
The script is inserted in the Product (Device -> Staging & Provisioning -> Product List View → Add Product) with deployment options like Compliance triggers or Schedule for installation.
In order for machines to register you need to ensure they have a proper serial number. While this is never an issue on physical machines virtual machines often need updates to get working.
For FUSION Machines:
Before you start the VM navigate to the root folder for the VM. You’ll see a config file with a .vmx extension.
If you insert the following two lines in the .vmx file, it will boot with a shorter 12 Char serial number. Without this you cannot use WS1 or any feature that relies on serial number.
SMBIOS.useShortSerialNumber = “TRUE”
SMBIOS.use12CharSerialNumber = “TRUE”
For VSphere Machines:
In the vSphere Web Client, navigate to the vCenter Server instance.
Select the Manage tab.
Select Advanced Settings.
Click Edit.
Add the following two lines:
SMBIOS.useShortSerialNumber = “TRUE”
SMBIOS.use12CharSerialNumber = “TRUE”
Step 1: Copy the contents of the AirWatch folder (optionally just copy the AirWatch folder) to a location of your choice. My preferred location for the files/folders is C:\Installs\AirWatch.
Step 2: Create a staging user in the AirWatch console at the top Organization Group. Set the staging mode to: Single User, Advanced: Enroll on behalf of user. Record the username and password of this user.
Step 3: (Optional): Download the latest agent (you can use the download_latest_agent1.ps1 in \setupfiles) then copy that agent to the same folder as the localdevice.exe OR Registration.cs file. Rename the file to AirWatchAgent.msi (you may need to replace an existing file).
Step 4: Create an AirWatch Administrator account API Service Account in AirWatch with Console Administrator role. Using a Base 64 encoder get the encoded string using the format:
`username:password`
Copy the encoded string to be used later in the INI file.
Step 5: Ensure that you have a Rest API key generated in the AirWatch Console. Settings -> General -> Advanced -> API -> REST API
Step 6: Modify the localdevice.ini file to reflect the correct settings. ; represent comments in ini files.
#************************************## INI SAMPLE FILE ##************************************#[Config]Authorization=Basic %BASE_64_ENCODED_API_CREDENTIALS%API_Key=%API_KEY%API_Server=https://%API_SERVER_URL%/apiEnrollment_Server=%ENROLLMENT_SERVER_URL%;LocationGroupID is Optional - can search by group idLocationGroupID=%LOCATIONGROUP_ID% GroupID=%GROUP_ID%AdminEmailAddress=%ADMIN_EMAIL_ADDRESS%StagingUser=%STAGING_USERNAME%StagingPassword=%STAGING_PASSWORD%[SMTP]UseSMTP=0SMTPServer=%SMTPServer%Sender=%SMTPSender%[Staging]AllowedStagingUsers=%UserAccount% ;Deliniate multiple accounts using commas. Use a period to represent local machines;Azure Users [Debug]EnableDebug=0DebugUser=%DebugUserName%;This section is for testing only. Delete entire section when deploying.
Step 7: In the imaging software you will like to use, you will need to copy the software to the install path, and either have the scheduled task built OR have an instruction to install the scheduled task. The recommended approach is the \setupfiles\install_task_psonly.ps1
Use Fiddler. Fiddler is a free web debugging proxy server tool (local MitM-attack) which logs HTTP(S) (with decryption, using fake certificate) traffic to quickly obtain all network communications to and from the device.
Installation
Download and install Fiddler on Windows 10 client device
Choose No in “Orphaned Exemption Record Found” message window
In “AppContainer Loopback Exemption Utility” window, choose Exempt, then Save Changes, then close the window
This setting captures UWP application traffic and setting on Windows 10. By default, Fiddler captures traffic only for Win32 app types.
Use Menu Tools → Options…
Check Decrypt HTTPS Traffic
Confirm all warnings: Yes, Yes, Yes, OK
Configure filters: most simple way is to only show traffic from specific hosts
Toggle Capture traffic in Menu File → Capture Traffic, OR use F12 hotkey
Traffic Inspection
Click Inspectors.
Select Raw. Because most MDM/IDM communication is in SyncML format, for Windows 10, always select XML.
If inspecting HTTPS packets, they may be encoded, the click “Response body is encoded. Click to decode” message.
Enrollment Troubleshooting
The most important sessions which deal with enrollment are the Policy.aws and Enrollment.aws messages and the authentication traffic in them.
#Compliance Script. For use in SCCM Compliance item as a discovery script.#Checking first for Airwatch Enrollment$val=(Get-ItemProperty -Path "HKLM:SOFTWARE\Microsoft\Provisioning\OMADM\Accounts\*" -ErrorAction SilentlyContinue).PSChildname
#Now checking whether enrollment is with a real user or the staging user$path2="HKLM:\SOFTWARE\Microsoft\Enrollments\$val"$val2=(Get-ItemProperty -Path $PATH2 -ErrorAction SilentlyContinue).UPN
#This will be "Completed" if it is staged enrollment has completed but not yet flipped to final user$staging=(get-itemproperty -path HKLM:\SOFTWARE\AIRWATCH\EnrollmentStatus -ErrorAction SilentlyContinue).status
$reassignment=(get-itemproperty -path HKLM:\SOFTWARE\AIRWATCH\Reassignment -ErrorAction SilentlyContinue).status
if($staging -eq "Completed" -and $reassignment -eq $null){ Write-Host "Non-Compliant"}Elseif ($val2 -like "*staging*" -or $val2 -eq $null){ Write-Host "Non-Compliant"}else{ write-host "Compliant"}
This feature is available through the Apps & Books section. The article also suggests ways to get the executable commands to enter for your Win32 applications in the AirWatch Console. It ends with steps to troubleshoot issues.
Validated Use Cases
AirWatch validated the success of the software distribution feature in the listed use cases. Review the list and see if your deployment is similar to the validated use cases.
Silent deployment of MSI applications
MSIs with multiple transforms, and the ability to deploy different transforms to different sets of users
64 and 32 bit apps on 64 bit devices
Installers with registry validations and file checks after installation
Patch applied to an already deployed application
Application installation on system context and user context
A complete silent application installation
Application installation with dependencies
Packages with scripts that invoke multiple files (ZIP files that contain PowerShell scripts, EXE, and MST)
Installation of applications that require reboot
Applications with disk space, battery, and RAM checks
To deploy this sample, navigate to Devices & User > Profile > Add > Windows > Desktop > Device > Custom Settings, then copy and paste the SyncML into the box and publish the profile.
Modify the values inside of the data tags.
Change the target of the policies to either device or user. Inside of you will want to change to either ./Device/ or ./User/ but be careful as some policies support User, Device, or Both.
Google Chrome
Deploy attached Chrome CSPs samples via AirWatch. To deploy navigate to Devices & User > Profile > Add > Windows > Desktop > Device > Custom Settings, then copy and paste the SyncML into the box and publish the profile.
Modify the values inside of the data tags.
Change the target of the policies to either device or user. Inside of you will want to change to either ./Device/ or ./User/ but be careful as some policies support User, Device, or Both, you can reference which are support by looking at the Chrome ADMX template.
Tips to Get Configurations
Review some ways to get the commands and criteria for the Win32 application. Enter the data in the AirWatch Console when you upload the Win32 application package.
Get the Install Command
Review a few ways to get install commands for Win32 applications.
Note: If an install command prompts for user interaction on the UI, then enter these commands with the User option in the Install Context option.
Call any script from the command-line that results in a successful installation of the Win32 application.
The MSI file has the install command pre-populated with silent parameters. You can edit and update these in the AirWatch Console.
If the EXE or ZIP file contains the MSI file of the Win32 application, use the msiexec command to install.
Get the Uninstall Command
Review some ways to get uninstall command for Win32 applications.
In a command-line session, use the /? or /help parameters to display supported actions. For example, Mysampleapp.exe /?.
Look at the HKEYs in the listed registries on the device.
If the EXE contains an underlying MSI, use the msiexec uninstall command. For example, msiexec /x <path_to_file>.
Get Detection Criteria
Use detection criteria to determine if the Win32 application is on devices. To get the detection criteria, install the application and identify the checks on the device.
Product ID check
Run the wmic command and use WMIC Product where name=””.
Look at the HKEYs in the listed registries on the device for the product ID.
Look at the HKEYs listed for Product ID check to find the file criteria.
Look in the Program Files folder or the Program Files(X86) folder to find the file criteria.
Registry check
Look at the HKEYs listed for Product ID check to find registries.
Look in HKEY_CLASSES_ROOT\Installer\Products.
Get Exit Codes
Use the environmental variable, %errorlevel%, to get exit codes. Use it in conjunction with built-in DOS commands like ECHO, IF, and SET to preserve the existing value of %errorlevel%.
In a command-line session, run the install command for the Win32 application.
Run ECHO %errorlevel%.
The %errorlevel% variable returns the reboot exit code, if the Win32 application requires a reboot for installation.
Troubleshoot Software Distribution Issues
Win32 application installations involve the successful execution of multiple steps. If your application installation fails, follow the troubleshooting steps to find the issue.
Win32 Package Received Reported by App Deployment Agent
The App Deployment Agent on the user’s device handles Win32 application installations. The system deploys the agent to devices either upon enrollment or when it collects the latest App List sample from devices that are already enrolled.
The system holds the app-install commands in the queue until the agent reports back that the application installed.
Steps
Check the following components to see that the agent installed on your end-users’ devices.
In the AirWatch Console, check that the device successfully enrolled and syncs with the console.
Check the registry for the AW App Deployment Agent.
Open a command-line session and run regedit. This opens the Registry Editor.
In the Registry Editor, go to HKEY_LOCAL_MACHINE > SOFTWARE > Microsoft > EnterpriseDesktopAppManagement.
Look for the AW App Deployment Agent. The correct status value for the AW App Deployment Agent is 70.
Check services on the device to ensure that the AW App Deployment Agent is running.
Check the registry for the AW MDM nodes.
Open a command-line session and run regedit. This opens the Registry Editor.
In the Registry Editor, go to HKEY_LOCAL_MACHINE > SOFTWARE > AirWatchMDM > AppDeploymentAgent.
Find three nodes. If these three nodes are missing, then the device did not receive the Win32 application package.
App Manifest – This node contains information about the options set in the AirWatch Console on the Deployment Options tab.
Content Manifest – This node contains information about the options set in the AirWatch Console on the Files tab.
Queue – This node contains detailed logs about the installation of the application. You can view the logs to check the progress of the download of the application.
Win32 Application Installation Status
After the agent installs on devices, you can track the application installation to troubleshoot issues. The install status for the Win32 application displays the listed statuses.
Install command ready for device – The install command is queued on the device but the device has not checked in to the AirWatch system.
Install command dispatched – The device checks in to the system and consumes the install command.
Installing – The Win32 application is downloading and the installation is in progress on the device.
Installed – The installation is complete and the device sent an alert to the AirWatch Console.
Transform cache refers to any transformation on content downloaded. For example, unzip a zip package.
TRANSFORM_CACHE_FAILED: cache transformation precludes this operation. When unzip operation fails, this evaluation would fail. When runtime error happens, this evaluation would fail. Note that, unzip is running in non-overwrite mode, so if unzipping target directory already contains files which are also in the zip package, unzip would fail.
TRANSFORM_CACHE_SUCCESSFUL: cache transformation allows this operation.
Sanitize cache would validate content cache against content manifest and delete any files that are not specified in content manifest.
SANITIZE_CACHE_FAILED: cache sanitize precludes this operation. When content files in cache folder are not matching ones specified in content manifest, this evaluation would fail. When runtime error happens, this evaluation would fail.
SANITIZE_CACHE_SUCCESSFUL: cache sanitize allows this operation
Requirements evaluation evaluate the conditions requirements to perform the install/uninstall operation. For example, evaluate memory, power, etc.
REQUIREMENTS_EVALUATION_FAILED: Requirements evaluation precludes this operation. When requirements are not met, this evaluation would fail. When runtime error happens, this evaluation would fail.
REQUIREMENTS_EVALUATION_SUCCESSFUL: Requirements evaluation allows this operation
PENDING_EXEC_DEPLOYMENT_RETRY: "Install Command" / "Uninstall Command" execution failed and the client would retry again. Retry timeout and interval are specified through deployment manifest.
EXEC_DEPLOYMENT_FAILED: The "Install/Uninstall Command" execution precludes this operation after retrying. When command execution returns some exit code which is considered error (not matching success exit code, e.g), this evaluation would fail. When command execution is timed out, this evaluation would fail. When runtime error happens, this evaluation would fail.
EXEC_DEPLOYMENT_SUCCESSFUL: The execution allows this operation.
PENDING_REBOOT: The execution is finished and requires reboot.
/* Retry attempts elapsed and/or we need a new CM. We * will suspend for a DOWNLOAD_CONTENT_FAILED for a given * period of time, before rolling it back. */
"PENDING_NETWORK_CONNECTIVITY" indicates the underlying network condition has been changed and download would be reattempted in 5 mins interval with 3 retry count. (default).
"PENDING_DOWNLOAD_RETRY" indicates download would be reattempted in 5 mins interval with 3 retry count. (default)
Executes the detection criteria before installing or downloading the application.
Detection Failed indicates that the criteria defined was unable to detect the application or failed to be executed due to some runtime error which would abort the deployment. "LastStatusCode" would reflect the result.
Detection Successful indicates that the criteria were executed successfully and it successfully detected the application.
Final detection verifies the execution result in previous step. It has the same implications as first detection.
Detection Failed indicates that the criteria defined was unable to detect the application or failed to be executed due to some runtime error which would abort the deployment. "LastStatusCode" would reflect the result.
Detection Successful indicates that the criteria were executed successfully and it successfully detected the application.
DEPLOYMENT_OPERATION_QUEUED = 0x000
a registry entry would be created under HKLM->SOFTWARE->AirWatchMDM->Queue
DEPLOYMENT_OPERATION_FAILED: There are some runtime/fatal errors thrown and the operation is aborted.
DEPLOYMENT_OPERATION_SUCCEEDED: The operation is successfully performed.
DEPLOYMENT_OPERATION_SUSPENDED: On certain conditions, the operation has to be suspended. The suspended operation would be reattempted on predefined interval.
Dependencies evaluation installs app dependencies. The installation of app dependency would go through the same deployment flow shown in this table.
DEPENDENCIES_FAILED: Dependencies evaluation precludes this operation. When dependency app deployment encounters failure on all evaluations here and the operation is considered being failed, for example, download failure or runtime error, this evaluation would fail.
DEPENDENCIES_SUCCESSFUL: Dependencies evaluation allows this operation
Reference Count is the count for app installation and number of apps who depends on it. The corresponding record/output for this stage is "InstallCount" in registry. The most significant bit in "InstallCount" is called "Permanent Bit" indicating whether the application is user installed. The remaining 31 bits are referring to actual reference count. If it is larger than 1 or it is equal to 0 for uninstallation, then the client state machine would preclude the following steps.
CHECK_REFERENCE_COUNT_FAILED: Reference count evaluation precludes this operation (install/uninstall). When the application is already installed/uninstalled, this evaluation would fail. When application is installed externally (user installed), this evaluation would fail. When any other runtime error happens, this evaluation would fail.
CHECK_REFERENCE_COUNT_SUCCESSFUL: Reference count evaluation allows this operation (install/uninstall).
Steps
If the installation fails after status #2, Install command dispatched, take these steps to find the reason for the failure.
In the AirWatch Console, validate the configurations for the Win32 application on the Deployment Options tab.
Go to Apps & Books > List View > Internal and edit the Win32 application.
Select Edit > Deployment Options tab.
In the How To Install section, review the InstallContext configurations for Device or User.
Review the Admin Privileges setting.
Review the Install Command setting.
Side-load the application to the device to see if this actions triggers the install command.
In the AirWatch Console, look at the Console Event Logs to find the reason for the failure in HUB > Reports & Analytics > Events > Console Events.
Look for a failure reason on the device.
On the device, open a command-line session and run regedit. This opens the Registry Editor.
In the Registry Editor, go to HKEY_LOCAL_MACHINE > SOFTWARE > AirWatchMDM> AppDeploymentAgent.
Look in the Queue node at the log field.
If there is no Queue node, look for a node with the device or user SID. This value has the Win32 application product code. Select the product code to view the reason for installation failure.
Review the App Installer Flow chart for a depiction of how the device validates the pre and post installation checks.
Copy transaction id from SQL DB ‘CBDFAD47-28F4-4D63-(A1D-91C3542840’ and search in syncml inside Device Services logs
Request Sent to Device
1.2DM/1.2721174828C828F0E444B325860CB5C3037Dhttps://migtest.ssdevrd.com/DeviceServices/Dm.svc/token/uq7Qncbdfad47-28f4-4d63-9a1d-91c3542840161ca07aea-16ea-4989-b793-0fe0d44d28ae./cimv2/MDM_AppInstallJob/MDM_AppInstallJob.JobID=%22WC_96%22/Exec=CreateJobchrtext/plainJobData=<AppInstallJob id=“96”><WebApplication PackageFullName=“webclicp” ActionType=“1” DeploymentOptions=“1” IsBundle=“false”><ContentURLList><ContentURL>https://google.com</ContentURL></ContentURLList><FrameworkDependencies/></WebApplication></AppInstallJob>
Copy the Profile Settings from the Latest AirWatch Console
Log into a version of the AirWatch console that supports the desired profile functionality.
Configure and Save this payload to create a profile.
Find the new profile in the list view: 1) Click its radio button. 2) Click the </>XML option. 3) Copy the SyncML that appears.
Paste the SyncML into a text editor, and edit it: 1) Remove lines of text so that all the code falls between the tags: <[ Add, Delete, Replace, or Exec ]> to <[ Add, Delete, Replace, or Exec ]> 2) Optionally, remove the whitespace, and linearize the SyncML.
Copy the formatted code.
Create New SyncML
Go to the Configuration Service Provider (CSP) Reference.
Access the newest Windows Insider features.
Follow the site’s available guidelines to create the code sample.
Copy the text.
Publish SyncML code:
Navigate to Devices > Profiles > List View > Add > Add Profile > Windows > Windows Desktop.
Refer to the LocURI to determine the profile’s context.
User Profile: Select if the LocURI begins with ./User/.
Device Profile: Select if the LocURI begins with ./Device/.
Configure General settings to determine how the profile deploys and who receives it.
Select the Custom Settings payload.
Click Configure, and paste the complete block of SyncML code in the text box.
If inner AirWatch CA/SCEP is used, go to Groups & Settings → All Settings → Enterprise Integration → Workspace ONE Access → Configuration, click Certificate → EXPORT button
Go to Devices → Profiles & Resources → Profiles → ADD → Add Profile → Windows → Windows Desktop → User Profile and make a User profile
Warning
There is also a Windows Desktop →Device Profile. Do NOT use it for SSO/Conditional Access, it will not work!
Give it a Name. Example: “Win10 SSO”. Select a group in Smart Groups. For example, choose all devices (World icon)
Go to SCEP tab/payload, and set:
Credential Source: **AirWatch Certificate Authority
**Certificate Template: **Certificate (Cloud Deployment)
**Issuer: CN=<Issuer name in certificate, example = name of current Organization Group>
On vIDM / Workspace One Access side
Go to Identity & Access Management → Manage and select Authentication Methods
Check the Enable Certificate Adapter, then Select File and upload the Certificate (*.cer) which you downloaded from the AirWatch CA/SCEP from the step above, or from ADCS Domain CA
Click Save
Go to Identity & Access Management → Identity Providers, click on Built-in IF you are NOT using the ESC connector. If you are using the Connector, choose it in the list
Find Authentication Methods area and select Certificate (Cloud Deployment) check box, then click Save
Go to Identity & Access Management → Policies and select default_access_policy_set, select Edit
In Configuration tab, ALL RANGES, select Device Type = Windows 10, and in “**then the user may authenticate using “**choose Certificate (Cloud Deployment)
(Optional) In “if the preceding method fails or is not applicable, then” choose Password (Cloud Deployment)
(Optional) Select the (****+) ADD FALLBACK METHOD and in “If the preceding method fails or is not applicable, then” select Password ( Local Directory)
Windows 10 Device Tests and Checks
On enrolled Win10 device, open MMC, select Menu File → Add/Remove Snap-In…, select My User Account
Check Personal folder to see that the profile certificate was delivered
Use Hub to access vIDM/Workspace ONE Access portal.
Troubleshooting certificate issues
CertificateAuthAdapterBase function header for requesting the certificate from Windows:
//function names & var names obfuscatedprotectedX509Cert[]getCert(@NonnullStringtenantId,@NonnullHttpServletRequestrequest,@NonnullHttpServletResponseresponse,@NonnullMap<String,String>attribVal,@NullableMap<String,String>inputParam)throwsAuthAdapterConfigException{...}X509Cert[]certs=getCert(tenantId,request,response,attribVal,inputParam);if(certs==null||certs.length==0){logger.info("No certificates were provided by the browser");// --> horizon.logif(certs==null){adapterResponse.setStatus(AuthnAdapterResponse.AuthnStatus.FAILURE);logger.info(logId+" authentication failure, no certificate provided");//-->horizon.log
getCert method returns the certificate, received from client browser HTTP-request. If not, it logs errors in horizon.log file on WS1 Access/vIDM.
When using Ws1 Launcher for Android, it will block Phone app and incoming phone call notifications. In order to allow phone dialer app (example: com.samsung.android.dialer) a custom profile has to be added:
Web clips should be configured and deployed using the current web clip payload UI
<dict><key>Dock</key><array><dict><key>Type</key><string>WebClip</string><key>URL</key><string>https://google.com</string></dict></array><key>Pages</key><array><array><dict><key>Type</key><string>WebClip</string><key>URL</key><string>https://yahoo.com</string></dict><dict><key>Type</key><string>Folder</string><key>DisplayName</key><string>My Web Clip</string><key>Pages</key><array><array><dict><key>Type</key><string>WebClip</string><key>URL</key><string>https://www.vmware.com</string></dict></array></array></dict></array></array><key>PayloadDisplayName</key><string>Home Screen Layout</string><key>PayloadDescription</key><string>HomeScreenLayout</string><key>PayloadIdentifier</key><string>97213d06-b750-466b-8a89-782d8a406f86.Home Screen Layout</string><key>PayloadOrganization</key><string></string><key>PayloadType</key><string>com.apple.homescreenlayout</string><key>PayloadUUID</key><string>2fa8fe03-30fa-4189-aa00-ba752eabXXXX</string><key>PayloadVersion</key><integer>1</integer></dict
Enable Bluetooth Command
Unlike custom profiles, the payload content and UUID are not required for custom commands. This command will not take place if the Allow Bluetooth Settings Modification restriction is enforced.
<dict><key>AllowedApplications</key><array><dict><key>BundleIdentifier</key><string>com.sample.app1</string><key>TeamIdentifier</key><string>ABCDEFG1HI</string></dict><dict><key>BundleIdentifier</key><string>com.sample.app2</string><key>TeamIdentifier</key><string>ABCDEFG1HI</string></dict></array><key>PayloadDisplayName</key><string>Autonomous Single App Mode</string><key>PayloadDescription</key><string>AutonomousSingleAppMode</string><key>PayloadIdentifier</key><string>7480b205-2e1c-40fe-bd59-b53db434652d.AutonomousSingleAppMode</string><key>PayloadOrganization</key><string></string><key>PayloadType</key><string>com.apple.asam</string><key>PayloadUUID</key><string>91b5e40b-5683-4376-9ec2-f9e214a6XXXX</string><key>PayloadVersion</key><integer>1</integer></dict
Warning
Can only be installed on User Approved MDM Enrolled devices. Must be installed as Device profile. Only one payload allowed per machine.
To be granted access, applications must be signed with the specified Bundle Identifier and Team Identifier using an Apple-issued production developer certificate. Applications must specify the com.apple.developer.assessment entitlement with a value of true.
The application’s bundle identifier. BundleIdentifier must be unique. If two dictionaries contain the same BundleIdentifier but different TeamIdentifiers, this will be considered a hard error and the payload will not be installed.
To check if the .app has the correct entitlement noted above:
This will print out XML with the entitlements. It needs to have the com.apple.developer.assessment entitlement with a value of true.
To get the Bundle & Team Identifier for an .app:
codesign –dvvvv /Applications/Example.app
The Bundle Identifier will be in the ‘Identifier’ field. The Team Identifier will be a 10 character string in the ‘TeamIdentifier’ field.
Content Caching
<dict><key>AllowPersonalCaching</key><true/><key>AllowSharedCaching</key><true/><key>AutoActivation</key><true/><key>CacheLimit</key><integer>100000000</integer><!--100 MB example--><key>DataPath</key><string>/Library/Application Support/Apple/AssetCache/Data</string><key>DenyTetheredCaching</key><false/><key>ListenRanges</key><array><dict><key>type</key><string>IPV4</string><key>first</key><string>0.0.0.0</string><key>last</key><string>255.255.255.255</string></dict></array><key>ListenRangesOnly</key><false/><key>ListenWithPeersAndParents</key><true/><key>LocalSubnetsOnly</key><true/><key>LogClientIdentity</key><false/><key>Parents</key><array><string>1.1.1.1</string><string>2.2.2.2</string></array><key>ParentSelectionPolicy</key><string>round-robin</string><!-- Possible values are
round-robin, first-available, url-path-hash, random, and
sticky-available--><key>PeerFilterRanges</key><array><dict><key>type</key><string>IPV4</string><key>first</key><string>0.0.0.0</string><key>last</key><string>255.255.255.255</string></dict></array><key>PeerListenRanges</key><array><dict><key>type</key><string>IPV4</string><key>first</key><string>0.0.0.0</string><key>last</key><string>255.255.255.255</string></dict></array><key>PeerLocalSubnetsOnly</key><true/><key>Port</key><integer>0</integer><key>PublicRanges</key><array><dict><key>type</key><string>IPV4</string><key>first</key><string>0.0.0.0</string><key>last</key><string>255.255.255.255</string></dict></array><key>PayloadDisplayName</key><string>Content Caching</string><key>PayloadDescription</key><string>ContentCaching</string><key>PayloadIdentifier</key><string>7480b205-2e1c-40fe-bd59-b53db434652d.ContentCaching</string><key>PayloadOrganization</key><string></string><key>PayloadType</key><string>com.apple.AssetCache.managed</string><key>PayloadUUID</key><string>98f5b40b-5683-2415-9ec2-f9e014a6XXXX</string><key>PayloadVersion</key><integer>1</integer></dict>
AirWatch 9.1 and later versions are supported on SQL Server 2016, SQL Server 2014, and SQL Server 2012.
Both Enterprise and Standard Editions are supported, Express Edition is NOT supported because it does not offer all of the features that are used by AirWatch.
It is recommended that the AirWatch databases are operating on 64-bit editions of Windows and using the 64-bit installation of SQL Server.
❗️ SQL Server Collation: AirWatch supports SQL_Latin1_General_CP1_CI_AS as the server AND database collation ONLY.
SQL Connections
MAX database connections are set to 150 per Application Pool and Service. Currently in production on each DS server there are :
4 Application Pools
8 Services
AirWatch Local
AW Tunnel Queue Monitor Service
AirWatch API
AW Entity Change Queue Monitor
AirWatch DS
AW Interrogator Queue Monitor
AirWatch SSP
AW Interrogator Server
AW Log Manager Queue Monitor
AW Master Queue Service
AW MEG Queue Service
AW Messaging Service
⭐️ Total = 12 * 150 max connections = 1800 per DS Server.
SQL Recommendations
VMware official recommendations
TempDB Configuration: the number of tempDB files must match the number of CPU cores when the core is less than or equal to 8 cores. Beyond 8 cores, the number of files must be the closest multiple of 4 that is less than or equal to the number of cores (e.g. 10 cores will need 8 tempDBs, 12 cores will need 12 tempDBs, 13 cores will need 12 tempDBs, 16 cores will need 16 tempDBs.) File size, growth rate, and the location need to be the same for all tempDB files.
⭐️ Microsoft SCCM best practice is to create no more than 8 temp DB files
Memory Allocation: Eighty percent of the server memory should be allocated to SQL. The remaining 20% must be freed up to run the OS.
Test = 16Gb
Production = 128GB
In Properties of server in Memory tab set restrictions for memory usage of SQL Server:
min = 60%
max = 80%
Cost Threshold for Parallelism and Maximum Degree of Parallelism: Cost Threshold for Parallelism is the cost needed for a query to be qualified to use more than a single CPU thread. Maximum Degree of Parallelism is the maximum number of threads that can be used per query. The following are recommended values for these parameters:
Cost Threshold of Parallelism: 50
Max Degree of Parallelism: 2 and reduce to 1 in case of high server utilization.
Hyperthreading: If the database is running on a physical server, hyperthreading must be disabled on the database to ensure best performance. If it is on a VM, then having hypertherading enabled on the ESX host will not have any performance impact, but hyperthreading must be disabled on the Windows host level;
Optimize for Ad hoc Workloads: Enable Optimize for Ad hoc Workloads under SQL server properties. This is recommended in order to free memory from the server. Refer to the following article for more information: https://msdn.microsoft.com/en-us/library/cc645587(v=sql.120).aspx;
Lock Escalation: Disable Lock Escalation for “interrogator.scheduler” table by running alter table interrogator.scheduler set (lock_escalation = {Disable})
This is recommended as the scheduler table has very high rate of updates/inserts. There is a high contention on this table with the use of GCM, and disabling lock escalation helps improve performance. However, the drawback is that more memory is consumed. Refer to the following article for more information: https://technet.microsoft.com/en-us/library/ms184286(v=sql.105).aspx.
Additional Microsoft recommendations for SQL DB for large installations
SQL Server Agent autostart: In SQL Server Configuration Manager properties of SQL Server Agent component put automatic start;
Disable Auto shrink of DB and journals: According to Microsoft Best Practices for SCCM, Auto Shrink of DB and journals should be turned OFF;
Journal size edit: According to Microsoft Best Practices for SCCM, initial size of transaction log should be 16Gb, growth by 512Mb;
Changing an administrator’s password requires first getting the CoreUserID for that user, and then updating the password and password salt for that user in the database.
Getting the CoreUserID
Run the following SQL query to get the CoreUserID for the user. Make sure to replace with the administrator’s username. If more than one result are returned, make sure you identify the right entry.
Select*fromCoreUserwhereUserName='<USERNAME>';
Updating the password and password salt
The following query will update the administrator’s password. Make sure to replace with the proper CoreUserID identified in the first section. Have updating the password, log in with the account and reset the password to something else.
-- This Updates the password to 'a123b456c789'
UPDATECoreUserSETPassword='c2otxl1SURGxVibCX1K9IJvyizYl4ylnIIfXhwNtfe1iCuuVM8LNPK1oWWSwE3C3BB3AYxspGqrfXaVnryxjzw==',PasswordSalt='6eklCHP5ixaMT9RREfQbmi4Z2jc='WHERECoreUserID=<COREUSERID>-- This Updates the password to 'Password123!'
UPDATEdbo.CoreUserSETPassword='awhash4:IGdeYQ7eaHqyh3g6RelU0zkbHjoRW111/dg2xyqjiK0=:100000:K91XOTYtcw/20ZxDOUm7pe3DVLFA3XrzuUAYtWdl21M='WHEREUserName='Administrator'
Account lock-out
Check IsLockedOut flag - it must be set to 0 for active/unlocked account.
First you need to get the GroupID of the organization group that has APNs configured. In Chrome, you can do this by right-clicking the organization group drop down as shown below and choosing Inspect Element. In the HTML, search for data-current-lg and note the GroupID.
Perform the following SQL query in the database to retrieve information about the APNs certificate:
Validate the results of this query. In a correct renewal, both the appleid and SubjectName columns of the results should match between the latest certificate and the previous certificate. You can tell which certificate is which based on the notBefore and notAfter columns, which match the validity dates of the certificate.
If the appleid field is different, then the administrator used an incorrect Apple ID when renewing the APNs certificate, and so the SubjectName will not match. The administrator must use the same Apple ID when renewing APNs, or all devices will lose the ability to communicate. If appleid matches but SubjectName is different, then the administrator used the correct Apple ID but chose the wrong certificate it Apple’s portal to renew. They must go back to Apple’s portal and renew the correct certificate.
Note: All devices enrolled after the notBefore date of an incorrect APNs certificate must re-enroll when the certificate is corrected. These devices will lose communication once the certificate is correct.
Note: If the administrator previously cleared out the APNs certificate (by selecting the Clear button in the APNs settings page and saving), they will lose communication with all devices. In this event, a database backup is required to restore the tokens, and this process generally cannot be completed on SaaS environments.
APNs Database Queries
Below are a list of helpful SQL queries specifically when troubleshooting APNs. All of the queries below are SELECT statements, which allows us to view the information but not update it.
This statement will display an overall view of the location group. This allows us to look at certain fields as well as the Location Group ID for the location where the APNs certificate is being uploaded. By inputting the name, you can receive the Group ID.
This statement displays the APNs settings at and above the LG provided. We are looking for these first four fields and which have values that are not NULL. It should only be configured at one level and inherited below. You simply need to input the group ID found in the first query.
This statement shows the APNs settings at or below the LG provided. You simply need to input the group ID found in the first query. The first four columns after the level should be NULL at every level below the level where the cert was uploaded at. You can also view the levels of the tree in the first column. If you do see multiple levels with values not being NULL, we can look at the different APNs certs and the number of devices associated. This will require some update statements which a DB or T3 Member can assist with.
This statement will display all the APNs certificates in the environment. You simply need to input the group ID found in the first query. It is important to match this with the previous query so we know which cert is at each level. It is also important to view if the topic is the same for different certs. If it is, we can change the application ID associated to the device without any end user interaction or effect. If the topics are different, devices will need to re-enroll. From this query, you will have the ProductionCertificateID and ApplicationID.
This statement will confirm if the certificates are alive by viewing the date. You simply need to input the ProductionCertificateID found using the queries previous.
This statement will tell the devices that are associated with the Application ID. You simply need to input the ApplicationID found using the queries previous. This will assist if the customer has multiple APNs certificates active in the console and you are trying to determine which to use. Obviously, we will want to choose the cert with the most devices for the least end user impact.
This statement will show the serial number associated with the APNs certificate. This will assist if you need to relay this information to Apple to determine if they have a corrupt certificate where AirWatch is unable to continue troubleshooting. Simply input the name of the Location Group where the APNs Certificate is uploaded.
This statement will show you all the APNs certificates that have been uploaded to the console at or below the LG provided. You simply need to input the group ID found in the first query.
Workspace ONE Managed – MDM on the device, but did not enroll through agent (Adaptive Mgmt)
ManagedBy column in dbo.Device = 1
EnrollmentCategoryID column in dbo.DeviceExtendedProperties = 1
Query:
Workspace ONE Managed – MDM on the device, but did not enroll through agent (Direct Enrollment)
ManagedBy column in dbo.Device = 1
EnrollmentCategoryID column in dbo.DeviceExtendedProperties = 3
Query:
Agent Enrollment with Workspace ONE – Workspace ONE as an app catalog, pushed as a managed app.
ManagedBy column in dbo.Device = 1
EnrollmentCategoryID column in dbo.DeviceExtendedProperties = NULL or 0
Query:
The ENS system leverages Amazon RDS(SQL Server) instance for its data persistence needs and makes use of 3 main tables.
EnsSubscriptionInfo
Keeps all user records with keys needed for decryption of url callbacks and device tokens to send messages to
APITokens
Keeps all valid API tokens for authenticating with the API
EWSUrlCache
Security
For security, apart from leveraging best practices defaults followed by Amazon on their RDS instances, the following has been enforced to protect customers data and integrity of the system:
Database never contain user’s emails or passwords. All identification is done via the userId that gets matched to a public/private key pair
Database access by ENS machines is limited via a single AWS IAM account with limited role, it has read/write records permission but no database/table level access.
API/Services Client Authentication
Authentication by clients is done via API keys created by us. The API token is sent as a header parameter (key: “ApiToken”) for all outgoing connections and authenticated by ENS server by checking against a table of authorized API keys. The api key is provided to the clients via a configuration pushed down by the console. Each VMware/Airwatch client is provided 1 API key for all their devices.
API Keys can be revoked and invalidated as explained in the API Key Revocal/Refresh section.
Boxer client activation via console
There are some keys that can be configured via console to activate the feature on Boxer iOS. These are described in Managed App Configuration
API/Services Provided by ENS Server to client devices.
Alive:
Used to determine if ENS the service is up and running.
Task
Endpoint
Description
Params
REQUEST/GET
/alive
Check if the system is currently up
-
Get Public Key:
Gets a public key from the server.
Task
Endpoint
Description
Params
REQUEST/POST
/getpublickey
Based on email passed, ENS server creates a record with a public/private key pair and a userId. At this point no devices are added and registered = false
userid = sha256Hash( lowercase(email))
RESPONSE
–
{ pubKey = <public key value including header/footer>, userid = , responseCode = <response_code> }
Register Device V2:
Register devices so ENS starts monitoring its email Inbox
Task: REQUEST/POST
Endpoint: /registerdevicev2
Description: Based on credentials passed, ENS should now autodiscover what is the EWS endpoint it needs to subscribe to for push notifications. Upon receiving a success it will update the registered column in the DB to true and the endpoint as well. Any errors should be reported to the client. Note: We can force a registerdevicev2 call to ignore current user status (including Subscribed) and force a resubscription by putting a “force” flag equal to 1 in the payload
Params:
Tells the server that we want to remove a specific device from using push notifications.
Task: REQUEST/POST
Endpoint: /unregister
Description: Based on userId and device token passed ENS will update corresponding record.
Get record and list of devices
Remove device, and Update Record
If its last device on list unregister from Exchange push subscription, and delete record
Params:
Endpoint: /getsubscriptionstatusv2
Description: Based on userId-devicetoken passed, ENS checks what is the corresponding status for that account. This was introduced so we could have more granularity and be able to better cleanup “stale” records for users who may not be using device anymore
Params:
Register devices so ENS starts monitoring its email Inbox
Task: REQUEST/POST
Endpoint: /updatesynckey
Description: Based on information sent, we update the background sync key and expiration time of the system which is sent down to the device with each push notification.
Params:
On each request we can send some extra parameters which influences how ENS handles the subscriptions as well.
badge - Whenever we send this on the header of a request (with value 1) we know that this device needs to be badged and hence ENS will include the badge on every notification that it sends down
development - This header needs to be included (with value 1) to know that this request is coming from a development device/build. This helps in sending the push notification to the correct push notification environment among other things we do server side that are special to development devices.
ENS server machines keep a cache of all API keys to speed up the process of validating every single call they receive. They refresh their keys on a schedule so that we can confidently remove api tokens and make them unusable
Encryption:
The ENS system uses asymmetric key encryption to keep all customer data transferred safe and invulnerable to various types of malicious attacks. Specifically, we use RSA Encryption to encrypt any crucial data passed around from client/server (see API/Services section for details).
A public key is created per user and is provided to the client upon authenticated request. Using this key, RSA encryption following PKCS1 standards needs to be performed on the client side for any services requiring it.
GPS Poll Time Interval - X mins (configured in AirWatch Console, for example, in Android Agent settings)
Data Transmit Interval - Y mins
Privacy settings for “GPS Data” needs to be set to Collect and Display for required device Ownership type.
The samples which are transmitted by the Agent as per the Y interval are all stored in the database in the dbo.GPSLog table. To see if any samples have been reported for your specific device, use the following query:
What information is saved to the SQL database for the MEM module during enrollment and profile deployment.
The SQL flow will be different depending on whether you use SEG, Powershell, or Google Apps for Work.
SEG & Powershell SQL Flow Diagram
graph TD

D -->|1| AW
AW[WS1 UEM] -->|2| D[Device]
D -->|3| AW
AW --> DB[(DB: 1,3)]
The device enrolls in the VMware Workspace ONE. We save some information to the SQL database;
A profile is pushed down to the device;
Sample data is sent from the device. Data is saved to the SQL database.
Note
Usually by the time you run a SQL query, all of these steps have already occurred as this happens very quickly.
Google Apps for Work SQL Flow Diagram
graph TD
D -->|1| AW
AW --> DB[(DB: 1,1)]
The device enrolls in VMware Workspace ONE. We only save password 1 if the customer is
using Google Apps direct integration. If the customer is using Google Apps with password retention, we also save password 2 to the database.
Useful SQL Queries
You can see what information is saved in the SQL database by running SQL queries. Our primary SQL table is mobileEmailGateway.MEMDevice but we also use other tables including MobileEmailGateway.MEMDeviceActivity, mobileEmailGateway.EasDeviceType, and mobileEmailGateway.MEMConfigproxy to name a few. Each entry in the MEMDevice table relates to one email client. You can think of this table like a giant Microsoft Excel spreadsheet where MEMDeviceID is the row number.
List Information on MEMDevice
For our first query, we want to see the details about all the email clients associated with a specific device. For any SQL troubleshooting issue, this is generally the first query you will want to run.
For this query to work, you will need to know what your DeviceID value is. You can find that value by going to the VMware AirWatch Console.
For the second query, we want to see all the email client entries in the SQL database. You might want to see this data after a client enrolls to troubleshoot various issues.
The above query returns information on each entry in the MEMDevice table where the location group is equal to 8998. To run this query, you only need to know the location group ID where the device enrolled. To find the location group ID, you can go to your OG and right-click the OG name and choose “Inspect”. From there you can see the OG group ID on the right. See the image below:
The result of this query shows you the following information for each MEMDeviceID.
MEMDeviceID: You will have a different MEMDeviceID for each email client a user has. You need to have 3 things to have a new MEMDeviceID. DeviceID, EasDeviceIdentifier, and EmailAddress.
EasDeviceIdentifier: This is the Exchange ActiveSync ID. Each mail client will have a unique ID for this that can be used to identify the device on the Exchange Server.
DeviceID: This is the DeviceID the device received when it enrolled. Each device will have a unique ID that our infrastructure will use to manage the device in the console.
IsManaged: This value indicates whether or not the email client is managed or not by the VMware UEM console. This is different for IsEnrolled as that refers to the device, IsManaged is referring to the email client.
LocationGroupID: This is the ID of the location group where the user enrolled.
AgentReportedPackageName: The name of the email client. For native iOS, this value will always be “NULL”.
IsEnrolled: Indicates whether or not the device is enrolled in the VMware UEM. This is different for IsManaged as that refers to the email client, IsEnrolled is referring to the device.
IsCompromised: Indicates whether or not the device is jailbroken or rooted.
IsDataProtected: Indicates whether the device is encrypted or not.
IsModelCompliant: If you are using the managed device policy for Model (under Email\Compliance Policies), this indicates whether or not this device is compliant based on that.
IsOSCompliant: If you are using the managed device policy for Operating System (under Email\Compliance Policies), this indicates whether or not this device is compliant based on that.
IsMDMCompliant: If you are using any device compliance policies (under Devices\Compliance Policies\List View), this indicates whether or not the device is compliant based on that.
AccessState: Based on the evaluation of all of the compliance policies that might affect the device or email client, this indicates if the device is allowed or blocked.
DiagnosticsEnabled: Unknown.
DiagnosticsEnabledOn: Unknown.
EmailAddress: The email address associated with the email client.
EasMailboxIdentity: The returned Exchange ActiveSync mailbox identify if available.
EasMailboxDisplayName: The returned Exchange ActiveSync mailbox display name if available.
EasDeviceGUID: Unknown.
EasDeviceTypeID: The Exchange ActiveSync device type returned from the table mobileEmailGateway.EasDeviceType.
EasDeviceOS: Displays the operating system version information when available. This appears to usually be “NULL”. If you don’t find any data here, you will usually find this information in EasDeviceFriendlyName.
EasDeviceUserAgent: Usually “NULL” but may contain additional details about the email client when available.
EasDeviceFriendlyName: Displays model and version information.
EasDeviceIdentity: Usually “NULL” or 0. Uknown.
EasDeviceImei: Displays the devices IMEI information.
CreatedOn: The date the SQL records was created.
ModifiedOn: The last date the SQL record was modified.
EasProfileInstall: If you are using the managed device policy for Require ActiveSync Profile (under Email\Compliance Policies), this indicates whether or not a valid profile has been pushed. If a profile has never been
pushed, this will be “NULL”. You will see a value of “1” if a valid profile has been pushed and a value of “0” if a profile has been removed.
LastDeviceStateChangeType: Unknown.
ResoruceId: Usually “NULL”. Unknown.
List Information on MEMDeviceActivity
If you are using Powershell, you might want to see what the status of the last Powershell command was after enrollment. In the case of SEG, you can use this to see if the last single device policy update failed or not. To do that, use the following query.
The above query returns information on each entry in the MeMDeviceActivityID table where the memDeviceID is equal to 927453. To run this query, you only need to know the memDeviceID. You can get this value by running the query from the “List Information on MEMDevice”.
The result of this query shows you the following information for each MemDeviceActivityID.
• MemDeviceActivityID: You will have a different MemDeviceActivityID for each activity transaction in the SQL database.
• MemDeviceId: You will have a different MemDeviceId for each email client a user has. You need to have 3 things to have a new MEMDeviceID. DeviceID, EasDeviceIdentifier, and EmailAddress.
• MemConfigId: When you create a new MEM configuration by going to Email > Email Settings > Add, a MEM configuration ID is created in the database. This field indicates the ID associated with this email client. • UserName: Unknown.
• EmailUserIdentity: The email address associated with the account.
• IPAddress: If we were able to determine the IP address for the device, it will be listed here.
• MailClientName: If we were able to determine the name of the mail client, you will see it listed here.
• DeviceAccessStateReason: If we are able to see the reason why the device is allowed or blocked, you will see it here.
• AllowReason: If the device is allowed, you will see the reason it is allowed here if available.
• BlockedReason: If the device is blocked, you will see the reason it is blocked here if available.
• LastGatewayServer: This will list the SEG server that was used last by the mobile email client.
• LastCommand: This will display the status of the last command we issued to the SEG or the Powershell endpoint.
• LastRequestDateTime: This will show the date that the email client last made a request.
• LastUpdate: This will display the last update response from the SEG or Powershell endpoint.
The above query returns information on the MEM configuration where the MEM configuration ID is equal to 8. The result of the query shows you the following information for individual MEM configurations.
MemConfigId: This is the unique ID that each MEM configuration is assigned. This is an auto-generated value and is unique within an environment.
LocationGroupId: This is the Location Group Id where the MEM configuration is created.
DeploymentId: This column can hold two values. 1 corresponds to a Proxy configuration while 2 corresponds to a Direct configuration.
ProxyTypeId: Unknown.
EmailTypeID: The value in this column corresponds to the type of email infrastructure. Exchange = 2, IBM Notes = 5, Google = 7 .
EmailVersionID: This corresponds to the email server version. Example: Exchange 2010 = 4, Exchange 2013 = 5, Exchange 2016 = 6, Exchange Online = 7.
DisableCompliance: This column can hold two values: 0 = Email compliance engine is enabled, 0 = Email compliance engine is disabled.
◦ NOTE: This is not specific to the MEM configuration but is a property of the location group where the MEM configuration is present.
FriendlyName: This is the name given to the MEM configuration.
IsEnabled: This column can holds two values: 1 = MEM configuration is active/enabled, 0 = MEM configuration is inactive/disabled.
TestModeEnabled: This column holds two values. 1 = Test mode is enabled, 0 = Test mode is disabled.
◦ When Test mode is enabled, you can test Email Compliance Policies without affecting email access for your devices. All devices are allowed for email and the Email Dashboard reflects the expected access state results of your Email Compliance Policies on these devices. This only applies to SEG.
UseRecommendedSettings: This column hold two values: 1 = The MEM configuration is using the Recommend Settings under the Advanced Section. 0 = The adminstrator has overriden the ‘Use Default Settings’ option under Advanced Settings.
MEMconfigGuid: This is the unique ID assigned to the MEM configuration. This is separate from the MEMConfigId.
Check for devices reporting the provisioning profile as installed (deviceProfile.DeviceProfileDevicePool)
Check against devices that are supposed to be assigned this application (deviceApplication.InternalAppAssignment)
Check against devices that are reporting the application as installed (interrogator.ApplicationList)
To find the variables in this query:
INTERNAL_APP_ID - This is found in the deviceApplication.Application database table, or in the URL when viewing the summary page for the internal application.
DEVICE_PROFILE_ID - This is found in the deviceApplication.Application table as the ProvisioningDeviceProfileID.
APPLICATION_ID - This is found in the interrogator.Application table as the ApplicationID. To find this value you can use the following query:
Verify if commands are in the command queue to update the provisioning profile
The following query can be used to identify if, for devices that have not yet installed the updated profile, commands have been queued to install it on the next device check in:
SELECT*FROMDeviceCommandQueue.DeviceQueue(nolock)dqJOINdeviceProfile.DeviceProfileVersiondpvONdq.DeviceProfileVersionID=dpv.DeviceProfileVersionIDWHEREdq.CommandID=13--CommandID for InstallProvisioningProfile
ANDdpv.DeviceProfileID={DEVICE_PROFILE_ID}
Search for application upload events
The following query is generated by HUB -> Reports and Analytics -> Events -> Console Events in the console, but the console only searches for Last Month, while manual procedure allows to search further back
Apps and books are together considered as an app in SQL.
Troubleshooting Smart Groups
Warning
Do not name a Smart Group with the same name as an existing User Group - this leads to Smart Group being “locked” from deletion
Problem 1:
After assigning a smart group to the application and selecting Save & Publish , the app assignment in application grid shows 0/0/0 even though the View Device assignment shows all devices in smart group.
Go to Deployment tab and check the deployment time and if possible change it to 12.00 AM same day. If the time is already set at 12.00 AM, check the admin user’s time zone and compare it with OG time zone. Also check if app wrapping is enabled and whether it is still in progress or not completed.
Problem 2:
When a smart group is attempted to be deleted, the following error appears: " Deletion is unsuccessful. This smart group is currently being used in assignment. Please remove the smart group from the assignment, and try again."
Check if the smart group is currently assigned to any app, profiles, compliance etc. Check if there is any user group which is having the same name as the smart group which the smart group uses.
Problem 3:
Certain apps are not being shown in App Catalog for some users.
Create a new smart group which contains these users. After that edit the app and add this smart group in exclusion list.
Also, in AirWatch SQL FAQ we see a comment:
When trying to login to the AirWatch console or perform actions within the console you may receive the error message “The transaction log for database ‘AirWatch’ is full.”
This typically means that there is no available space on your SQL server. The common cause for this is backups not being deleted even though newer backups are being done, or lack of transaction log backups. To fix this issue you should first consult your local database admin and make them aware of the issue. The fix that we recommend is to perform a full database backup and then switch the database to simple recovery mode. Your database admin should be familiar with this and know how to perform these actions.
Shrinking the Log File When Disk Space is Full
The log file cannot be shrunk until it is truncated and free space is available. If a log file has grown to the point that it is full or consuming all available disk space, truncate it immediately in order to restore normal database operations. (If the log file has reached the maximum size database property and free disk space is still available, increase the value of maximum size property or set it to ‘unlimited’. A shrink operation should not be required in this case.)
To truncate a log file immediately, set the recovery model to Simple then shrink log file. The following commands are examples of how to do this. They may require editing to tailor them to the customer’s environment.
-- look up the name of the log file
SELECT name as log_file_name FROM sys.database_files WHERE type_desc='LOG'ALTER DATABASE [AirWatch] SET RECOVERY SIMPLE;DBCC SHRINKFILE ('AirWatch_log',0,TRUNCATEONLY);-- replace 'log_file_name' with the actual name of the log file
ALTER DATABASE [AirWatch] MODIFY FILE (NAME= AirWatch_log, SIZE= 10GB , FILEGROWTH= 128MB );ALTER DATABASE [AirWatch] SET RECOVERY FULL;-- Full backup
BACKUP DATABASE [AirWatch] TO DISK='E:\MSSQL\Backup\AirWatch_20160123_full.bak' WITH STATS;
Setting the recovery model to Simple erases all of the transaction log records. For this reason, it is essential to create a full backup of the database immediately afterward the shrink procedure to ensure full data recoverability in the event of a database failure.
Preventative Measures
Make sure that the regular database and transaction log backups are scheduled for the AirWatch database. There are various methods: SQL scripts, third party tools, or SQL Server maintenance plans, which can be used.
Full Recovery Mode caveats
Generally the reason why DB log file is large is because the required DB maintenance has not been implemented. Typically, the size of the transaction log file stabilizes when it can hold the maximum number of transactions that can occur between transaction log truncations that are triggered by either checkpoints or transaction log backups.
What Scenarios can cause the Log to Keep Growing?
There are many reasons, but usually these reasons are of the following two patterns
Recovery process overview…
In SQL Server, there are three recovery models - Full, Bulk-Logged and Simple. We’ll ignore Bulk-Logged hybrid model: most people who are in this model are there for a reason and understand recovery models. The two we care about are Simple and Full.
Before we talk about Recovery Models - Let’s talk about recovery in general.
The transaction log file is there for crash/restart recovery. For the rolling forward and rolling back of work that was either done (rolling forward/redo) before a crash or restart and the work that was started but not finished after a crash or restart (rolling back/undo). It is the job of the transaction log to see that a transaction started but never finished (rolled back or crash/restart happened before the transaction committed). In that situation It is the log’s job to say “hey.. this never really finished, let’s roll it back” during recovery. It is also the log’s job to see that you did finish something and that your client application was told it was finished (even if it hadn’t yet hardened to your data file) and say “Hey.. this really happened, let’s roll it forward, let’s make it like the applications think it was” after a restart. Now there is more but that is the main purpose.
The other purpose for a transaction log file is to be able to give us the ability to recover to a point in time due to an “oops” in a database or to guarantee a recovery point in the event of a hardware failure involving the data and/or log files of a database. If this transaction log contains the records of transactions that have been started and finished for recovery, SQL Server can and does then use this information to get a database to where it was before an issue happened. But that isn’t always an available option for us. For that to work we have to have our database in the right recovery model, and we have to take log backups.
Simple Recovery Model
In this model, you are telling SQL Server - I am fine with you using your transaction log file for crash and restart recovery (You really have no choice there.. Look up ACID properties and that should make sense quickly), but once you no longer need it for that crash/restart recovery purpose, go ahead and reuse the log file.
SQL Server listens to this request in Simple Recovery and it only keeps the information it needs to do crash/restart recovery. Once SQL Server is sure it can recover because data is hardened to the data file (more or less), the data that has been hardened is no longer necessary in the log and is marked for truncation - which means it gets re-used.
Full Recovery Model
With Full Recovery, you are telling SQL Server that you want to be able to recover to a specific point in time, as long as your log file is available, or to a specific point in time that is covered by a log backup. In this case when SQL Server reaches the point where it would be safe to truncate the log file in Simple Recovery Model, it will not do that. Instead It lets the log file continue to grow and will allow it to keep growing, until you take a log backup (or run out of space on your log file drive) under normal circumstances.
If you just switch into Full Recovery mode, but never take an initial Full Backup, SQL Server will not honor your request to be in Full Recovery model. Your transaction log will continue to operate as it has in simple until you switch to Full Recovery Model AND Take your first Full Backup.
So, that’s the most common reason for uncontrolled log growth: Being in Full Recovery mode without having any log backups.
The rollback process contains two phases. First, a backup of the database (that was taken prior to the upgrade) is restored and configured. Next, either backups of any application servers (Console, Device Services, etc) are applied, or the previous version of the AirWatch application is simply reinstalled on those servers after uninstalling the current version.
Restoring a database backup
The following steps can be used to restore a database backup to an existing database server and apply the necessary configuration changes. This process assumes that a backup has been created prior to any upgrades, when the environment was fully functional.
Before working with the database, make sure that, for any AirWatch application servers (Console, Device Services, etc), all AirWatch services are stopped. Additionally, stop the World Wide Publishing Service. Finally, make sure that IIS is stopped as well.
Open Microsoft SQL Server Management Studio, right-click on Databases and select Restore Database.
Under the General tab on the left and within the Source for restore section, select From device, then select ‘…’ button.
From the Specify Backup page, select Add. Locate the backup, select it, and click OK. The database backup will display on the Specify Backup page. Click OK.
Select the Restore check box.
Under Destination for restore, select the To database drop-down list and select the AirWatch database name. Note: This should be the last database in the list, in the event you have multiple backups all named AirWatch and are unsure of which one to select. Click OK to start the database restoration.
On the old database: Next you need to note the user permissions of the old database’s AirWatch SQL Service Account. To do this:
Open Microsoft SQL Server Management Studio
Navigate to Security > Logins > to locate your DB User in the Object Explorer, and then right-click and choose Properties.
Navigate to the Server Roles tab. Write down the roles listed
Select User Mapping. Write down the user mappings listed and the role membership permissions
Warning
Take note of all of the role memberships for AirWatch, master, model, msdb, and tempdb.
On the new database:
Delete the AirWatch SQL Service Account, which was created when you restored.
Create the new AirWatch SQL Service Account. To do this navigate to Security > Logins, right-click, and select New Login.
Warning
This procedure is only for the main AirWatch SQL Service Account If you had any other custom-created SQL accounts you will need to perform this procedure for each of them.
Enter the following:
A. Select whether to use Windows or SQL Server authentication. For SQL Server authentication, enter your user credentials. Note: The username needs to exactly match the username of the old database.
B. Uncheck Enforce password policy.
C. Select the AirWatch database as the Default database.
D. For Server Role, enter the roles you noted previously.
E. For User Mapping, enter the user mappings and permissions you noted previously. IMPORTANT: This should include all of the permissions that you copied for AirWatch, master, model, msdb, and tempdb.
Next you need to migrate any AirWatch-related jobs.
Warning
The steps below are for the purge job, but any other AirWatch-related jobs need to be similarly migrated using the procedure below
On the old database:
Navigate to SQL Server Agent > Jobs, right-click <AirWatch_DB> - Purge Expired Sample Data, and select Script Job as > CREATE To > New Query Editor Window.
Save as the query.
Transfer the query to your new database.
On your new database: Execute the query.
Warning
To reiterate, any other AirWatch-related jobs need to be similarly migrated using the procedure above
On the new database: Perform a test query. For example, one for device count, to ensure proper functioning. To do this:
Right-click on the AirWatch database under Databases and select New Query.
Enter the query as shown below.
Select Execute.
Rename the old database, for example, to AirWatch_OLD. To kill all connections and rename the database, run the following script, replacing ‘AirWatch’ with the name of your old AirWatch DB and AirWatch_OLD with what you would like to rename the old database to.
Restoring a previous version of the application
With the database backup restored, the next step is to restore the proper version of the application. Ideally, there will be a snapshot or backup of each application server from the same time as the database backup. In this case, simply restore these backups in order to restore functionality.
However, if there are no available snapshots or backups of the servers, then the previous version of the AirWatch software must be reinstalled.
In these cases, identify which application servers have an updated version of the application (this will likely be all application servers, but may only be a subset of them). For each of these, ensure that a copy of the AirWatch installer for the correct version has been installed on the server. Uninstall the current version of the software through Computer > Uninstall or change a program by selecting the AirWatch application. With this uninstalled, open previous version of the AirWatch installer and proceed as normal. When configuring the database connection, ensure the configurations used match those of the restored database.
Finally, when both the database and application has been restored properly, ensure that IIS and all AirWatch services (as well as the World Wide Web Publishing service) are properly started.
Changing the database connection string
In some cases, it may be necessary to change the database connection string of an application server without fully reinstalling the software. For example, if a database migration has occurred, the name of the database may have simply changed. Perform the following steps to update the database connection string on each AirWatch application server. Note that this must be done on every application server so that they are pointing to the new database.
Note
For deployments with dedicated API and AWCM servers: Dedicated API and AWCM servers are considered application servers, similar to the AirWatch Console and Device Services. You should therefore perform the steps below regarding re-pointing app servers on these servers if you have dedicated servers for these components.
EIS, SEG, ACC/ESC are considered auxiliary components and you do not need to perform this step for these components.
Steps:
Navigate to AirWatch Root Folder on the application server.
Navigate to AirWatch X.X\Supplemental Software\Tools\UpdateSQLServerInfo.
Launch UpdateSQLServerInfo.exe.
Update the Server Hostname, Database Name, Username and Password. If Windows authentication is being used, the password field may be blank.
Make sure to restart IIS and all AirWatch services on each server after updating the SQL connection string.
This query provides you with the index fragmentation % for every table in the DB.
/**************************************************************
You can use the following script to determine index
fragmentation by table. This can help to determine
that the database is causing performace problems.
**************************************************************/SELECTOBJECT_NAME(object_id),index_id,index_type_desc,index_level,avg_fragmentation_in_percent,avg_Page_space_used_in_percent,page_countFROMsys.dm_db_index_physical_stats(DB_ID(N'AirWatch'),null,null,null,'SAMPLED')ORDERBYavg_fragmentation_in_percentDESC
Table Size Audit
This query will provide physical sizing information of all the tables in the database.
/**************************************************************
This query can help you determine what table is taking
up the most disk space and potentially what tables have
too many rows.
**************************************************************/--If the temp table exisits drop temp table
IFEXISTS(SELECT*FROMsys.objectsWHEREobject_id=OBJECT_ID(N'#Sizes')ANDtypein(N'U'))BEGINDROPTABLE#Sizes;END--Create temp table, #Sizes
CREATETABLE#Sizes(--Table name
table_namenvarchar(255),--Number of rows
table_rowschar(11),--Physical space table is using
table_reservedvarchar(18),--Phyiscal space table data is using
table_datavarchar(18),--Physical space idexes are using
table_index_sizevarchar(18),--Physical space reserved
table_unusedvarchar(18))EXECsp_MSforeachtable@command1='INSERT #Sizes (table_name, table_rows, table_reserved,
table_data, table_index_size, table_unused) EXEC sp_spaceused ''?'''--This query orders the results by actual phyisical table size
SELECT*FROM#SizesORDERBYCAST(SUBSTRING(table_data,0,LEN(table_data)-2)ASInT)DESC--This query orders the results by row count
--SELECT * FROM #Sizes ORDER BY CAST (table_rows AS int) DESC
Table Row Count Only
A more efficient script to get table row counts.
/**************************************************************
This is a more efficient way to get Row Counts
but will not include any Physical Sizing data
**************************************************************/SELECTsc.name+'.'+ta.nameTableName,SUM(pa.rows)RowCntFROMsys.tablestaINNERJOINsys.partitionspaINNERJOINsys.schemasscONta.schema_id=sc.schema_idWHEREta.is_ms_shipped=0ANDpa.index_idIN(1,0)GROUPBYsc.name,ta.nameORDERBYSUM(pa.rows)DESC;
Database IO Stalls
You can use this query to see which queries are causing IO stalls.
/**************************************************************
The table valued dynamic management function,
sys.dm_io_virtual_file_stats provides a breakdown of SQL
Server reads, writes, and io_stalls for a particular
database or transaction log file. IO_stalls is the total
cumulative time, in milliseconds, that users waited for
I/O to be completed on the file since the last restart of SQL Server.
**************************************************************/SELECTDB_NAME(fs.database_id)AS[DBName],fs.file_id,mf.physical_name,io_stall_read_ms,num_of_reads,CAST(io_stall_read_ms/(1.0+num_of_reads)ASNUMERIC(10,1))AS'avg_read_stall_ms',io_stall_write_ms,num_of_writes,CAST(io_stall_write_ms/(1.0+num_of_writes)ASNUMERIC(10,1))AS'avg_write_stall_ms',io_stall_read_ms+io_stall_write_msASio_stalls,num_of_reads+num_of_writesAStotal_io,CAST((io_stall_read_ms+io_stall_write_ms)/(1.0+num_of_reads+num_of_writes)ASNUMERIC(10,1))AS'avg_io_stall_ms'FROMsys.dm_io_virtual_file_stats(NULL,NULL)ASfsINNERJOINsys.master_filesASmfONfs.database_id=mf.database_idANDfs.[file_id]=mf.[file_id]ORDERBYavg_io_stall_msDESC;GO
Identify Expensive Operations
/**************************************************************
This query provides you with operations that are expensive
from a database standpoint. This query is useful in
determining what is causing performance problems on a server
**************************************************************/SELECTTOP25DB_NAME(qp.[dbid])ASdbname,qp.[dbid],qp.objectid,qp.number--, qp.query_plan
--the query plan can be *very* useful; enable if desired
,qt.[text],SUBSTRING(qt.[text],(qs.statement_start_offset/2)+1,((CASEstatement_end_offsetWHEN-1THENDATALENGTH(qt.text)ELSEqs.statement_end_offsetEND-qs.statement_start_offset)/2)+1)ASstatement_text,qs.creation_time,qs.last_execution_time,qs.execution_count,qs.total_worker_time/qs.execution_countASavg_worker_time,qs.total_physical_reads/qs.execution_countASavg_physical_reads,qs.total_logical_reads/qs.execution_countASavg_logical_reads,qs.total_logical_writes/qs.execution_countASavg_logical_writes,qs.total_elapsed_time/qs.execution_countASavg_elapsed_time,qs.total_clr_time/qs.execution_countnbsp;ASavg_clr_time--, qs.total_worker_time
--, qs.last_worker_time
--, qs.min_worker_time
--, qs.max_worker_time
,qs.total_physical_reads,qs.last_physical_reads,qs.min_physical_reads,qs.max_physical_reads--, qs.total_logical_reads
--, qs.last_logical_reads
--, qs.min_logical_reads
--, qs.max_logical_reads
--, qs.total_logical_writes
--, qs.last_logical_writes
--, qs.min_logical_writes
--, qs.max_logical_writes
--, qs.total_elapsed_time
--, qs.last_elapsed_time
--, qs.min_elapsed_time
--, qs.max_elapsed_time
--, qs.total_clr_time
--, qs.last_clr_time
--, qs.min_clr_time
--, qs.max_clr_time
--, qs.[sql_handle]
--, qs.statement_start_offset
--, qs.statement_end_offset
--, qs.plan_generation_num
--, qp.encrypted
FROMsys.dm_exec_query_statsASqsCROSSAPPLYsys.dm_exec_query_plan(qs.plan_handle)ASqpCROSSAPPLYsys.dm_exec_sql_text(qs.[sql_handle])ASqt--sample WHERE
WHERElast_execution_time>'20120912 12:15'ANDcreation_time>'20130101'ANDexecution_count>10--AND SUBSTRING(qt.text, (qs.statement_start_offset/2) + 1,
--((CASE statement_end_offset
--WHEN -1 THEN DATALENGTH(qt.text)
--ELSE qs.statement_end_offset END
-- - qs.statement_start_offset)/2)
-- + 1)
-- LIKE '%MyText%'
--sample ORDER BY
--ORDER BY qs.execution_count DESC --Frequency
--ORDER BY qs.total_worker_time DESC --CPU
--ORDER BY avg_worker_time DESC --CPU
--ORDER BY qs.total_elapsed_time DESC --Durn
--ORDER BY qs.total_logical_reads DESC --Reads
--ORDER BY qs.total_logical_writes DESC --Writes
--ORDER BY qs.total_physical_reads DESC --PhysicalReads
--ORDER BY avg_worker_time DESC --AvgCPU
--ORDER BY avg_elapsed_time DESC --AvgDurn
--ORDER BY avg_logical_reads DESC --AvgReads
--ORDER BY avg_logical_writes DESC --AvgWrites
ORDERBYavg_physical_readsDESC--AvgPhysicalReads
General SQL Queries
Table search by column name
This query allows you to see what tables / procedures have a specified column name in them.
/**************************************************************
Example(s) of common column names:
DeviceId, LocationGroupId, ApplicationId, ProfileId,
CoreUserId
**************************************************************/SELECT*FROMsysobjectsWHEREidIN(SELECTidFROMsyscolumnsWHEREnameLIKE'%ColumnName%')
SP_WHO2 Advanced Query
This allows you to filter on SP_WHO2, which helps when backing up and restoring the AirWatch database.
/**************************************************************
This query may look complex but can really
narrow down if something is connected to
AirWatch or not. When you are upgrading
or restoring a database you need to ensure
that nothing is locking the databse. **************************************************************/CREATETABLE#sp_who2(SPIDINT,StatusVARCHAR(1000)NULL,LoginSYSNAMENULL,HostNameSYSNAMENULL,BlkBySYSNAMENULL,DBNameSYSNAMENULL,CommandVARCHAR(1000)NULL,CPUTimeINTNULL,DiskIOINTNULL,LastBatchVARCHAR(1000)NULL,ProgramNameVARCHAR(1000)NULL,SPID2INT)INSERTINTO#sp_who2EXECsp_who2SELECT*FROM#sp_who2WHEREDBNameLIKE'%AirWatch%'GODROPTABLE#sp_who2GO
Get all devices from Location Group
This query can return all devices under one locationgroup tree. This is an especially helpful query when used with other queries.
/**************************************************************
This script provides all devices residing under
the parent location group. You can combine this
query with other queries by using the WHERE column
IN (SELECT query) filter (this script uses the
same filter to filter the location groups)
**************************************************************/SELECT*FROMDeviced(nolock)INNERJOINLocationl(nolock)ONl.LocationId=d.LocationIdINNERJOINLocationGrouplg(nolock)lg.DefaultLocationId=l.LocationIdWHERElg.LocationGroupIDIN(/*****************************************************
The below sub query provides all children
Location Groups under one Parent. This can
also be useful with other queries.
***************************************************/SELECTlgf.ChildLocationGroupIDFROMLocationGrouplg(nolock)INNERJOINLocationGroupFlatlgf(nolock)ONlgf.ParentLocationGroupID=lg.LocationGroupIDWHERElg.NameLIKE'%Customers LG%')
Event Log Search
This query allows you to search the event log. This is imperitive since the event log often times out from the console.
/**************************************************************
This script provides you with a list of modules in the
event log. These can be used to filter the following
query.
**************************************************************/SELECTDISTINCTel.ModuleFROMeventLog.EventLogel(nolock)/**************************************************************
This query will select information from the event log
and allow you to filter on Modules. Modules provide you
with context of the event that occured. The Name is
the actual name of the event that occured. This will
only show you the last 30 days. You can decrease this
number to improve performance.
You can also filter on the LocationGroupID if you know
the location group name. Keep in mind that some modules
only report at Global.
The Username is the Admin user who performed the task.
sysadmin is the system user for running stored procedures
however some modules (like the device module) show
sysadmin even if a user performed the action.
**************************************************************/SELECTcu.UserName,el.Module,e.Name,el.*FROMeventLog.EventLogel(nolock)INNERJOINeventLog.Evente(nolock)ONe.EventId=el.EventIdINNERJOINCoreUsercu(nolock)ONcu.CoreUserId=el.ActionByWHEREel.CreatedOn>DATEADD(DAY,-30,GETUTCDATE())ANDel.ModuleLIKE'Dashboard'--AND LocationGroupID IN (SELECT LocationGroupID
--FROM LocationGroup WHERE Name LIKE '%AirWatch%')
Role compare script
This script shows you two roles side by side for comparison.
/**************************************************************
Update the values in @Role1 and @Role2
to compare two roles. If you need to find
why a custom role is missing use the next
script.
**************************************************************/DECLARE@Role1ASnvarchar(50);DECLARE@Role2ASnvarchar(50);SET@Role1='AirWatch Administrator';SET@Role2='System Administrator';SELECTre.ResourceID,c.NameAS'Module',re.Name,m1.AllowAS'Role1 Allowed',m2.AllowAS'Role2 Allowed'FROMResourcereINNERJOINCategoryc(nolock)ONc.CategoryID=re.CategoryIDINNERJOINModem1(nolock)ONre.ResourceID=m1.ResourceIDINNERJOINRoler1(nolock)ONr1.RoleId=m1.RoleIdINNERJOINModem2(nolock)ONre.ResourceID=m2.ResourceIDINNERJOINRoler2(nolock)ONr2.RoleID=m2.RoleIDWHEREr1.Name=@Role1ANDr2.Name=@Role2ORDERBYModule,ResourceID
Missing Custom Role script
This script shows you two roles side by side for comparison.
/**************************************************************
Update the values in the variables to check
if resources are missing from the role who is
supposed to have higher priviledges.
**************************************************************/DECLARE@HigherRoleASnvarchar(50);DECLARE@LowerRoleASnvarchar(50);SET@HigherRole='Role with higher privileges';SET@LowerRole='Role with less privileges';SELECTm.ModeID,r.Name,re.Name,m.AllowFROMModem(nolock)INNERJOINRoler(nolock)ONr.RoleId=m.RoleIdINNERJOINResourcereONre.ResourceID=m.ResourceIDWHEREr.NameLIKE@LowerRoleANDm.Allow=1ANDm.ResourceIDIN(SELECTResourceIDFROMModemINNERJOINRolerONr.RoleId=m.RoleIdWHEREr.NameLIKE@HigherRoleANDm.Allow=0)
### Status of Events stuck in ‘Processing’ or ‘Failed’ to ‘Ready for Processing’
UPDATEadp.AdpExportTrackingSET[Status]=2-- 2 = Completed Event
WHERE[Status]=1;-- 2 = Pending Event
-- This script updates the status of Error Exports in adp.ADPExportTracking table
SETNOCOUNTON;BEGINTRYIFOBJECT_ID(N'adp.ADPExportTracking')ISNOTNULLBEGINUPDATEadp.ADPExportTrackingSET[Status]=2WHERE[Status]=-1-- -1 = Failed Status
ENDENDTRYBEGINCATCHDECLARE@error_severityINT,@error_stateINT,@error_messageNVARCHAR(2048);SELECT@error_severity=ERROR_SEVERITY(),@error_state=ERROR_STATE(),@error_message=ERROR_MESSAGE();RAISERROR(@error_message,@error_severity,@error_state);ENDCATCHGO
Each application uploaded to AirWatch would have its own row in the deviceApplication.Application table. Each column contains specific attributes for that object. For example, an application in the deviceApplication.Application table would have a column for Name, PackageID, LocationGroup, etc.
Device Management Tables
dbo.DeviceOperatingSystem: OS versions supported by AirWatch Console in current version
dbo.DeviceModelInfo: Device models (for Apple) or Android vendors supported by AirWatch Console in current version
User Management Tables
dbo.CoreUser: Admins – UserName, TimeZone, LastLogin, etc.
mobileManagement.EnrollmentUser: End users – UserName, LocationGroupID, DisplayName, UserPrincipleName, etc.
mobileManagement.CurrentDeviceEnrollmentUser: Ties enrolled devices to enrollment users
deviceApplication.RecommendedExternalApplication: All things public application
deviceApplication.VPPLicensePool: SmartGroup, Allocated licenses, Redeemed licenses, etc.
deviceApplication.ApplicationGroup: For blacklists/whitelists/required lists of apps
smartGroup.SmartGroup: info about the Smart Group
smartGroup.AWEntitySmartGroupAssignmentMap: Maps a Smart Group to the App/Book that uses it for assignment
MEM Tables
mobileEmailGateway.MEMConfig
Contains attributes related to the Email Configuration, including pre-7.1 sets of System Codes
mobileEmailGateway.MEMDevice
Contains all the attributes for each device, whether managed or unmanaged
mobileEmailGateway.MEMDeviceActivity
Contains the status and activity info for each device
mobileEmailGateway.MEMConfigProfile
Contains associations between MEMConfig and EAS device profiles
mobileEmailGateway.MEMDeviceConfig
Contains associations between MEMConfig and MEMDevice. When an enrolled device receives an EAS profile, MEMDevice will receive corresponding MEMConfig
mobileEmailGateway.MEMDeviceDiagnostic
Contains diagnostics data for devices
mobileEmailGateway.{all the rest}
Email Policy configurations, such as attachment encryption or OS policies
MCM Tables
enterpriseContent.Content
All settings pertaining to uploaded content – offlineViewing, allowEmail, Name, etc.
enterpriseContent.ContentRepository
Details for repositories – Name, Link, AuthenticationUsername, User/Admin Repository
enterpriseContent.ContentMap
Links DeviceID, EnrollmentUserID, and ContentVersionID
Recommendations for monitoring on the WS1 UEM database
Monitor
Descritpion
Data Files
Monitor and alert for resizing when free space in data files drops below 10%.
Transaction Logs
Monitor and resize if free space in log drops below 10%.
Waiting Tasks
Waiting tasks in the SQL activity monitor must be under 10 on average. Ideally waiting tasks should be between 0 and 2 when compared to 20,000 batch requests per second.
Index Rebuild
Monitor for fragmentation between 10% and 29%. Reorganize with an update of statistics. Indexes with fragmentation greater than 29% should be rebuilt.
SQL Server CPU
Monitor sustained high CPU utilization (Over 90% for a 15 minute duration).
SQL Server Job History
Monitor failed SQL Server Agent Jobs (in particular, AirWatch Jobs).
SQL Server Page Life Expectancy
Monitor SQL Server Page Life Expectancy (dropping below 3000).
SQL Server Disk Space
Monitor disk space usage on all Data and Log Drives for ‘AirWatch’ and ‘tempdb’ Databases.
SQL Server Disk Queuing
Monitor Disk Queuing on all Data and Log Drives for ‘AirWatch’ and ‘tempdb’ Databases. Check Disk Queue Length via Task Manager > Performance > Resource Monitor > Dist Tab > Storage. It should average between 2 and 4. It could increase or decrease, but on average it should be between those values.
Page Life Expectancy
Page Life Expectancy is an indication of whether the database server has memory pressure. The expected number is over 1,000 (seconds). If it is low, this is a first indicator of memory pressure. This may not be an issue if:
- The PLE is increasing over time. If it is increasing, but is still less than 1,000, then that is a sign of a memory pressure.
- After an index maintenance job, the PLE can be low. This needs to be monitored for a few hours to see if it goes up.
Index Fragmentation Level
A high fragmentation level means data retrieval becomes less efficient and reduces database performance. Run the defragmentation job on a nightly basis. The script below shows the fragmentation level (in percent) against all the tables. The recommended fragmentation level is less than 30% when the page size is more than 1,000.
If the database is highly fragmented, it is recommended that you perform an index reorganize or rebuild.
Health Checks
Synthetic transactions are the strongest indicator of a healthy AirWatch environment. They can mimic end user actions (for example, enrollment) and report if there are issues. Many different use cases could be considered, and high-use scenarios should be tested with synthetic transactions. An example synthetic transaction could be:
Navigate to the AirWatch Console.
Log in using credentials.
Navigate to Hub > Reports & Analytics > Reports > List View.
Run a report.
Log out.
Typically, a tool like Keynote or AlertSite would be used to generate and monitor synthetic transactions.
Disable insecure TLS/SSL protocol support
- Yes, you can disable this and this will not have any impact on AirWatch Applications because we have made the necessary changes in our components as well.
POODLE attack, SSLv3 etc have been taken care by our developers in console version 8.1 and above.
Remove the default page or stop/disable the IIS server
- Yes, you can remove the default page, but do not disable the IIS server. Recommended not to disable the IIS server.
This will not have any impact on the AirWatch application and you can have this disabled. Best solution for this will be to enable TLS1.2 https://support.microsoft.com/en-us/kb/187498
Regarding Ciphers suites
Be it any kind of Ciphers(Static key cipher, 3DES cipher, Strong cipher) the best solution for this is to enable TLS. Also, the MicrosoftKB article 245030 as mentioned in the ticket is the best solution for all the Cipher questions. https://support.microsoft.com/en-us/kb/245030
The RC4 cipher can be completely disabled on Windows platforms by setting the “Enabled” (REG_DWORD) entry to value 00000000 in the following registry locations:
We can either do it at a JRE system wide level or at a JVM instance (such as AWCM) level adding RC4 as a disabled algorithm when a choice has to be made as part of SSL handshake.
In the latter case, It will be a config change on AWCM Service parameters (only change being the added restriction option in $AWCM_HOME/service/AWCMService.exe.parameters).
Tip
IIS Crypto Tool can be used to turn off weak ciphers in Windows Server 2008+
Warning
Usage of iiscrypto tool to disable Cipher Suites, as well as registry keys can break communication between AirWatch components.
Use with extreme caution, ONLY AFTER AirWatch was deployed and tested to be working. Disable Cipher Suites one by one and re-test AirWatch functionality after each change!
Security scanner sees IIS vulnerabilities:
SWEET32
POODLE
TLS_FALLBACK_SCSV
Hardening:
POODLE - need to disable SSL 3.0 protocol. Open registry: HKEY_LOCAL_MACHINE\SYSTEM\CurrentControlSet\Control\SecurityProviders\Schannel\Protocols and create keys SSL 3.0\Server (if not created previously), create a DWORD value Enabled = 0;
SWEET32 - need to disable weak ciphers. Open registry: HKEY_LOCAL_MACHINE\SYSTEM\CurrentControlSet\Control\SecurityProviders\SCHANNEL\Ciphers\Triple DES 168, create a DWORD value Enabled = 0. Create keys “RC4 56/128”, “RC4 40/128”, “RC4 128/128” create a DWORD value in all keys called Enabled = 0;
Warning
When turning off Triple DES the RDP protocol to server may stop working. Need to patch RDP to use modern ciphers to solve this problem.
TLS_FALLBACK_SCSV (only for Windows 2003-2008! see KB from Microsoft: https://support.microsoft.com/kb/980436/en-us) - Open registry: HKEY_LOCAL_MACHINE\System\CurrentControlSet\Control\SecurityProviders\SCHANNEL and create DWORD called UseScsvForTls with parameters:
UseScsvForTls = 0 # Client sends Renegotiation Info extension for TLS protocol
UseScsvForTls = 1 # Client sends SCSV for TLS protocol - use this to solve problem
Warning
AirWatch Self-Service portal uses TLS1.0/RC4-type cryptography, and gives Error and blank page after IIS hardening!
iOS 11 & Wi-Fi TLS 1.2 Requirements
With the release of iOS 11, TLS 1.2 will now be the default for EAP-TLS negotiation. This may cause an issue with older clients that still need to connect on TLS 1.0 or 1.1. Apple has allowed for a method to override this default setting with a configuration profile sent down to the device via MDM. In order to ensure your iOS devices maintain Wi-Fi connection when upgrading to iOS 11, please follow the steps below:
Note: If you already have a successfully deployed iOS Wi-Fi with EAP-TLS configured, skip to step 3.
Create a new profile with a Wi-Fi payload using EAP-TLS and General payload configured.
Ensure that the profile successfully configures Wi-Fi on an iOS device.
From your profile list view, select the Wi-Fi with EAP-TLS created profile and choose to view XML.
Export or copy the XML of the profile.
Edit the XML to remove everything prior to the first and after its corresponding .
Edit the XML again to add the following bolded key/values (accepted values are 1.0, 1.1, and 1.2). These should be a part of the EAPClientConfiguration key
Edit the XML a final time to create a unique identifier for the payload. Locate the PayloadUUID key and edit the values that correspond to the ‘X’s to random values. Please ensure these values are as random as possible to avoid issues with duplicate identifiers (e.g. 123456, 111111, 101010).
Create another new profile and configure the General payload
Paste your edited XML into the Custom Settings payload and publish to devices
IISCrypto config from AirWatch
iOS supports all latest ciphers and encryptions – however there are questions with Android, so Android 4.4 will be the baseline.
Protocols: SSL 2.0, SSL 3.0, TLS 1.0, TLS 1.1 can be turned off as all of the platforms supports newer protocols.
Warning
Test results at client site (AirWatch ver. 9.2.3): disabling TLS 1.0 showed 4 services failing at AirWatch Device Services Server role - proceed with caution!
❗️All Windows systems, which will be used to deploy AirWatch / Workspace One UEM, in localization settings, there should be language = US-EN.
❗️Special attention to Regional Settings on floating point identifier: it must be a dot, not a comma!
❗️All Windows systems, which will be used to deploy AirWatch / Workspace One UEM, should have all current patches applied. For example, early versions of Win2012R2 have broken ASP.NET and break AirWatch installation.
Legend
BE - (BackEnd server) WS1 UEM Admin Console
FE - (FrontEnd server) WS1 UEM Device Services
SQL - Microsoft SQL Database Server
UEM - AirWatch / Workspace One UEM
Database Deployment
❗️See first SQL Recommendations page before production or semi-production deployment.
Install SQL
Login to the SQL server, launch SQL Management Studio;
Create a new database. In database settings apply General → Autogrowth / Maximize → File Growth → In Megabytes = 128;
SQL 2008 and MS SQL 2008R2 are not supported anymore. For MS SQL 2016 choose Options → Compatibility Level = 2014
❗️Issues currently detected with installing Workspace ONE UEM up to version 1909 in Microsoft SQL 2017. Services do not start after install, console does not launch.
As recommended by Microsoft for SQL 2017, services should use the element to improve startup performance. Using this element can also help avoid delays that can cause a time-out and the cancellation of the service startup. See Microsoft KB article.
Create a user in Mixed-mode SQL (non-domain), with sysadmin permissions for server and db_owner for database. Gice the user permissions for msdb: SQLAgentUserRole, SQLAgentReaderRole, db_datareader roles. Do not forget to cancel password expiration for this user;
If there is not Internet on DB server - download Microsoft .NET Framework 4.6.2 from Microsoft website for English Windows on separate computer and copy to this server (during setup WorkspaceONE_UEM_DB_XX.YY.Z.K_Setup tries to download the framework itself, with no Internet it may hang the installation process for some time);
Copy WorkspaceONE_UEM_DB_XX.YY.Z.K_Setup files to the server, launch it. Copy to **C:\Distr**;
❗️Do NOT launch installer from C:\Users\Documents and Settings\Downloads etc folders - long path may cause unpacking error.
Enter “localhost” in install wizard, login and password of the SQL user, and choose the UEM database;
❓️ If the database is created on AlwaysOn Cluster - turn on Using SQL AlwaysON Availability Groups option;
Wait for installer to end (10-15min). Install progress can be seen as log file growth in c:\AirWatch\AirWatch 1811\Database\AWDatabaseLog.txt* (the log will grow up to 2.3Mb when the installation will finish);
Check the installation, use SQL Management Studio to launch a script:
select * from dbo.DatabaseVersion;
The answer should be the UEM version number.
❓️ For AlwaysOn cluster - do not forget to clone the database Jobs on the other cluster nodes!
Device Services Front-End (FE) Server
Enter Windows Server Manager and check the following roles/features (double-check official doc for feature list):
Web Server (IIS)
Web Server (IIS) → Web Server → Common → Static Content, Default Document, Directory Browsing, HTTP Errors, HTTP Redirection
Web Server (IIS) → Web Server → Performance → Dynamic Content Compression
Web Server (IIS) → Web Server → ASP
Web Server (IIS) → Web Server → ASP.NET 4.5
Web Server (IIS) → Web Server → Security → IP & Domain Restrictions
Web Server (IIS) → Web Server → Health & Diagnostics → Request Monitor
Web Server (IIS) → Web Server → Application Development → Server Side Includes
.NET Framework 4.5 → WCF → HTTP Activation
Message Queuing
Telnet Client
❗️ DON NOT turn on Web Server (IIS) → Web Server → Common → WebDav Publishing - this will lead to multiple bugs in managing iOS devices
❓️ If there is not Internet on FE server - download and install URL Rewrite Module 2.0 (https://go.microsoft.com/?linkid=9722532) for IIS. Old version of Rewrite Module 2.0 provided on this page as attachment in case of need;
Upload an external certificate in PFX format with private key. Password used to protect the certificate MUST be 6+ characters long. Short password will lead to problems with AWCM Java keystore! Install the certificate into Local Machine account, leaving Automatic Detect option for certificate type. Also install any root and intermediate certificates of the certificate trust chain. Subject Alternative Name of the certificate MUST contain the external DNS name of the server!
Check correct start config of IIS - use browser to go to http://127.0.0.1/ (start page of IIS must be present)
Go to IIS admin console, bind the certificate: in sites tree choose Default Web Site → Bindings menu → Add.., choose https, in SSL Certificates list choose the certificate from previous step. Enter the external DNS name of the server, which is written in the certificate.
❗️Port binding is needed ONLY for Device Service and Console Service.
Launch installer WorkspaceONE_UEM_Application_X.X.X.X_Full_Install. Choose Continue setup without importing/exporting config file;
In modules selection choose only Device Services, select This feature will not be available for Admin Console, continue installation;
❗️For AirWatch 9.2.2+: during installation, AirWatch installer deploys SQL Native Client, which may not have enough time to initialize during the work of the wizard. During SQL check, an error may be generated, that SQL is not found. Press Cancel and reboot the server, then re-launch the setup process.
Enter SQL data: in full database name, only enter the server name, do not enter SQL Instance name;
Specify the DNS name for reaching the server by HTTPS from outside and inside. Do not choose SSL Offload - it is much easier to make all connections as HTTPS and then edit configuration;
⭐️ Instead of choosing different DNS names and then have issues with AWCM, I recommend to enter the same external name for Device Services and Web Console (check Same as above? option). After this, make an alias on the local DNS server, or use the hosts file on Admin Console/BE server to alias the external name of Directory Services/FE to an internal IP address.
Choose Default Web Site as install target;
Leave AWCM listening IP as 0.0.0.0 since it is installed locally, and port 2001 for connection. Install the PFX certificate and enter its’ password;
❗️The PFX certificate MUST be created with Export All Properties option! Or the Java keytool will not be able to import it into awcm.keystore, and it will not give errors in the log! But AWCM will not work!
Choose Implicit Clustering (do not cluster AWCM);
Wait for install completion. AirWatch Certificate Installation Wizard will open, click Next and choose SQL Authentication. If Internet is accessible, a code must be entered. For offline installation, click Get File and save the *.plist fiel on disk;
Go to my.workspaceone.com: My Workspace One menu → My Company → Certificate Signing Portal → Authorize Install → Generate a token (for Internet access);
OR
My Workspace One menu → My Company → Certificate Signing Portal → Authorize Install → Upload Your File (for offline), and upload *.plist file.
Save the certs.plist answer file and upload it in the installation wizard, thus ending the installation.
❗️AirWatch (WOne UEM 1909) services may not start due to timeout error on Windows 2008-2012.
Increase Timeout time in Windows registry: HKEY_LOCAL_MACHINE\SYSTEM\CurrentControlSet\Control → ServicesPipeTimeout=180000
External link: https://kb.vmware.com/s/article/50105044?lang=en_US
Admin Console Back-End (BE) Server
Enter Windows Server Manager and check the following roles/features (double-check official doc for feature list):
Web Server (IIS)
Web Server (IIS) → Web Server → Common → Static Content, Default Document, Directory Browsing, HTTP Errors, HTTP Redirection
Web Server (IIS) → Web Server → Performance → Dynamic Content Compression
Web Server (IIS) → Web Server → ASP
Web Server (IIS) → Web Server → ASP.NET 4.5
Web Server (IIS) → Web Server → Security → IP & Domain Restrictions
Web Server (IIS) → Web Server → Health & Diagnostics → Request Monitor
Web Server (IIS) → Web Server → Application Development → Server Side Includes
.NET Framework 4.5 → WCF → HTTP Activation
Message Queuing
Telnet Client
❗️ DON NOT turn on Web Server (IIS) → Web Server → Common → WebDav Publishing - this will lead to multiple bugs in managing iOS devices
❓️ If there is not Internet on FE server - download and install URL Rewrite Module 2.0 (https://go.microsoft.com/?linkid=9722532) for IIS. Old version of Rewrite Module 2.0 provided on this page as attachment in case of need;
Check correct start config of IIS - use browser to go to http://127.0.0.1/ (start page of IIS must be present)
Configure the certificate on IIS - for Admin Console on BE a self-signed certificate may be used:
Enter IIS Admin Console, choose Server Certificates, and in the right column menu choose Create Self-Signed Certificate;
Enter a name for the certificate, type = Web Hosting, click ОК;
Go to IIS admin console, bind the certificate: in sites tree choose Default Web Site → Bindings menu → Add.., choose https, in SSL Certificates list choose the certificate from previous step.
❗️Port binding is needed ONLY for Device Service and Console Service.
Launch installer WorkspaceONE_UEM_Application_18.11.0.3_Full_Install. Choose Continue setup without importing/exporting config file;
In modules selection choose only the Admin Console, choose This feature will not be available for Device Services, continue the installation;
❗️For AirWatch 9.2.2+: during installation, AirWatch installer deploys SQL Native Client, which may not have enough time to initialize during the work of the wizard. During SQL check, an error may be generated, that SQL is not found. Press Cancel and reboot the server, then re-launch the setup process.
Enter SQL data: in full database name, only enter the server name, do not enter SQL Instance name;
Specify the FQDN name for HTTPS access on Admin Console from the inside. Do NOT use a short name of DNS alias. Choose an External DNS name for access via HTTPS on Device Services server. Check the absence of space characters before or after the names. An error in this form may be corrected only by re-installing UEM!
Choose Default Web Site as the install target;
In Company Profile choose the company name and installation type = Production;
❗️AirWatch (WS1 UEM 1909+) services may not start due to timeout error on Windows 2012R2+.
Increase Timeout time in Windows registry: HKEY_LOCAL_MACHINE\SYSTEM\CurrentControlSet\Control → New 32-Bit DWORD: ServicesPipeTimeout, Decimal=200000 (Decimal=60000 too small, put more!)
Switch to Groups & Settings → Groups → Organization Groups → Organization Groups Detail
Set the company name, set GroupID, country and time zone
iOS Agent
Switch to Groups & Settings → All Settings → Devices & Users → Apple → Apple iOS → Intelligent Hub Settings, click Override
Set Background App Refresh - for the AirWatch Agent works in the background and does not interfere with other apps
Turn on Collect Location Data - collection of data from GPS (Location Services)
Do not touch SDK profiles, leave settings as is currently
AWCM
Launch the Admin Console on the exact server, where AWCM is installed (FE) and go to Groups & Settings > All Settings > Device & Users > Android > Intelligent Hub Settings
Switch Use AWCM Instead of C2DM as Push Notification Service - if you have Android devices with no Google Apps/Services, no Google Account, or want to restrict PUSH notifications to MDM-direct
Switch AWCM Client Deployment Type to Always Running, click Save
Go to Groups & Settings > All Settings > System > Advanced > Secure Channel Certificate
Check/configure the Windows environment variable JAVA_HOME - it must point to the last version installed c:\Program Files\jre-<номер версии>
Click Download AWCM Secure Channel Certificate Installer and launch the cert installer
Check the cert install: open cmd as Administrator and enter command such as:
Enter password as the password for the keystore, and check there are 2 certificates entered, including the secure channel certificate
Switch to tenant = Global, go to Groups & Settings > All Settings > System > Advanced > Site URLs, click Enable AWCM Server button at the end of the page
Check AWCM settings: internal and external DNS names (they MUST be exactly those used in the corp certificate!) and port number (TCP2001).
Port TCP 2001 MUST be open FROM the outside to server with AWCM (Device Services - FE) in order for direct PUSH to work with Android, and Windows Phone/Desktop devices.
If the external DNS name is published on an external proxy or load balancer, and the inner servers do not know this, use hosts file on Admin Console (BE) server and AirWatch Cloud Connector (ACC) / Enterprise Systems Connector (ESC) to make an alias of external DNS name and internal IP of Device Services (FE) server.
APNs certificate for Apple and SSL for Apple profiles
Launch Admin Console using Firefox, Safari or Chrome (IE not supported!). Go to Groups & Settings → All Settings → Devices & Users → Apple → APNs for MDM
On Apple website click Create certificate, accept the terms, upload the plist file, download the corresponding PEM file on local disk
Return to the Admin Console - click Next, upload the PEM file and enter the corresponding AppleID click Save. Enter the PIN code of the console administrator
Go to Groups & Settings → All Settings → Devices & Users → Apple → Profiles
Click Upload and choose the PFX file of the corp certificate enter the password of the PFX container
Google Play Registration and Android for Enterprise/Legacy Enrollment
Launch Admin Console using Firefox, Safari or Chrome (IE not supported!). Switch to Groups & Settings → All Settings → Devices & Users → Android → Android EMM Registration
Click Register with Google
Proceed with steps on Google website, entering the GMail Account (each GMail Account may only be used ONCE for 1 ЕММ system (any))
For old AirWatch Console 9.0.1 and earlier, if upgraded to latest version of UEM, the Enable Play Store button should be clicked.
Open Enrollment Restrictions tab: choose Define the enrollment method for this organization group. Default is Always use Android, which means to always use Android for Enterprise of type = Device Work Profile (duplication of software into BYOD/Corp containers). If devices with potential AfE support in current group are to be enrolled and managed using Android Legacy ELM/POEM drivers, then choose Always use Android (Legacy) in list, or choose hybrid mode by defining user groups for AfE: Define Assignment Groups that use Android.
After choosing the EMM registration method, DO NOT CHANGE IT with many devices enrolled. Consequences:
Profiles can still be installed on the device as they’re being installed directly from Workspace ONE;
Communication is maintained between the device and Workspace ONE UEM;
You will be unable to leverage any Play store services;
No new apps added to Workspace ONE will be visible on the device managed play store;
Previously added applications in Workspace ONE will no longer be deployable from the console.
AirWatch Cloud Connector (ACC) / Enterprise Systems Connector
Launch the Admin Console on the exact server, where ACC is to be installed and switch to a non-Global Tenant
You cannot download the ACC distrib on one server, then copy and launch on another!
Go to Groups & Settings > All Settings > System > Enterprise Integration > Cloud Connector, turn on Override, switch Enable AirWatch Cloud Connector and Enable Auto Update
It is strongly recommended to configure ACC on non-Global level
Switch to Advanced tab, click Generate Certificate button to create the connection certificate to AWCM
Choose Use Internal AWCM URL - if the connector is in LAN, and AWCM - in DMZ
Use buttons to switch ON services/components, which will talk to the connector (the usual minimum is LDAP, CA, SCEP, Syslog, )
Switch back to General tab, choose Download Enterprise Systems Connector Installer link, enter password
Install .NET Framework 4.6.2 on server
Launch the downloaded installer
Enter the password for certificate
Check the installation
Go to Groups & Settings > All Settings > System > Enterprise Integration > Cloud Connector
Click Test Connection and check that the connector is available
“Error : Reached AWCM but VMware Enterprise Systems Connector is not active” is resolved by server reboot and opening TCP2001 port from Cloud Connector to AWCM.
Active Directory
Use Company tenant, go to Groups & Settings > All Settings > System > Enterprise Integration > Directory Services
Bind Authentication Type - connection type = GSS-Negotiate is recommended, which means choose automatically Kerberos or NTLM depending on what is available
Bind Username - enter the service account user for reading the domain as <user>
Bind Password - enter the domain service account password
In Domain - Server fields enter the suffix of the domain and the name of the domain controller
Click Test Connection, check there is network access to the domain controller
Choose the User tab, DN field - choose the topmost level from the list
Choose the Group tab, DN field - choose the topmost level from the list
Click Save
Troubleshooting connection to Active Directory - see article.
Self-enrollment of Active Directory Users
In Company tenant go to **Groups & Settings > All Settings > Device & Users > General > Enrollment
**
In Authentication Mode(s) choose Directory checkbox
Go to Restrictions, make sure that Restrict Enrollment To Known Users and Restrict Enrollment To Configured Groups are disabled.
Batch Import and Message Templates
To Batch Import users in an AirWatch group, this group needs a Group ID, which allows Enrollment into it.
During user import, a connection token can be distributed via EMail. The template language depends on the localization configuration of the specific Organization Group.
When defining localization on the topmost level, the sub-groups of the lower level may have a strange setting like “Select*”. It is recommended to specify the localization settings on each group and sub-group, so there is no obscurity in the settings.
Configure SDK default profiles
Switch to Groups & Settings → All Settings → Apps → Settings & policies → Security Policies, click Override
Leave Passcode turned on
Activate Single Sign-On
Activate Integrated Authentication to auto-enter apps and websites, put Enrollment Credentials and write star symbol ( * ) in mask = all websites
Problem: App Catalog does not automatically appear after device enrollment.
Solution:
In AirWatch Admin Console go to Groups & Settings > All Settings > Apps > Catalog > General > Publishing > repeat SAVE procedure
Alternative: create separate webclip profile for all devices with URL: https://{DS_URL}/Catalog/ViewCatalog/{SecureDeviceUdid}/{DevicePlatform}
External link: https://kb.vmware.com/s/article/50100220?lang=en_US
Check the connection with Device Services server with a defined in the install phase external URL, signed with external certificate (type of link: https://<DS_URL>/DeviceManagement/Enrollment )
Check the AWCM component, using link https://<DS_URL>:2001/awcm/status*
Check AirWatch services - launch services.msc in Windows Server and check that AirWatch services are Started
Check the GEM Inventory Service: go to the AirWatch Console server, in the folder C:\AirWatch\Logs\Services\ and delete the file AirWatchGemAgent.log; open services.msc and restart GEM Inventory Service. New log will either NOT show up, or show up without errors.